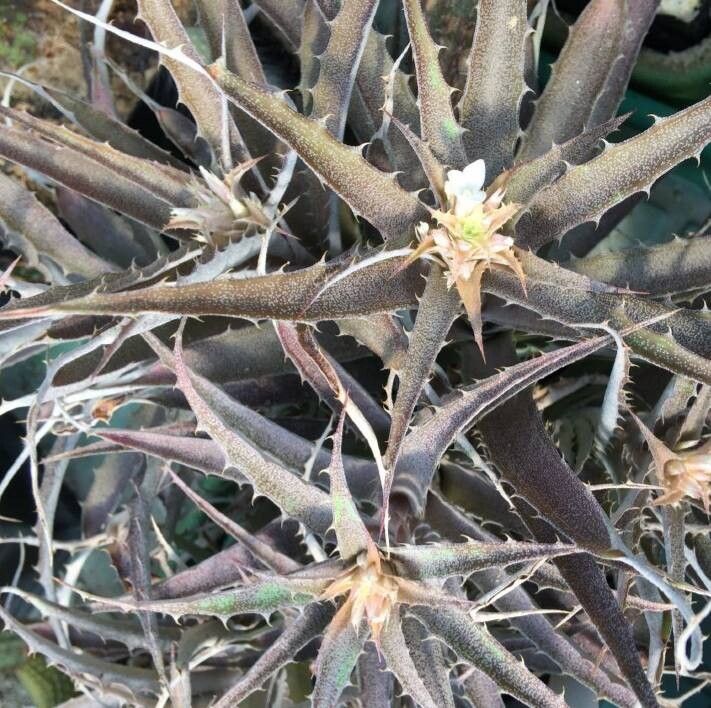
Hello fellow plant lovers! It’s so wonderful to connect with you today. If you’re like me, you probably find yourself drawn to plants that boast unique textures and a touch of the exotic. That’s precisely why I’ve fallen head over heels for Orthophytum saxicola. This fascinating bromeliad, with its architectural rosettes and intriguing foliage, brings a sculptural element to any collection. And the best part? Sharing its beauty by propagating it is incredibly rewarding. Now, as for being beginner-friendly… let’s just say it requires a little patience and observation, but it’s certainly achievable for anyone willing to give it a try!
The Best Time to Start
When I’m looking to multiply my Orthophytum saxicola, I always aim for the spring or early summer. This is when the plant is actively growing after its winter rest. Healthy, vigorous growth means your cuttings or divisions will have the best energy reserves to root successfully. You’re essentially catching them in their prime!
Supplies You’ll Need
Here’s what I keep handy when I’m ready to propagate:
- Sharp, clean pruning shears or a knife: Sterilized is key to preventing disease. A quick wipe with rubbing alcohol does the trick.
- Well-draining potting mix: I use a blend specifically for bromeliads, often a mix of orchid bark, coco coir, perlite, and a bit of compost. You want air to get to those roots!
- Small pots or propagation trays: Nothing too large. Small containers help the soil dry out appropriately.
- Rooting hormone (optional but recommended): A little boost can speed up the process and improve success rates. I usually opt for a powder.
- Spray bottle: For a gentle misting of water.
- Labels and a marker: To keep track of what’s what and when you started them.
Propagation Methods
Orthophytum saxicola is primarily propagated through division. These plants tend to produce pups, or baby plants, around the base of the mother plant.
- Assess Your Plant: Gently remove your Orthophytum saxicola from its pot. You’ll see new growth emerging from the base, typically connected by a rhizome to the parent plant. Look for pups that are at least one-third the size of the mother plant. Smaller pups can be more challenging to root.
- Separate the Pups: Using your sterilized pruning shears or knife, carefully cut the pup away from the mother plant. Try to get a clean cut, and if possible, include a small section of the rhizome with the pup. This makes it easier for the pup to establish its own roots.
- Prepare the Pup: If the pup has any damaged or very old leaves, you can gently remove them. This reduces the risk of rot.
- Apply Rooting Hormone (Optional): If you’re using rooting hormone, lightly dip the cut end of the pup into the powder, tapping off any excess.
- Potting Up: Fill your small pots with your well-draining potting mix. Make a small divot in the center and place the base of the pup into it. Gently firm the soil around it.
- Initial Watering: Water lightly after potting. You don’t want to waterlog the soil, just enough to settle the potting mix around the roots.
The “Secret Sauce” (Pro Tips)
Here are a couple of things I’ve learned over the years that really make a difference:
- The Acclimation Trick: After dividing, I don’t immediately place my new pups in direct sun. I give them a week or so in bright, indirect light to recover from the shock of separation before moving them to their preferred spot. This gentle transition is crucial.
- Bottom Heat is Your Friend: If you have a heat mat used for seed starting, place your pots on it during the propagation phase. Orthophytum saxicola loves a bit of warmth to encourage root development. Just make sure the soil isn’t drying out too quickly from the increased temperature.
Aftercare & Troubleshooting
Once you’ve potted up your pups, keep the soil lightly moist but not soggy. What I often do is check the soil by poking my finger about an inch down. If it feels dry, I water. Misting the leaves occasionally is also beneficial, especially in dry environments, but avoid letting water sit in the rosette for extended periods.
Signs of trouble usually involve rot. If you notice mushy, brown leaves or a foul smell from the soil, it’s likely rot. This often happens from overwatering or poor drainage. If you catch it early, you can try carefully cutting away the rotted parts with your sterilized tool and repotting in fresh, dry soil. Sometimes, unfortunately, a rotted pup is a goner, but don’t get discouraged!
A Little Patience Goes a Long Way
Propagating Orthophytum saxicola is a journey, not a race. Your new pups might take several weeks to show signs of active root growth or new leaves. Be patient, observe your plants closely, and celebrate each tiny bit of progress. I promise, the satisfaction of nurturing these beauties from a single cutting is truly immense. Happy growing!
Resource:
https://identify.plantnet.org/k-world-flora/species/Orthophytum%20saxicola%20(Ule)%20L.B.Sm./data