Hello there, fellow plant enthusiasts! Today, we’re diving into something a little outside the box, a plant that brings a real spark of intrigue to any garden: Orobanche arenaria, commonly known as Sand Broomrape.
Why Grow Sand Broomrape?
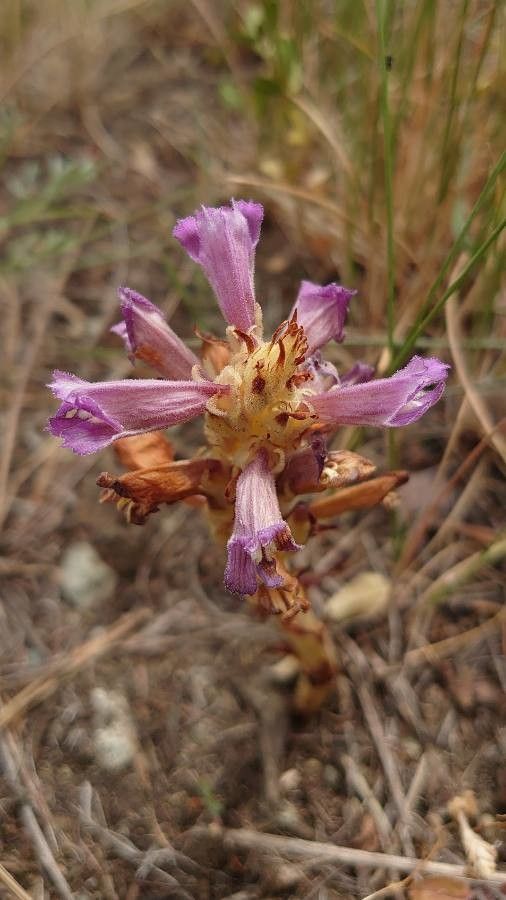
Now, Orobanche arenaria isn’t your typical flowering shrub. It’s a holoparasitic plant, meaning it doesn’t have chlorophyll and gets all its nutrients by attaching itself to the roots of specific host plants. It has these beautiful, upright spikes of delicate, tubular flowers that can range from pale lilac to a dusky purple. It brings a wild, untamed beauty, like a little piece of the steppe brought into our gardens. And propagating it? Well, it’s a bit of a special challenge, and for that reason, I’d say it’s not one for complete beginners. But if you’ve got a bit of gardening under your belt and love a project, you’ll find it deeply rewarding.
When to Get Your Hands Dirty
The absolute best time to attempt propagating Orobanche arenaria is late spring to early summer. This is when the parent plant is actively growing and putting out new shoots. It’s also when its host plants are typically robust and ready to support new growth. Trying to propagate outside of this window can be significantly more challenging, with much lower success rates.
What You’ll Need for Success
Having the right tools makes all the difference. Here’s a little kit I always have on hand for these kinds of projects:
- Sterile Pruning Shears or a Sharp Knife: Cleanliness is paramount to prevent disease.
- Small Pots or Seedling Trays: Nothing too big; we want to avoid moisturelogged soil.
- A Well-Draining Potting Mix: A mix of perlite, coarse sand, and a bit of coco coir works wonderfully. Avoid heavy, moisture-retentive soils.
- Rooting Hormone (Optional but Recommended): A powder or gel can give your cuttings a little boost. Look for one with auxin.
- A Spray Bottle: For gentle misting.
- A Clear Plastic Bag or Propagator Lid: To create a humid environment.
- A Small Dibber or Pencil: For making holes in the soil.
- Your Chosen Host Plant! This is non-negotiable. Orobanche arenaria needs its partner.
Let’s Get Propagating: Methods
Since we’re dealing with a parasitic plant, we’re not looking at traditional stem cuttings in the same way you might with a geranium. The most effective way to propagate Orobanche arenaria is by seed, but getting those seeds to germinate is tricky. A more direct approach, though still specialist, involves using parts of the plant itself, often in conjunction with its host. For our purposes, and to give us the best fighting chance, we’re going to focus on division of established plants and collecting tiny adventitious shoots.
Method: Division of Established Plants
Occasionally, you’ll find an established Orobanche arenaria pushing up alongside its host, and it might have developed its own separate root system. This is your golden ticket.
- Gently Unearth: With extreme care, using a trowel or even just your hands, gently unearth the area around the Orobanche and its host. The goal is to expose the connection without tearing delicate roots.
- Identify Separate Growth: Look for a distinct clump of Orobanche shoots that seems to be emerging from a separate point on the host’s root system.
- Sever the Connection: Using your sterilized pruning shears or knife, make a clean cut to separate the Orobanche clump from the host. Try to leave a small section of the host’s root attached if possible, although this isn’t always feasible and the Orobanche can often re-establish.
- Prepare the New Pot: Fill a small pot with your well-draining mix.
- Plant the Division: Create a small hole with your dibber or pencil. Carefully place the divided Orobanche clump into the hole, ensuring the base is at soil level.
- Water Gently: Water very lightly. You don’t want to saturate the soil, just moisten it.
- Cover and Place: Place the pot into a propagator or cover it with a clear plastic bag to maintain humidity. Put it in a bright location, but out of direct, scorching sunlight.
Method: Collecting Adventitious Shoots (More Advanced)
Sometimes, you’ll see very tiny, almost bud-like shoots emerging directly from the Orobanche’s underground root system or where it connects to the host. These are often referred to as “adventitious shoots” and can sometimes be coaxed into rooting.
- Locate Small Shoots: Very carefully probe around the base of a healthy Orobanche plant and its host. You’re looking for tiny, pale, fleshy shoots that are just starting to emerge.
- Carefully Extract: Using a small, sharp knife or even a clean toothpick, try to gently tease and lift these tiny shoots away from the main root structure. This is incredibly delicate work.
- Prepare the Potting Mix: Fill a very small pot with your very gritty, well-draining mix. Make a tiny indentation with a toothpick.
- Plant the Shoot: Gently place the tiny shoot into the indentation. You might apply a tiny amount of rooting hormone to the cut end if you have it.
- Mist and Cover: Mist the surface of the soil very lightly and immediately cover the pot with a clear plastic bag or propagator lid. Place in a warm, bright spot away from direct sun.
The “Secret Sauce”: Insider Tips
Over the years, I’ve learned a few things that aren’t always written in the manuals, especially when it comes to these unique plants.
- Don’t Overwater, Ever! I can’t stress this enough. Orobanche arenaria is prone to rot if its roots sit in soggy soil. Think of it like a desert dweller; it prefers to dry out a bit between waterings. The humidity from the cover is for the plant’s air, not its roots soaking.
- Think Like a Host: Remember, this plant relies on a host. When you try to propagate it, you’re essentially trying to get it to establish a new parasitic relationship. Success is more likely if you ensure the cutting or division has proximity to the roots of the host plant, or at least a very similar soil environment that it would naturally find its host in.
- Bottom Heat is Your Friend: Especially for those tiny adventitious shoots, a gentle bottom heat (around 70-75°F or 21-24°C) can significantly speed up root development and encourage new growth. You can use a heat mat designed for seedlings.
Aftercare and When Things Go Wrong
Once your new Orobanche arenaria shows signs of life – perhaps a tiny new shoot or a firmer appearance – you’re on the right track!
- Gradual Acclimatization: Slowly increase the ventilation by opening the plastic bag or propagator for longer periods each day before removing it entirely.
- Continue Gentle Watering: Keep the soil lightly moist but never wet. Let the surface dry out slightly before watering again.
- Provide Light: Ensure it has bright, indirect light.
- Patience is Key: Don’t expect rapid growth. Orobanche arenaria is a slow and steady grower.
Troubleshooting: The most common sign of failure is mushy, blackening stems or leaves, which indicate rot. This is almost always due to overwatering or poor drainage. If you see this, try to improve drainage immediately, remove any rotten parts if possible, but honestly, it’s often a sign that it’s too late. Another sign is the plant shrivelling and darkening, which can mean it’s drying out too much or it’s failing to establish its parasitic connection.
Keep at It, Gardeners!
Propagating Orobanche arenaria is a true test of patience and observation. It requires a delicate touch and a deep understanding of its unique needs. Don’t be discouraged if your first attempts aren’t successful. Each one is a learning experience. Keep experimenting, observe your plants closely, and enjoy the journey of bringing this fascinating plant into your life and garden. Happy gardening!
Resource:
https://identify.plantnet.org/k-world-flora/species/Orobanche%20arenaria%20Borkh./data