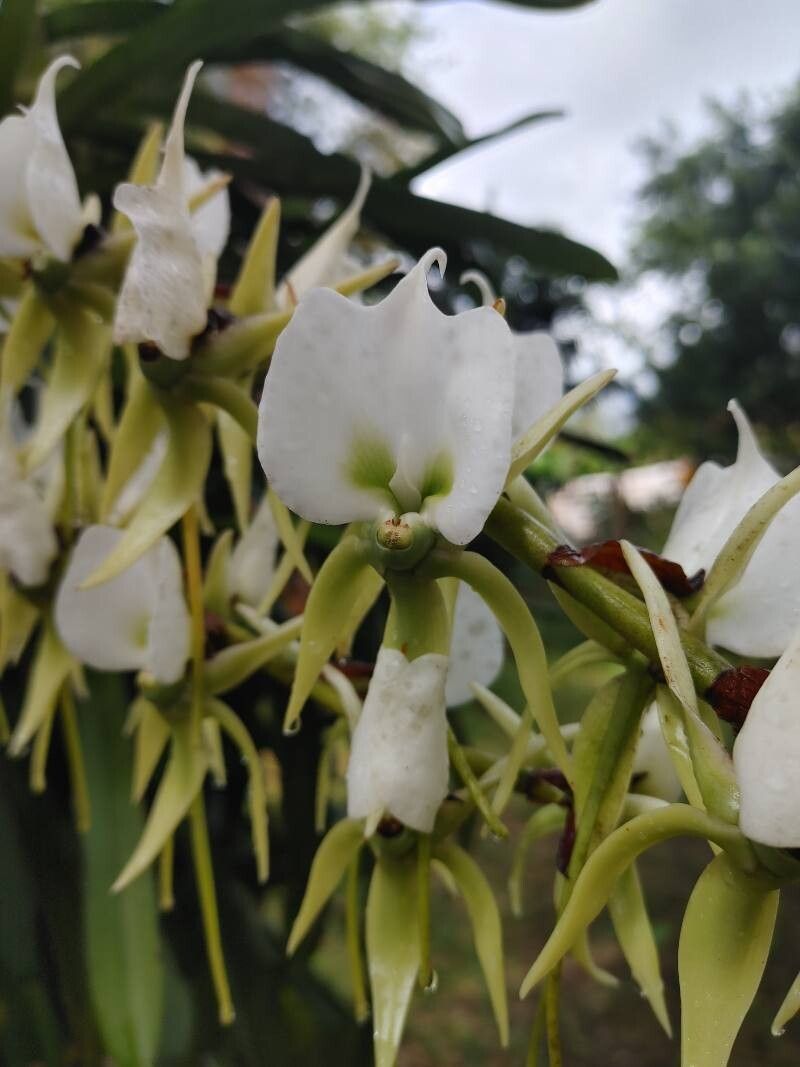
Hello, fellow plant lovers! It’s so lovely to have you over for a virtual cup of coffee and a chat about a truly magnificent orchid: Angraecum eburneum. If you’ve ever seen one of these beauties in bloom, you know exactly why they capture our hearts. Those long, arching spikes adorned with waxy, fragrant white flowers are simply breathtaking. And the scent! Oh, the scent is heavenly, often described as lemon-scented, and it’s strongest at night.
Now, about propagating Angraecum eburneum. For those of you just dipping your toes into the world of orchid propagation, I’ll be honest – this isn’t the easiest orchid for a complete beginner. It enjoys specific conditions and can be a bit slow to show its enthusiasm for new beginnings. But don’t let that deter you! The reward of nurturing a new life from an established plant is immense, and with a little patience and the right approach, you absolutely can succeed. Think of it as a rewarding challenge, a chance to learn and grow alongside your plants.
The Best Time to Start
Generally, the most opportune time to give Angraecum eburneum a nudge towards creating new life is when it’s actively growing, typically in the spring or early summer. This is when the plant has ample energy reserves to invest in developing new growth and roots. You’ll often see new roots or aerial root shoots appearing around this time, which is a great indicator that the plant is ready to be encouraged.
Supplies You’ll Need
To set yourself up for success, here’s what I always have on hand:
- Sharp, sterile pruning shears or a knife: Cleanliness is paramount to prevent disease. I like to wipe mine down with rubbing alcohol before and after each use.
- Cinnamon powder: A natural fungicide that helps seal the cut surfaces.
- Potting medium: For Angraecum eburneum, a very well-draining mix is crucial. I often use a blend of coarse orchid bark, perlite, and charcoal. Some growers also find success with sphagnum moss, but it needs careful monitoring to avoid waterlogging.
- New pots: Small ones are best to start, to avoid having too much potting mix sit around the developing plant and potentially causing rot. Terracotta pots can be excellent as they breathe well.
- Rooting hormone (optional but helpful): This can give your cuttings a little extra boost.
- Water sprayer: For misting.
- Patience! This is perhaps the most important tool!
Propagation Methods
Angraecum eburneum is primarily propagated through division. This plant tends to form basal growths or “pups” over time.
Division:
- Assess your plant: Look for a mature Angraecum eburneum that has developed one or more basal growths, often appearing at the base of the main pseudobulbs or along the rhizome. These pups should ideally have at least two to three pseudobulbs and a few healthy roots of their own.
- Remove from the pot: Gently unpot your established Angraecum eburneum. You might need to carefully shake or tease away some of the old potting mix to get a clear view of the rhizome and the pups.
- Locate the division point: Identify where the pup is attached to the mother plant. You want to make a clean cut that separates the pup with its own root system intact.
- Make the cut: Using your sterile pruning shears or knife, make a clean cut to separate the pup from the parent plant. If there are any dead or decaying parts, trim those away as well.
- Apply cinnamon: Dust the cut surfaces on both the pup and the mother plant generously with cinnamon powder. This acts as a protective barrier.
- Allow to dry (optional but recommended): Some growers like to let the cut surfaces air dry for a day or two in a shaded, well-ventilated spot. This helps to further callus over the wound.
- Potting the new pup: Gently pot the division into its own small pot with your chosen well-draining orchid mix. Ensure the roots are nestled in the medium. Don’t bury the base of the pseudobulbs too deeply.
- Initial watering: Water very sparingly after potting. The goal is to keep the potting medium just slightly moist, not wet. Overwatering at this stage is the quickest way to invite rot.
The “Secret Sauce” (Pro Tips)
Here are a couple of things I’ve learned over the years that can really make a difference:
- Don’t let the leaves touch the water: If you ever decide to try water propagation for any plant (though I wouldn’t generally recommend it for Angraecum eburneum due to rot risk with the pseudobulbs), always ensure the leaves are held above the water line. Any contact can lead to fungal issues and rot, quickly ending your propagation dreams. For Angraecum eburneum divisions, this tip is more about ensuring the potting medium breathes well and doesn’t become soggy around the delicate new roots.
- Bottom heat is your friend: If you can provide a gentle source of bottom heat, like a seedling heat mat set to a low temperature (around 70-75°F or 21-24°C), it can significantly encourage root development in new divisions. This mimics the warmth of the tropics and gives them that extra push.
Aftercare & Troubleshooting
Once your Angraecum eburneum division is potted, treat it gently.
- Watering: Water only when the potting mix is almost dry. It’s better to err on the side of underwatering than overwatering during this sensitive period. Mist the leaves occasionally if the air is very dry, but ensure they dry quickly.
- Light: Place the new division in a spot with bright, indirect light. Avoid direct sun, which can scorch its leaves.
- Patience is key: It can take weeks, even months, for new roots to establish and for the plant to show signs of active growth. Don’t panic if you don’t see immediate results.
Common signs of trouble:
- Rot: This is the biggest concern. Look for mushy, brown, or black pseudobulbs or roots. If you spot rot, you may need to carefully excise the affected parts with your sterile knife. Sometimes, sadly, a severely rotted section cannot be saved.
- Wilting leaves: This can indicate either underwatering or root rot (where the roots are damaged and can’t take up water). Check the moisture level of the potting mix and the condition of the roots if possible.
A Encouraging Closing
Propagating Angraecum eburneum is a journey, not a race. You’re not just growing a new plant; you’re learning to understand its rhythms and needs. Be patient with yourself and with your little green protégé. Celebrate every tiny new root, every hint of new leaf growth. The satisfaction of watching your efforts bloom will be well worth it. Happy growing, and enjoy this wonderful process!
Resource:
https://identify.plantnet.org/k-world-flora/species/Angraecum%20eburneum%20Bory/data