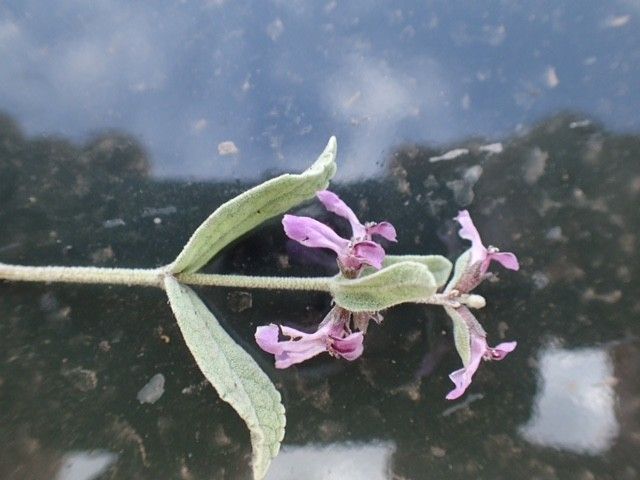
Oh, hello there, fellow plant lover! Grab your favorite mug, settle in, and let’s chat about a truly delightful plant – Stachys argillicola. You might know it better as Woolly Betony, or sometimes Lamb’s Ears, though this particular fellow has a charm all its own. I’ve been growing and propagating it for years, and honestly, it’s a joy to work with. Its fuzzy, grey foliage adds such a soft texture to any garden bed or container. And the best part? It’s wonderfully rewarding to create more of these beauties yourself. For newcomers to the gardening scene, I’d say Stachys argillicola is quite approachable. You’ll likely find success with its propagation.
The Best Time to Start
For the highest chance of success, I always find that late spring to early summer is your golden window. This is when the plant is actively growing, full of vigor, and has plenty of healthy stems to work with. Starting after the risk of frost has passed, when temperatures are warming up, really gives your new cuttings the best chance to establish themselves quickly.
Supplies You’ll Need
Here’s a quick rundown of what you’ll want to have on hand:
- Sharp pruning shears or a clean knife: For taking clean cuts.
- Rooting hormone (optional, but helpful): I like to use a powder or gel for an extra boost.
- Well-draining potting mix: A blend of peat moss, perlite, and a bit of compost works wonders. You can also buy specific seedling or cutting mixes.
- Small pots or seed trays: With drainage holes, of course!
- Watering can or spray bottle: For gentle watering.
- Clear plastic bags or a propagation dome: To maintain humidity.
- A sunny, warm location: Free from harsh, direct sun initially.
Propagation Methods
Stachys argillicola is pretty versatile, but my go-to methods are usually stem cuttings and division.
Stem Cuttings
This is my favorite way to multiply Stachys argillicola.
- Select your material: Look for healthy, non-flowering stems. You want stems that are still somewhat pliable, not woody. Aim for pieces about 4 to 6 inches long.
- Make the cut: Using your clean shears or knife, make a clean cut just below a leaf node. This is where roots are most likely to form.
- Prepare the cutting: Gently strip off the lower leaves, leaving just the top couple of leaves. This prevents the lower leaves from rotting in the soil and ensures the plant focuses its energy on root development.
- Apply rooting hormone (optional): If you’re using it, dip the cut end into the rooting hormone, tapping off any excess.
- Plant your cuttings: Fill your small pots with your well-draining mix. Make a small hole with your finger or a pencil, and insert the cut end of the stem into the soil. Gently firm the soil around it.
- Water gently: Water thoroughly until you see water draining from the bottom of the pot.
- Create a humid environment: Cover the pot with a clear plastic bag or place it under a propagation dome. This high humidity is crucial for encouraging root formation. You can secure the bag with a rubber band.
- Provide indirect light and warmth: Place your cuttings in a bright spot that receives indirect light. Avoid direct sun, which can scorch them. A bit of warmth from a windowsill is usually enough, but bottom heat can speed things up.
Division
This is a fantastic method when your established plant is getting a bit large or you simply want to share the wealth!
- When to divide: The best time is usually in spring, as soon as the ground can be worked, or in early autumn.
- Dig up the plant: Gently dig around the base of the mature plant and lift it carefully from the soil. Try to disturb the roots as little as possible.
- Separate the crowns: You’ll often see that a mature plant has multiple smaller rosettes or crowns. You can gently pull these apart with your hands, or if they are more tightly bound, use a clean, sharp spade or knife to cut through the root ball, ensuring each section has healthy roots and some foliage.
- Replant immediately: Plant the divisions into their new locations or pots filled with good soil, just as you would a freshly purchased plant. Water them in well.
The “Secret Sauce” (Pro Tips)
Here are a few things I’ve learned over the years that really make a difference:
- Don’t let the fuzzy leaves touch the water if you’re doing water propagation. While Stachys argillicola isn’t my first choice for water propagation, if you do, make sure only the stem is submerged, not the leaves. Those fuzzy leaves will rot in a heartbeat.
- Bottom heat is your friend. For stem cuttings, placing the pots on a seedling heat mat set to a consistent 70-75°F (21-24°C) dramatically speeds up root development and increases your success rate, especially if your home is a bit on the cooler side.
- Mist, don’t soak, the cuttings. Once your cuttings are covered, mist the inside of the plastic bag or dome every day or two to maintain humidity. You don’t want standing water on the leaves, just a moist environment for the stems to callus and root.
Aftercare & Troubleshooting
Once your cuttings have developed a healthy root system – you’ll know when you gently tug on them and feel resistance – it’s time to acclimate them to their new, slightly drier life.
- Gradual acclimation: Slowly remove the plastic bag or dome for increasing periods each day over a week or so. This helps them adjust to normal humidity levels.
- Move to brighter light: Once they’re fully acclimated, you can move them to a spot with brighter, but still indirect, light.
- Watering: Water them when the top inch of soil feels dry to the touch. Avoid waterlogging!
The most common issue you might encounter is rot. If your cuttings look limp, mushy, or develop black spots, it’s usually a sign of too much moisture or poor drainage. Discard any affected cuttings immediately to prevent it from spreading. Overly humid conditions combined with poor air circulation can also lead to fungal issues.
A Encouraging Closing
Propagating Stachys argillicola is such a satisfying journey. It’s a plant that just wants to grow and spread its fuzzy charm. Be patient with your cuttings, observe them closely, and don’t be discouraged if a few don’t make it. Every gardener has had them! Enjoy the process of nurturing these new plants from simple cuttings or divisions. You’ll be rewarded with more of that lovely grey-green foliage to enjoy in your garden beds, containers, or even gifted to friends. Happy propagating!
Resource:
https://identify.plantnet.org/k-world-flora/species/Stachys%20argillicola%20Sebsebe/data