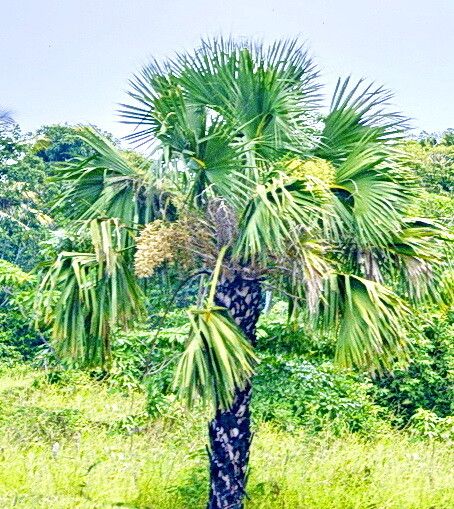
Hello, fellow garden enthusiasts! Today, we’re going to talk about a palm that truly captures the heart. Some palms are showy, others are subtle, but Sabal gretherae has this wonderful, almost architectural elegance that adds instant character to any landscape. It’s a palm that invites you to sit beneath its fronds and dream.
If you’ve fallen for its charm like I have, you’ll be thrilled to know you can create more of these beauties. Propagating palms can sometimes feel a bit like a mystery, but with Sabal gretherae, it’s definitely an accessible project, even if you’re just dipping your toes into propagation for the first time. It’s a very rewarding way to share this plant with friends or simply expand your own collection without breaking the bank.
The Best Time to Start
My go-to time for starting new Sabal gretherae is late spring or early summer. This is when the plant is really kicking into its active growth phase. Everything is warming up, and the energy is just flowing through the plant. This means any cuttings or divisions you take will have a much better chance of taking root and thriving. You want to avoid trying this when it’s cold, as the plant will be slowing down.
Supplies You’ll Need
Before we dig in, let’s gather our tools. Having everything ready makes the whole process smoother:
- Sharp pruning shears or a clean knife: For making precise cuts.
- Well-draining potting mix: I like a blend of coarse sand, perlite, and peat moss. A good cactus or succulent mix can also work.
- Small pots or rooting containers: Make sure they have drainage holes.
- Rooting hormone powder (optional but recommended): This really gives a boost to root development.
- A watering can with a fine rose: For gentle irrigation.
- Clear plastic bags or a propagator: To create a humid environment.
- A small label and waterproof marker: To remember what you planted and when!
Propagation Methods
For Sabal gretherae, the most reliable method is division. These palms tend to produce offsets, or “pups,” at their base, which is perfect for propagation.
Division Method (Step-by-Step):
- Examine your mature plant: Look for smaller shoots, or pups, growing from the base of the main trunk. These are our potential new plants. They should ideally have at least a few leaves themselves.
- Gently unearth the pup: Carefully dig around the base of the main plant. You want to expose the point where the pup is attached. Use your hands or a small trowel to avoid damaging the roots of either the parent plant or the pup.
- Separate the pup: Once you can see the connection, you’ll need to make a clean cut. Use your sharp pruning shears or knife to sever the pup from the mother plant. Try to get as much of the pup’s own root system as possible.
- Prepare the pup: If there are any damaged leaves, trim them off. You can also trim back any overly long roots if they’re hindering potting, but generally, the more root you can keep, the better.
- Apply rooting hormone (if using): Dip the cut end of the pup into the rooting hormone powder, tapping off any excess. This helps stimulate root growth.
- Plant in a new pot: Fill a small pot with your well-draining potting mix. Make a hole in the center large enough to accommodate the pup’s roots. Gently place the pup in the hole and backfill with soil, firming it gently around the base.
- Water gently: Give the newly planted pup a good drink, ensuring the soil is moist but not waterlogged.
- Create humidity: Tent a clear plastic bag loosely over the pot, or place it inside a propagator. This will help the pup retain moisture while it establishes new roots.
The “Secret Sauce” (Pro Tips)
Here are a couple of things I’ve learned over the years that really make a difference:
- Don’t be afraid of a clean cut: When you’re separating the pup, a sharp, clean cut is crucial. A dull tool can tear tissues, making it harder for the plant to heal and root. I always sterilize my shears with rubbing alcohol before and after using them.
- Consider a touch of bottom heat: If you have a heat mat for seedlings, placing your potted pups on it can significantly speed up root development. Palms love warmth, and a gently heated soil surface encourages those roots to get busy.
Aftercare & Troubleshooting
Once your pup is potted, keep it in a bright spot, but avoid direct, harsh sunlight for the first few weeks, especially if it’s under a plastic bag. Mist the leaves occasionally, and monitor the soil moisture. You want it to be consistently slightly moist, not soggy.
The first sign of success is seeing new leaf growth emerge from the center. This usually takes a few weeks to a couple of months.
If you notice leaf browning or the pup becoming soft and mushy, that’s a sign of rot. This usually happens from overwatering or poor drainage. If you catch it early, you might be able to salvage it by removing it from the pot, trimming away any rotted parts (both roots and stem), and repotting in fresh, dry soil. Sometimes, sadly, if rot sets in deeply, the pup may not recover. Don’t be discouraged if one doesn’t make it; it’s all part of the learning process!
A Fond Farewell
Propagating Sabal gretherae is a patient journey, but oh, so worth it. It connects you more deeply with your plants and allows you to share their beauty. So, take your time, enjoy the process, and get ready to welcome some new, magnificent palms into your garden! Happy growing!
Resource:
https://identify.plantnet.org/k-world-flora/species/Sabal%20gretherae%20H.J.Quero/data