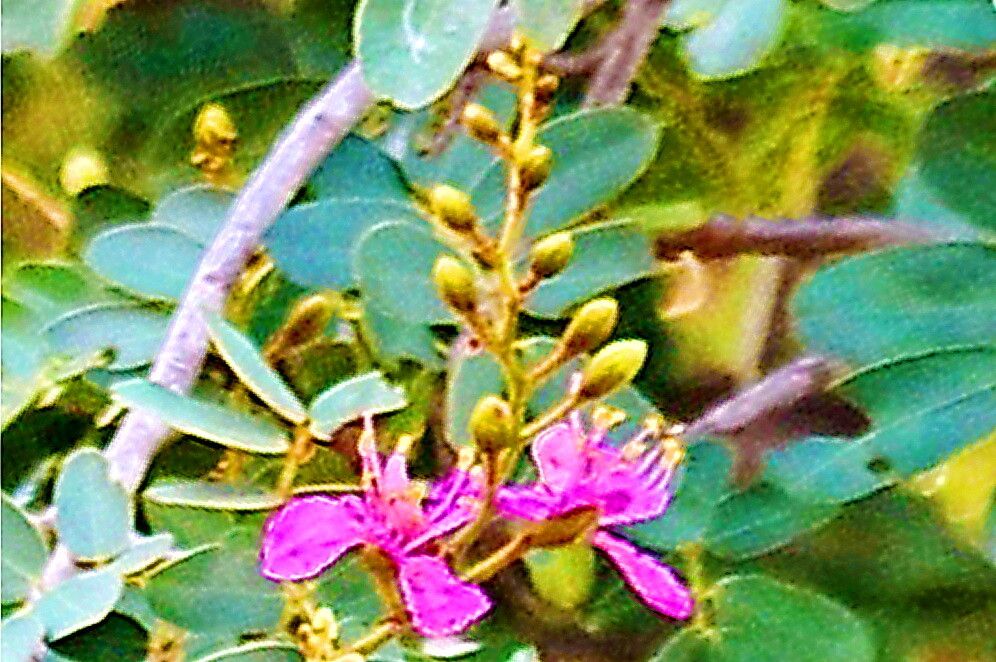
Oh, hello there! Pull up a chair, let’s chat about one of my favorite garden treasures: Baikiaea plurijuga, or as many of us affectionately call it, the African Teak. Its stunning bloom—a cascade of delicate, often fragrant, pink to purple flowers—is truly a sight to behold. And the best part? You can bring that beauty into more corners of your garden, or even share it with friends, by propagating it yourself!
Now, if you’re a total beginner, I won’t lie and say Baikiaea is as straightforward as a succulent cutting. It can be a tad fussy, but with a little patience and these tips, you’ll be well on your way. The reward of watching a tiny cutting transform into a thriving plant is just immense.
The Best Time to Start
For the highest success rate, I find that late spring to early summer is your golden window. This is when the plant is actively growing after its spring flush. You want to take cuttings from healthy, mature stems that are firm, not overly woody, and not producing new, super-soft growth. Think somewhere in between.
Supplies You’ll Need
Here’s what I always have on hand:
- Sharp, clean pruning shears or a razor blade: This is crucial for making clean cuts to prevent disease.
- Rooting hormone powder or gel: While not strictly mandatory for every plant, I find it gives Baikiaea a real boost.
- A well-draining potting mix: I like a blend of equal parts peat moss or coco coir, perlite, and a bit of coarse sand. Avoid heavy garden soil!
- Small pots or seedling trays: Clean ones, of course!
- A clear plastic bag or dome: To create a mini-greenhouse effect.
- A spray bottle: For gentle misting.
Propagation Methods
Let’s get our hands dirty! I’ve found two primary methods work best for Baikiaea:
Stem Cuttings
This is my go-to.
- Select your cutting: Find a healthy, semi-hardwood stem on your Baikiaea plant. Aim for pieces about 4-6 inches long.
- Make the cut: Using your clean shears or blade, make a clean cut just below a leaf node (where a leaf attaches to the stem).
- Prepare the cutting: Gently remove the lower leaves, leaving just a few at the very top. This helps the cutting focus its energy on rooting, not leaf production. If the remaining leaves are quite large, you can even cut them in half to reduce water loss.
- Apply rooting hormone: Dip the cut end into your rooting hormone, tapping off any excess.
- Plant the cutting: Make a small hole in your prepared potting mix with a pencil or your finger. Insert the cutting so the leaf nodes are submerged in the soil. Gently firm the soil around it.
- Water it gently: Give it a light watering.
- Create a humid environment: Cover the pot with a clear plastic bag, propped up so it doesn’t touch the leaves, or place it under a clear dome.
- Place it in the right spot: Find a spot with bright, indirect light. No direct sun, as this will scorch your delicate cutting.
Water Propagation (with a Caveat)
While some plants root beautifully in water, Baikiaea can be a bit more reserved. If you try this:
- Take your cutting as described above, making sure to remove all leaves except for the top two or three.
- Place the cutting in a clear glass or jar of clean water, ensuring no leaves are submerged. This is key to preventing rot.
- Change the water every few days to keep it fresh.
- Place it in bright, indirect light.
- Be patient! Roots may take longer to form than with soil propagation. Once you see substantial root growth (at least an inch or two), you’ll then need to carefully transplant it into your well-draining potting mix, treating it much like a previously rooted cutting.
The “Secret Sauce” (Pro Tips)
Here are a couple of things I’ve learned through trial and error that really make a difference:
- Bottom Heat is Your Friend: Baikiaea just loves a bit of warmth from below. If you have a seedling heat mat, popping your pots on it can significantly speed up root development. It mimics the warmth of the soil in its natural environment.
- Don’t Disturb Too Soon: Resist the urge to tug on your cuttings to see if they’ve rooted. Wait until you see new leaf growth appearing, which is a good sign the roots are established. If you’re unsure and really want to check, gently try to move the cutting. If there’s resistance, it’s likely forming roots.
Aftercare & Troubleshooting
Once you see signs of life, typically new leaf growth, congratulations!
- Gradually Acclimate: Slowly remove the plastic bag or dome over a few days to let the new seedling get used to normal humidity.
- Water Sparingly: Keep the soil consistently moist but not waterlogged. Overwatering is the quickest way to doom your new plant. Let the top inch of soil dry out slightly between waterings.
- Fertilize Lightly: Once the plant is actively growing and looks sturdy, you can introduce a diluted liquid fertilizer designed for houseplants or flowering plants, maybe once a month during the growing season.
What if things go wrong? The most common culprit is rot. If your cutting turns black and mushy, it’s likely too much moisture and not enough air circulation. If it wilts and looks dry but isn’t growing, it might be thirsty or in too much direct sun. Don’t be discouraged; every gardener loses a cutting now and then!
A Little Encouragement
So there you have it! Propagating Baikiaea plurijuga is a wonderfully rewarding endeavor. It takes a bit of effort, and certainly some patience, but the joy of nurturing a new plant from a tiny piece of its parent is truly special. Enjoy the process, the learning, and most importantly, the beautiful blooms that will eventually grace your garden! Happy growing!
Resource:
https://identify.plantnet.org/k-world-flora/species/Baikiaea%20plurijuga%20Harms/data