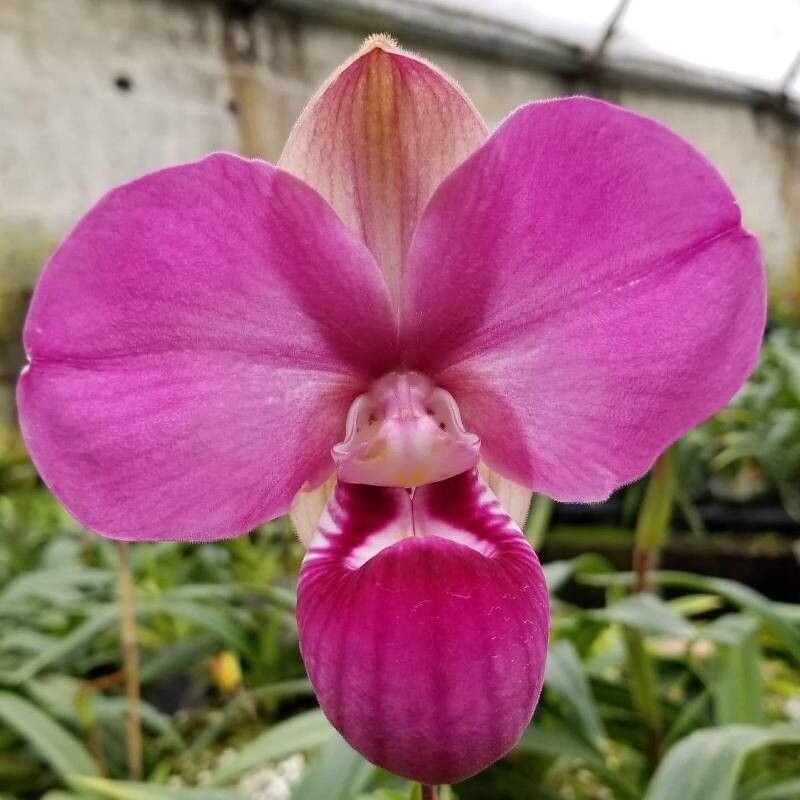
Oh, Phragmipedium kovachii! Just the name conjures up images of those stunning, rosy-pink slippers. If you’ve ever seen one in bloom, you know it’s a showstopper. The velvety petals, the sheer size and vibrancy – it’s enough to make any orchid lover swoon. And the thought of creating more of these beauties from your own plant? That’s a truly rewarding feeling. Now, I won’t lie, Phragmipedium kovachii has a bit of a reputation. It’s not the absolute easiest orchid to propagate, but with a little patience and the right approach, it’s absolutely doable. Think of it as a delightful challenge, not an insurmountable hurdle.
The Best Time to Start
For Phragmipedium kovachii, the sweet spot for propagation is truly when the plant is showing active, vigorous growth. This usually means after it has finished blooming and is putting on new leaves, or perhaps during the warmer, brighter spring and summer months when conditions are naturally more conducive to root development. Avoid trying to propagate when the plant is dormant or stressed. A happy, healthy plant is your best bet for success.
Supplies You’ll Need
Gathering your tools before you begin is half the battle! Here’s what you’ll want to have on hand:
- Sterilized Pruning Shears or a Sharp Knife: Cleanliness is paramount to prevent introducing diseases.
- Potting Medium: A well-draining mix is essential. I personally love a blend of fine-grade orchid bark, perlite, and a bit of sphagnum moss. You want something that holds some moisture but doesn’t stay soggy. For kovachii, a slightly more water-retentive mix can be beneficial compared to some other orchids.
- Clean Pots or Propagation Containers: Small pots, community trays, or even clear plastic cups can work. Make sure they have good drainage.
- Rooting Hormone (Optional but Recommended): A product containing indole-3-butyric acid (IBA) can give your cuttings a helpful boost.
- Water: Clean, room-temperature water is best.
- Sphagnum Moss or Perlite: For maintaining humidity around your propagations.
- Labels: Don’t forget to label your new babies!
Propagation Methods
Phragmipedium kovachii is primarily propagated through division. While stem cuttings can sometimes work, they are generally less successful with orchids of this type compared to dividing a mature plant.
Division: Giving Your Phragmipedium Room to Grow
This is the most reliable method for home growers. It involves carefully separating a mature plant into smaller, viable sections.
- Prepare Your Plant: Gently remove your large Phragmipedium kovachii from its pot. You might need to loosen the potting medium with your fingers or a chopstick to ease it out.
- Clean the Roots: Gently wash away as much of the old potting mix as you can from the roots. This allows you to clearly see the natural divisions and where the rhizome (the thickening stem connecting the growths) is.
- Identify Divisions: Look for distinct new growths, each with its own set of healthy roots. You want to find sections that have at least two to three healthy pseudobulbs (or leaf bases) and a good root system.
- Separate Carefully: Using your sterilized pruning shears or knife, carefully cut through the rhizome to separate the divisions. Try to make a clean cut. If a division has very few roots, don’t worry too much, but aim for those with established root systems.
- Inspect and Trim: Check the roots for any mushy or dead sections and trim them away.
- Pot Up Your Divisions: Pot each division into its own appropriately sized pot using your prepared well-draining orchid mix. Ensure the new growth is at the surface of the potting medium, not buried too deeply.
- Water Lightly: Water your newly potted divisions very gently. You don’t want to disturb the roots, but you need to settle the potting medium.
The “Secret Sauce” (Pro Tips)
Here are a few things I’ve learned over the years that can really make a difference:
- Don’t Drown Your New Roots: When watering divisions, err on the side of caution. You want the potting mix to be moist but never soggy. Overwatering is one of the quickest ways to invite rot. I often let the surface of the mix dry out slightly between waterings initially.
- Humidity is King (and Queen!): New divisions are vulnerable to drying out, especially if their root systems are still developing. I like to increase the humidity around them. This can be done by placing the pots on a pebble tray filled with water (making sure the pot isn’t sitting directly in the water!) or by placing them in a clear plastic bag with some air holes as a temporary mini-greenhouse.
- Bottom Warmth Helps: Orchids love a bit of warmth at their roots to encourage growth. Placing your propagation pots on a propagation mat or on top of a gently warmed appliance can significantly speed up root development. Just make sure it’s not so hot that it cooks the roots! A gentle warmth, around 70-75°F (21-24°C), is ideal.
Aftercare & Troubleshooting
Once your divisions are potted up, the real parenting begins! Keep them in bright, indirect light – much like you would an adult plant, but avoid intense direct sun which can scorch delicate new growth. Continue with the careful watering routine, checking for moisture before watering.
Watch out for the dreaded rot! The most common sign of failure is mushy, dark-colored roots or a blackening at the base of the leaves. If you see this, act quickly. You may need to unpot the division, trim away the affected tissue with a sterile tool, and repot it in fresh, dry medium. Sometimes, a sprinkle of Cinnamon powder on the cut surfaces can help deter fungal growth. Don’t be discouraged if a division doesn’t make it; it happens to the best of us. Every plant behaves a little differently.
A Gentle Encouragement
Propagating Phragmipedium kovachii is an exercise in patience and observation. You’re not just growing a plant; you’re participating in its life cycle. Enjoy the process, learn from each step, and celebrate every new root or leaf that appears. Before you know it, you’ll have a whole new collection of these magnificent orchids to admire! Happy growing!
Resource: