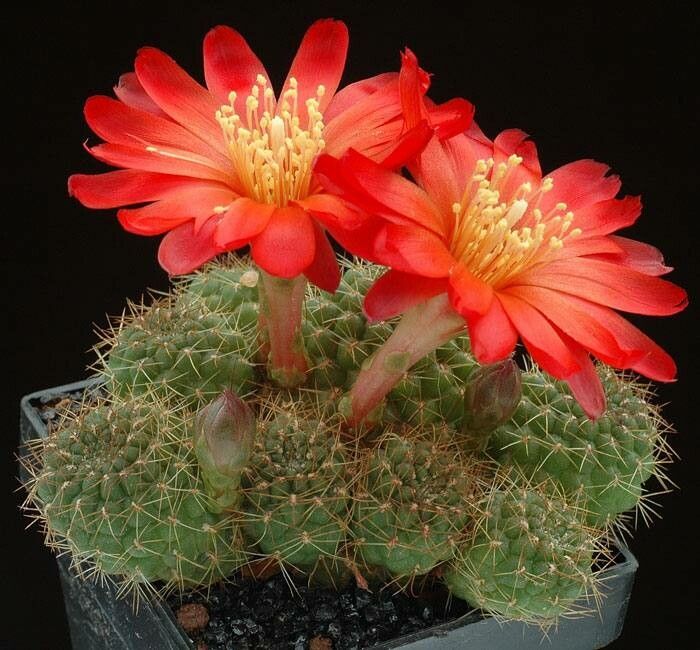
Ah, Rebutia padcayensis! If you’ve ever admired those perfectly rounded, often brightly colored cacti, you’ve probably seen this beauty. They have a delightful habit of producing offsets, giving you the perfect excuse to multiply your collection. It’s such a joy to watch a tiny pup unfurl and eventually become its own little globe of joy. For beginners? I’d say propagating Rebutia padcayensis is wonderfully accessible, which makes it an even more rewarding endeavor.
The Best Time to Start
My favorite time to begin propagating these little treasures is during their active growing season. Think late spring through summer. This is when they’re full of energy and more likely to root quickly. You’ll see them producing new offsets, which are just begging to be given their own space to grow!
Supplies You’ll Need
Before we dive in, let’s gather our essentials. It doesn’t take much, and having everything at hand makes the process smooth sailing.
- Well-draining soil mix: A cactus and succulent potting mix is perfect. I often add a little extra perlite or pumice for even better drainage.
- Small pots or trays: Whatever you have that’s clean and airy will do. Little terracotta pots are lovely for this.
- Sharp, clean knife or pruning shears: We want a clean cut, so make sure they’re sterilized. A quick wipe with rubbing alcohol does the trick.
- Rooting hormone (optional but helpful): This promotes faster and more robust root development.
- Gloves (optional): If you’re sensitive to cactus spines, these are a good idea!
- Watering can or spray bottle: For gentle watering.
Propagation Methods
Rebutia padcayensis is a champion at producing babies, making division the most straightforward and successful method for this particular cactus.
Division: The “Pup” Snatchers
- Assess your plant: Look for mature cacti that have produced several offsets, often called “pups,” around their base.
- Gently remove the soil: Carefully brush away some of the soil from around the base of the mother plant and the pup you want to separate.
- Sever the connection: Using your clean knife or shears, gently twist and cut the pup away from the mother plant. Try to leave a small bit of the parent plant’s base attached to the pup if possible, as this can aid rooting. If it pulls away cleanly on its own, that’s fine too!
- Allow to callous: This is a crucial step! Place the separated pup in a dry, well-ventilated spot for a few days, or even up to a week. You’ll see the cut end start to dry and form a callus. This prevents rot when planted.
- Plant your pup: Fill your small pot with your prepared cactus mix. Make a little indentation in the soil and gently place the callous end of the pup into the soil. Don’t bury it too deep; just enough for it to stand upright.
- Wait to water: Resist the urge to water immediately. Wait at least a week, sometimes two, after planting before giving your new little cactus its first drink. This gives any tiny nicks in its base time to heal.
The “Secret Sauce” (Pro Tips)
Now, for those little bits of wisdom that make a difference.
- When you’re separating pups, avoid pulling them off. Always use a clean, sharp tool. This minimizes damage to both the parent and the pup, which means a healthier start for your new plant.
- If you happen to have a propagation mat with gentle bottom heat, the pups will absolutely love it during the rooting phase. It mimics the warmth they’d typically get in their native habitat and really encourages those roots to form. Just set it to a low temperature; we’re not cooking, just providing a cozy environment!
Aftercare & Troubleshooting
Once those roots have taken hold – and you’ll know when they do because the pup will feel a bit more secure and might even show a tiny bit of growth – you can start watering more regularly, but still, let the soil dry out completely between waterings. Think of it like this: they prefer to be a bit thirsty than waterlogged.
The most common issue you’ll encounter is rot. If your pup starts to look mushy or turns black at the base, it’s likely rot. This is usually a sign of too much moisture and not enough drainage. If you see this, act quickly. You might be able to salvage a healthy section by cutting it off, letting it callous, and starting again. Don’t get discouraged if this happens; it’s part of the learning process for all gardeners!
A Encouraging Closing
Growing new plants is such a rewarding journey, and watching a tiny Rebutia padcayensis pup transform into a healthy specimen is a special kind of magic. Be patient, enjoy the process, and soon you’ll have a whole windowsill full of these delightful little cacti. Happy propagating!
Resource:
https://identify.plantnet.org/k-world-flora/species/Rebutia%20padcayensis%20Rausch/data