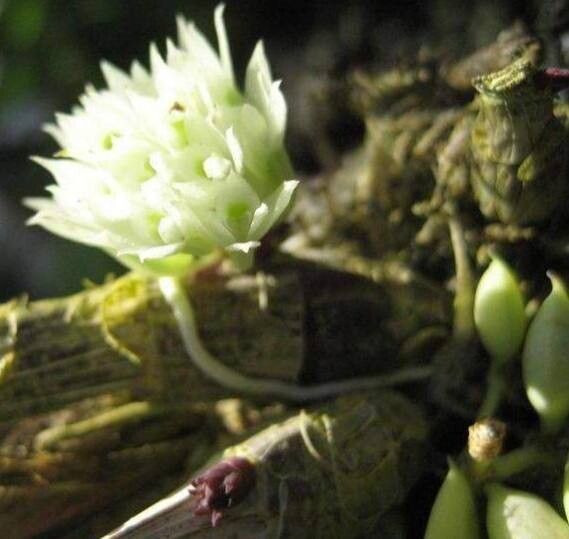
Oh, hello there! Come on in, pull up a chair. I’ve got a fresh pot of coffee brewing, and I’m just itching to chat about one of my favorite orchids: Dendrobium capituliflorum. If you’ve ever admired those lovely clusters of delicate blooms, you know exactly the magic I’m talking about. It’s a real charmer, isn’t it?
Propagating them yourself is such a rewarding journey. It’s like watching a baby plant come to life, and before you know it, you have more of these beauties to share or simply enjoy in your own collection. Now, it’s not the absolute easiest orchid to multiply for complete beginners, but with a little care and this guide, you’ll be well on your way. Don’t let that deter you!
The Best Time to Start
Honestly, the sweet spot for propagating Dendrobium capituliflorum is when the plant is actively growing. That usually means spring and early summer. You want to see new growth emerging, those plump little pseudobulbs swelling up, and healthy, vibrant leaves. Trying to propagate when the plant is dormant is just setting yourself up for disappointment. Let it get a good start on its energetic phase!
Supplies You’ll Need
Gathering your supplies before you begin makes the whole process so much smoother. Here’s what I’ve found essential:
- Sharp, sterile pruning shears or a clean knife: For making precise cuts. Sterilize them with rubbing alcohol or a bleach solution.
- Fine-grade orchid bark: A good quality mix that drains well is vital. I like a blend with a good amount of perlite for added aeration.
- Sphagnum moss: For retaining a bit of moisture when needed.
- Small pots or containers: Orchid pots with good drainage holes are ideal.
- Rooting hormone (optional but helpful): A powder or gel can give that extra boost.
- Small spray bottle: For misting.
- Clear plastic bag or a propagation dome: To create a humid environment.
- Labeling system: So you don’t forget what you’ve propagated and when!
Propagation Methods
For Dendrobium capituliflorum, the most successful method I’ve found is by division. This is when you separate a mature plant into smaller, viable sections.
Here’s how I do it:
- Gently remove the plant from its pot. You might need to loosen the edges with a knife if it’s very snug.
- Inspect the root ball. Look for distinct pseudobulbs (the thickened stems) that have roots attached. Ideally, you want each new section to have at least two or three healthy pseudobulbs and a good network of roots.
- Carefully untangle the roots. You can gently wash away some of the old potting mix with lukewarm water to get a clearer view.
- Using your sterile shears or knife, cut through the rhizome (the creeping stem connecting the pseudobulbs). Make sure each division has healthy roots and at least two pseudobulbs.
- Allow the cut surfaces to air-dry for a day or two. This helps to callus over the wounds and prevent rot. It might look a bit sad, but trust me, this step is crucial.
- Pot up your divisions. Use your fresh orchid bark mix in small pots. Plant them so the pseudobulbs are just at the surface of the mix, not buried too deeply.
- Water sparingly at first. You don’t want to saturate the medium. Just a light watering or misting is enough.
The “Secret Sauce” (Pro Tips)
Now, here are a couple of things I’ve learned over the years that really make a difference:
- Don’t overwater after division. This is probably the most common mistake! The new divisions don’t have the established root system to handle a lot of moisture, and waterlogged conditions are a fast track to rot. Think “barely damp” rather than “wet.”
- Provide a humid microclimate. A clear plastic bag over the pot, secured loosely with a rubber band, or a propagation dome will create that much-needed humidity. Open the bag or dome for a few minutes each day to allow for air circulation and prevent fungal issues. This helps the plant establish roots without drying out.
- Patience is key with the roots. Don’t be tempted to yank on the plant to check for roots too soon! You’ll see new leaf growth first, which is a good sign. You’ll know roots are developing strongly when the plant feels firmly anchored in its pot and you see new roots emerging from the pot’s drainage holes.
Aftercare & Troubleshooting
Once you see signs of new growth – a tiny new leaf unfurling or a little root peeking out – you can slowly start to increase the watering. Continue to keep it in bright, indirect light and maintain that gentle humidity. You might want to keep it in a slightly shadier spot than your mature plants for the first few weeks.
The main thing to watch out for is rot. If a pseudobulb turns black and mushy, or if leaves start to yellow and drop very quickly without any new growth, that’s usually a sign of too much moisture or fungal infection. If you catch it early, you might be able to cut away the rotted section with your sterile knife and let the healthy part callus over. Sometimes, sadly, a division just won’t make it. Don’t get discouraged; it’s all part of the learning process!
A Word of Encouragement
Growing new plants takes time and a bit of intuition. Be patient with your Dendrobium capituliflorum divisions. Celebrate every little sign of progress, whether it’s a new leaf or a strong root. Enjoy the quiet satisfaction of nurturing something from a piece of a parent plant into its own thriving individual. You’ve got this! Happy growing!
Resource:
https://identify.plantnet.org/k-world-flora/species/Dendrobium%20capituliflorum%20Rolfe/data