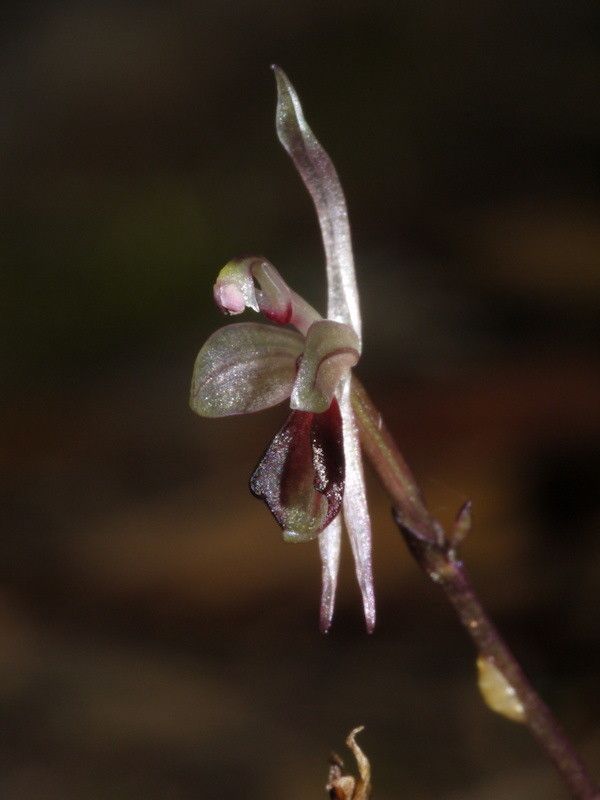
Hey there, fellow plant lovers! I’m so excited to talk to you about a real gem: Stigmatodactylus corniculatus. If you’ve ever seen this beauty, you know its delicate, uniquely shaped flowers are an absolute showstopper. They have this charming, almost whimsical air about them, and personally, I find their subtle elegance incredibly captivating.
Want to fill your home with more of that magic? Propagating them is a fantastic way to do it. It’s incredibly rewarding to nurture a tiny cutting into a full-fledged plant, knowing you helped it come to life. Now, I won’t lie – Stigmatodactylus corniculatus can be a tad bit fussy, so it might be a little challenging for absolute beginners. But with a bit of care and this guide, you’ll be well on your way!
The Best Time to Start
Timing is everything, right? For Stigmatodactylus corniculatus, your best bet is to start propagation in the spring. This is when the plant is actively growing and has the most energy reserves to put into developing new roots. Aim for after the last frost, when temperatures are consistently mild, and days are getting longer. You’re essentially tapping into its natural urge to expand and flourish.
Supplies You’ll Need
Don’t worry, you won’t need a whole greenhouse to get started. Here’s what you’ll want to have on hand:
- Sharp, sterile pruning shears or a sharp knife: Cleanliness is key to preventing disease.
- Potting mix: A well-draining mix is crucial. I like to use a blend of peat moss, perlite, and a bit of orchid bark.
- Small pots or propagation trays: Anything that allows for good airflow and drainage will work.
- Rooting hormone (optional but helpful): A powdered or gel formula can give your cuttings a boost.
- Plastic bag or humidity dome: To keep the humidity high around your cuttings.
- Water mister or spray bottle: For gentle hydration.
Propagation Methods
We’ll focus on the most reliable method for Stigmatodactylus corniculatus: stem cuttings.
- Select Your Cutting: Look for a healthy, vigorous stem that is at least 4-6 inches long. Ideally, choose a stem that has started to mature but isn’t woody. You want to see a few sets of leaves.
- Make the Cut: Using your sterile shears or knife, make a clean cut just below a leaf node. A leaf node is where a leaf attaches to the stem. This is where the magic happens for root development.
- Prepare the Cutting: Gently remove the lower leaves, leaving just the top 2-3 leaves. If the remaining leaves are very large, you can even cut them in half to reduce water loss through transpiration.
- Apply Rooting Hormone (Optional): If you’re using rooting hormone, lightly dip the cut end of the stem into the powder or gel. Tap off any excess.
- Plant Your Cutting: Fill your chosen pot with your well-draining potting mix. Make a small hole in the center with your finger or a pencil. Insert the cut end of your stem into the hole, ensuring the leaf nodes you stripped are below the soil surface. Gently firm the soil around the stem.
- Water Gently: Water thoroughly but gently to settle the soil around the cutting.
The “Secret Sauce” (Pro Tips)
Here are a few little tricks I’ve picked up over the years that really seem to make a difference for these divas:
- Don’t Let Leaves Touch the Water (If Using Water Propagation – though soil is preferred for Stigmatodactylus): If you were doing water propagation (which I generally don’t recommend for this specific plant due to rot risk), it’s critical that no leaves are submerged. They’ll just rot and take your cutting down with them. For soil propagation, this translates to ensuring your leaves are well above the soil line.
- Create a Humid Haven: Stigmatodactylus corniculatus absolutely loves humidity. Once you’ve potted your cuttings, cover the pot with a clear plastic bag, a propagation dome, or even a plastic water bottle cut in half. This creates a mini-greenhouse. Poke a few small holes in the bag or dome for ventilation.
- Bottom Heat is Your Friend: If you have a heating mat designed for plants, placing your pots on it can significantly speed up root development. It mimics the warmth of spring soil and gives your cuttings that extra push. Just ensure the mat doesn’t dry out your soil too quickly.
Aftercare & Troubleshooting
Once your cuttings are planted and covered, it’s time for patience. Keep the soil consistently moist but not waterlogged. Mist the leaves occasionally if they look dry. You’ll want to place them in bright, indirect light. Direct sun will scorch those delicate leaves.
You’ll know your cutting is successful when you see new leaf growth emerging from the tip, or when you feel a gentle tug of resistance when you lightly pull on the stem – indicating roots have formed. This can take anywhere from 4 to 8 weeks, sometimes longer.
What if things go wrong? The most common issue is rot. If your stem turns black and mushy, it’s likely rotted. This usually happens from too much moisture, poor drainage, or inadequate airflow. If you see this, unfortunately, it’s time to discard the cutting and try again. Another sign of stress is wilting that doesn’t improve, which might mean it’s not getting enough humidity or the light is too intense.
A Little Encouragement
Propagating plants is a journey, and sometimes you’ll have setbacks. Don’t get discouraged! Every attempt is a learning experience. Enjoy the process of watching these little bits of magic start to grow. With a bit of care and a lot of patience, you’ll soon have a delightful collection of your own Stigmatodactylus corniculatus to admire. Happy planting!
Resource: