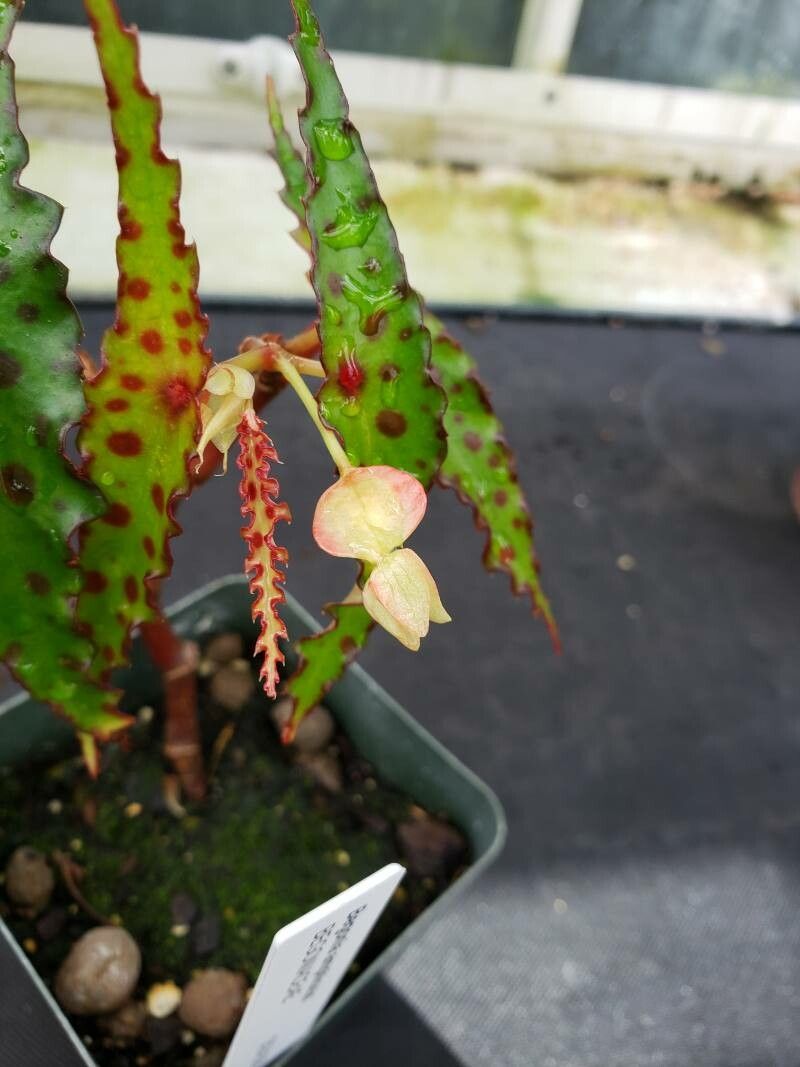
Oh, Begonia amphioxus! If you’ve ever seen one of these beauties, you know why they’re so captivating. Those long, slender, almost arrow-shaped leaves with their intricate patterns are just… mesmerizing. They have this wild, untamed elegance that makes them stand out in any collection. And the thought of creating more of them from a single plant? Pure gardening joy!
Now, I won’t lie. Begonia amphioxus can be a little bit of a diva when it comes to propagation. It’s not the rock-solid beginner plant like a pothos, but with a little attention and the right approach, it’s absolutely doable. The reward of seeing those tiny roots emerge and a new plant unfurl is so worth the effort.
The Best Time to Start
For the highest success rate with Begonia amphioxus, I find that late spring through early summer is your sweet spot. This is when the plant is naturally in its most vigorous growth phase. You’ll have plenty of healthy, active material to work with, and the warmer, brighter days lend themselves beautifully to rooting. Don’t try to propagate when the plant is stressed, dormant, or during the cold, dark winter months.
Supplies You’ll Need
Gathering your tools beforehand makes the whole process smoother. Here’s what I like to have on hand:
- Sterilized pruning shears or a sharp knife: Essential for clean cuts.
- Rooting hormone (optional, but recommended): I prefer a powder form for stem cuttings.
- Well-draining potting mix: A blend of equal parts peat moss or coco coir, perlite, and orchid bark works beautifully for begonias.
- Small pots or propagation containers: Clean terracotta or plastic pots (around 3-4 inches) are great.
- Clear plastic bag or propagation dome: To create a humid environment.
- Spray bottle: For misting.
- Patience! This is the most important ingredient.
Propagation Methods
Let’s get our hands dirty with the most reliable methods for this unique begonia.
Stem Cuttings
This is my go-to for Begonia amphioxus.
- Select a healthy stem: Look for a piece of stem that has at least 2-3 nodes (where leaves emerge). A healthy stem should be firm, not withered or overly soft.
- Make a clean cut: Using your sterilized shears, cut the stem just below a node. You want to get as much of that node as possible, as that’s where the magic happens. You can take cuttings of about 3-6 inches in length.
- Prepare the cutting: Gently remove any lower leaves, leaving just 1-2 at the top. If your cutting is very long, you can prune it back.
- Apply rooting hormone (if using): Dip the cut end into your rooting hormone powder, tapping off any excess.
- Plant the cutting: Fill your small pot with your prepared, slightly damp potting mix. Make a small hole with your finger or a pencil and carefully insert the cutting, ensuring at least one node is buried in the soil.
- Water gently: Water the soil thoroughly but allow excess to drain.
- Create humidity: Cover the pot with a clear plastic bag, an upside-down clear plastic container, or place it inside a propagation dome. This traps moisture and helps the cutting establish. Make sure the leaves don’t touch the sides of the bag.
- Place in bright, indirect light: Avoid direct sun, which can scorch the delicate cutting. A bright windowsill that doesn’t get harsh midday rays is perfect.
Water Propagation (With a Caveat!)
While some begonias root readily in water, Begonia amphioxus can be a bit trickier. If you choose this method, be extra vigilant.
- Take your cuttings: Follow the same steps as above for taking stem cuttings.
- Remove lower leaves: Ensure no leaves will be submerged in the water.
- Place in water: Put the cuttings in a clean jar or glass with fresh water. Crucially, make sure no leaves are touching the water. This is a common cause of rot.
- Change water regularly: Replace the water every few days to keep it fresh and prevent bacterial growth.
- Monitor for roots: You’ll eventually see tiny white roots emerge from the nodes.
- Transplant when ready: Once the roots are about an inch long, carefully transition the cutting to your well-draining potting mix. Keep the soil consistently moist for the first few weeks as it acclimatizes.
The “Secret Sauce” (Pro Tips)
Here are a couple of things I’ve learned over the years that really give Begonia amphioxus propagation a boost:
- Bottom Heat is Your Friend: If you have a seedling mat, using it under your propagation containers makes a world of difference for Begonia amphioxus. It mimics spring soil temperatures and encourages vigorous root development. Aim for a consistent temperature around 70-75°F (21-24°C).
- Don’t Overwater, but Don’t Let it Dry Out: This is the delicate balance. Once planted in soil, the mix should always feel slightly damp to the touch, never soggy. If the leaves start to droop and the soil feels dry, that’s your cue to water. But if the soil stays wet for days, you’ll invite rot. Check frequently.
- Watch for the “Green Nodules”: Sometimes, before you see actual roots, you’ll notice tiny, pale green bumps appearing at the nodes on the stem, especially if you’re using bottom heat. These are early root primordia, and it’s a sure sign your cutting is attempting to root!
Aftercare & Troubleshooting
Once you see signs of root development – whether it’s tiny roots peeking out of the drainage holes or new leaf growth – congratulations! You’ve successfully initiated your new plant.
- Gradual Acclimation: If your cutting was under a dome or bag, slowly start to introduce it to ambient humidity by opening the bag a little more each day over a week.
- Watering: Continue to keep the soil consistently moist but not waterlogged. As the plant grows and establishes, you can gradually let the top inch of soil dry out between waterings, just like you would for a mature begonia.
- Light: Maintain that bright, indirect light.
The most common issue you’ll encounter is rot. If your cutting turns black and mushy, it’s usually a sign of too much moisture and not enough air circulation. Unfortunately, once rot sets in, it’s very difficult to save. If you see a bit of rot on a stem, you can try to cut away the affected part with sterile tools and re-root the healthy section, but it’s often a lost cause. Overwatering is the usual culprit, so prioritize good drainage and mindful watering. Wilting can also happen if the ambient humidity is too low, especially if you’ve removed the humidity dome too soon.
A Encouraging Closing
Propagating Begonia amphioxus is a journey, and like any good journey, there will be moments of anticipation and perhaps a few little bumps along the way. Don’t get discouraged if your first attempt isn’t a runaway success. Learn from each one, adjust your approach, and remember to enjoy the process. Watching a new life emerge from a simple stem cutting is one of gardening’s greatest joys. Happy propagating!
Resource:
https://identify.plantnet.org/k-world-flora/species/Begonia%20amphioxus%20Sands/data