Oh, hello there! Come on in, pull up a chair. I’ve got my favorite mug ready, and I’m just itching to talk about one of my absolute favorite little treasures: Ramonda serbica.
Introducing the Enchanting Ramonda Serbica
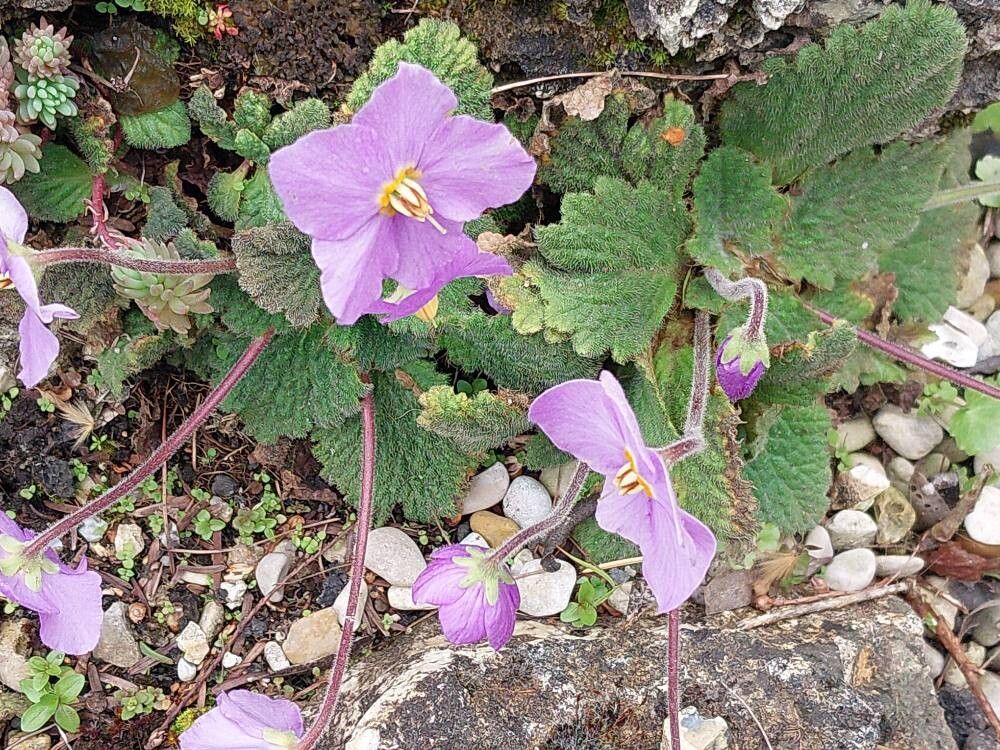
Isn’t it just the most charming thing? Ramonda serbica, with its rosette of velvety, often wrinkled leaves and its delicate spikes of lilac-blue flowers, feels like a tiny piece of woodland magic right in your garden. It’s a plant that whispers secrets of ancient mountainsides and resilient beauty. Propagating it myself has brought me so much joy – watching a tiny cutting transform into a thriving new plant is truly a special kind of satisfaction. Now, I won’t lie, Ramonda serbica can be a bit of a diva sometimes, so for absolute beginners, it might present a gentle learning curve. But with a little patience and some of the know-how I’m about to share, you’ll be well on your way.
When to Get Your Hands Dirty
For Ramonda serbica, the absolute best time to try your hand at propagation is during its active growing season. Think late spring through early summer. This is when the plant is full of vigor, and the cuttings will have the energy they need to root. You’ll be working with fresh, healthy growth, which always gives the best results.
What You’ll Need for Success
Gathering your supplies beforehand makes the whole process so much smoother. Here’s what I always have on hand:
- Sharp Pruning Shears or a Clean Knife: For making clean cuts.
- Well-Draining Potting Mix: I swear by a mix of coarse perlite, fine bark chips, and a bit of peat moss. You want something airy that won’t hold too much water. You can also find specialized succulent or cactus mixes that work wonderfully.
- Small Pots or Trays: Clean ones are key!
- Rooting Hormone (Optional but Recommended): A good quality rooting powder or gel can give your cuttings a helpful boost.
- Watering Can with a Fine Rose: For gentle watering.
- Plastic Bag or Cling Film: To create a mini-greenhouse effect.
- Labels and a Pen: Don’t forget to label your efforts!
My Favorite Propagation Methods
Ramonda serbica is most commonly propagated through division and, sometimes, leaf cuttings, though the latter can be a little trickier. I find division to be the most reliable for creating healthy, established plants.
Method 1: The Art of Division
This is my go-to for Ramonda serbica. It’s like giving your plant a little haircut and getting new friends in return.
- Gently Remove the Plant: Carefully take your Ramonda serbica out of its pot. If it’s in the ground, gently loosen the soil around it.
- Inspect the Roots: Look for natural divisions. You’ll often see where one rosette is clearly emerging from the base of another. The root system usually connects them.
- Make the Cut: Using your sharp, clean knife or pruning shears, carefully cut between the rosettes, making sure each new section has a decent amount of roots attached. Don’t be afraid to be decisive but gentle. If you’re struggling to find natural breaks, it’s okay to make a cut through the rhizome (the underground stem).
- Potting Up: Fill your clean pots with your well-draining potting mix.
- Plant Your Divisions: Make a hole in the soil and place your new Ramonda serbica division in it, ensuring the roots are spread out. Firm the soil gently around the base.
- Initial Watering: Water them in lightly. You want the soil to be moist but not soggy.
Method 2: Leaf Cuttings (More Advanced)
This method takes patience and a bit of finesse.
- Select a Healthy Leaf: Choose a mature, healthy leaf from the mother plant.
- Make the Cut: Using your clean knife, carefully cut the leaf off at its base, as close to the rosette as possible.
- Prepare the Leaf: If the leaf stem is very long, you can trim it back a bit.
- Dipping in Hormones (Optional): If you’re using rooting hormone, dip the cut end of the leaf into the powder or gel.
- Planting: Fill a small pot with your well-draining mix. Make a small hole and insert the cut end of the leaf into the soil. You can gently firm the soil around it. If the leaf is large, you might be able to insert multiple leaves into one pot, ensuring they aren’t touching each other too much.
- Water Sparingly: Water very lightly, just enough to settle the soil around the cut end.
The “Secret Sauce” – Little Tips from My Garden
Over the years, I’ve learned a few tricks that really make a difference.
- Airflow is King (Especially for Leaf Cuttings): If you’ve used leaf cuttings, resist the urge to keep the soil constantly wet. The leaves are prone to rot if they sit in soggy conditions. Let the surface dry out between waterings. It mimics their natural environment where they might dry out slightly between misty mountain rains.
- Bottom Heat Works Wonders: For divisions, especially if you’re trying them a little earlier or later in the season, placing your pots on a gentle heating mat can significantly speed up root development. It’s like giving them a cozy warm bed to sprout in.
- Don’t Rush the Potting Up: When you’ve made divisions, it’s tempting to pot them up into large containers right away. I find it’s best to let them settle into smaller pots first. This prevents overwatering and helps them focus their energy on root growth.
Aftercare and What to Watch Out For
Once your cuttings or divisions are planted, the real waiting game begins.
- For Divisions: Keep the soil lightly moist. You should see new leaf growth indicating they’ve settled in. This usually happens within a few weeks.
- For Leaf Cuttings: This is where patience is crucial. You might not see much action for weeks, even months. Look for tiny new plantlets forming at the base of the leaf. Mist the soil lightly every few days, ensuring it doesn’t stay waterlogged.
- Troubleshooting: The biggest enemy here is rot. If you see leaves turning mushy and black, or the stems going soft, it’s a sign of too much moisture. You can try to salvage it by cutting away the rotted parts and letting the remaining healthy bits dry out before replanting them in fresh, dry soil. It’s a tough lesson, but one that teaches you about balance.
Keep Growing, Keep Enjoying
Propagating Ramonda serbica is a journey, not a race. There will be times when your efforts don’t quite take, and that’s perfectly okay. Every gardener has those moments. But when you see those tiny roots forming, or a new rosette unfurling, the feeling is just… magnificent. So, be patient with yourself and with your little Ramonda plants. Enjoy the process, learn from each attempt, and savor the beauty you’re bringing into your world. Happy gardening!
Resource:
https://identify.plantnet.org/k-world-flora/species/Ramonda%20serbica%20Pančić/data