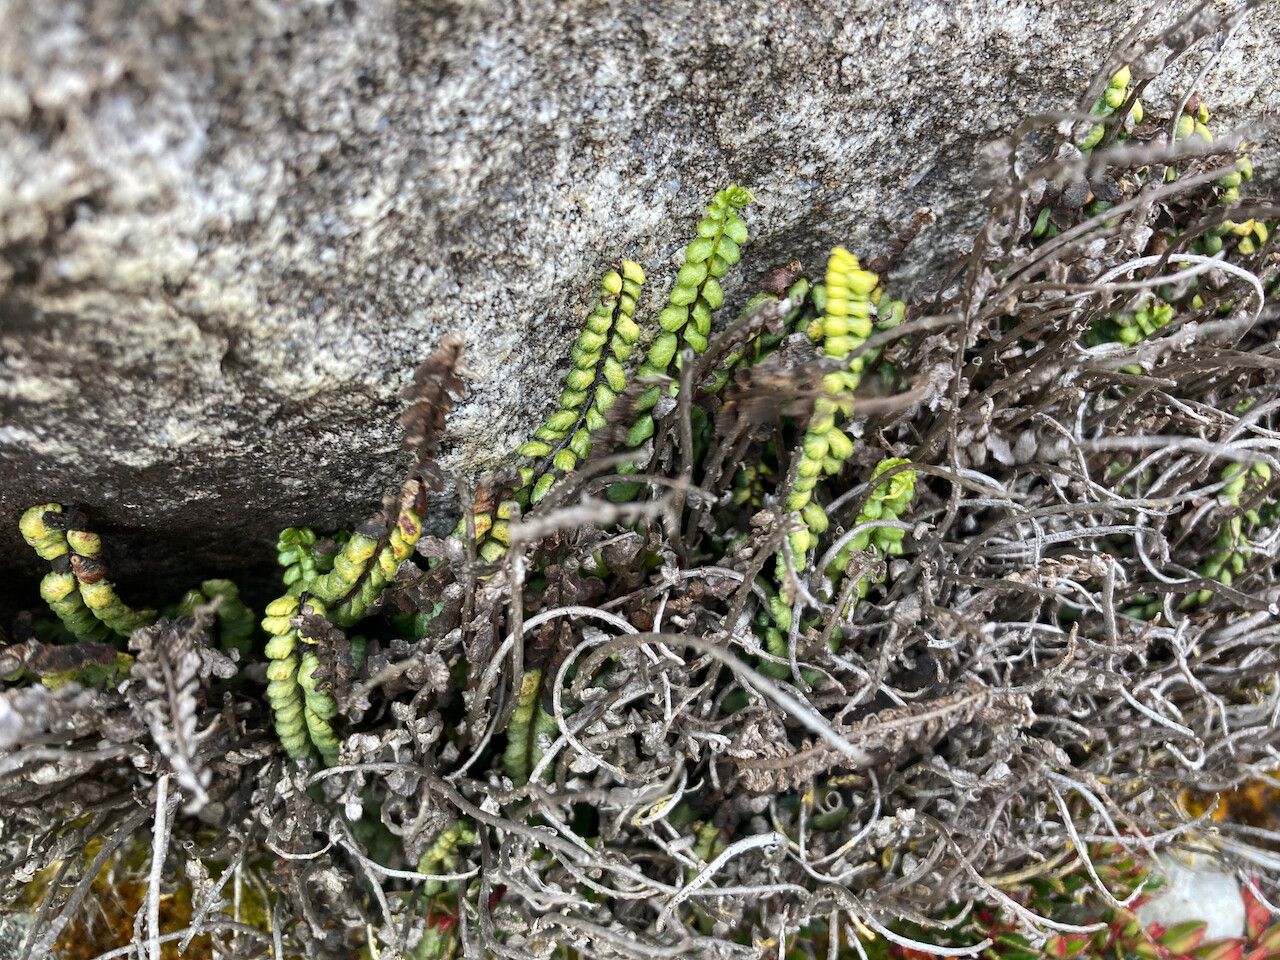
Oh, hello there! Pull up a chair and let’s chat about a little gem that’s been capturing my heart lately: Grammitis moniliformis. You might know it by its common name, the Necklace Fern. Honestly, it’s just delightful. Its bead-like fronds have an almost whimsical charm, and seeing a tiny new plant unfurl from a piece of your own makes all the effort feel incredibly worthwhile. If you’re looking for a fun project that can bring a little extra green joy into your life, this is a great one to try. For beginners? I’d say it’s moderately easy once you get the hang of it, but with a little patience, you’ll be a pro in no time.
The Best Time to Start
For the highest chance of success with Grammitis moniliformis, I always aim to propagate during active growth periods. Think spring and summer. This is when the plant is naturally pushing out new energy and making it more receptive to forming roots. Trying to propagate when the plant is a bit stressed or dormant, like in the middle of winter, can be a much slower and less fruitful endeavor.
Supplies You’ll Need
Gathering your tools beforehand makes the whole process so much smoother. Here’s what I usually have on hand:
- Well-draining potting mix: A blend of peat moss, perlite, and a bit of orchid bark works wonders. You want something that holds moisture but doesn’t get waterlogged.
- Sharp pruning shears or a clean knife: For making precise cuts. Sterilize them with rubbing alcohol to prevent disease.
- Small pots or propagation trays: Whatever you have on hand works, just ensure they have drainage holes.
- Clear plastic bags or a propagation dome: To create a humid environment for cuttings.
- Water: For hydration, of course!
- Optional: Rooting hormone: While Grammitis moniliformis can root without it, a little dip can give cuttings a helpful boost.
Propagation Methods
This little fern is quite adaptable, and I find a couple of methods work particularly well.
Division
This is arguably the most straightforward way, especially if you have a mature plant.
- Gently remove the plant from its pot. If it’s stuck, give the pot a firm squeeze or run a knife around the edge.
- Examine the root ball. You’re looking for natural divisions – clumps of roots and fronds that seem to be growing separately.
- Carefully tease the root ball apart with your fingers or a clean tool. Try to keep as much of the root system intact on each division as possible.
- Pot each division into its own container with your prepared potting mix.
- Water gently and place in a warm spot with bright, indirect light.
Stem Cuttings (Rhizome Cuttings)
This method works best when you have a healthy, vigorous plant that’s producing new growth.
- Identify a healthy rhizome (the creeping stem) with a few fronds attached. These are often found growing along the surface of the soil.
- Using your sterilized shears or knife, carefully cut a section of the rhizome that’s at least an inch or two long. Make sure it has at least two or three fronds.
- Remove any lower fronds that might end up buried in the soil, as these tend to rot.
- You can dip the cut end into rooting hormone if you’re using it.
- Plant the cutting into your well-draining potting mix, burying the rhizome section just enough to keep it stable. The fronds should be above the soil.
- Water gently to settle the soil.
- Cover the pot with a clear plastic bag or a propagation dome to maintain high humidity. You can prop the bag up with a few skewers so it doesn’t touch the fronds.
The “Secret Sauce” (Pro Tips)
Here are a few little tricks I’ve learned over the years that can make a big difference:
- Don’t let those lovely fronds touch the water! Whether you’re doing divisions or cuttings, if the leaves are consistently sitting in water, they’re much more prone to rot. Make sure your potting mix is holding the moisture, not standing water.
- Bottom heat is your friend. Ferns, especially when trying to root, appreciate a little warmth from below. A seedling heat mat placed under your propagation trays can significantly speed up root development. Just make sure it’s not set too high – warm to the touch is perfect.
- Patience, dear friends, patience! Sometimes, you won’t see visible roots for weeks, and that’s perfectly normal. Resist the urge to constantly dig around and check. Trust the process.
Aftercare & Troubleshooting
Once your cuttings have rooted (you might see new frond growth or feel a gentle tug when you lightly pull on a frond), it’s time to transition them.
- Gradually acclimate them to lower humidity. Start by opening the plastic bag or propagation dome for a few hours each day.
- Continue to keep the soil consistently moist but not soggy.
- Provide bright, indirect light. Direct sun will scorch those delicate new leaves.
What if things go wrong? The most common culprit is rot. If you see your cuttings turning mushy or blackening at the base, it’s usually a sign of too much moisture and not enough air circulation. Unfortunately, rotten cuttings are usually a lost cause, but don’t despair! Just try again with fresh material and adjust your watering and humidity levels. Yellowing fronds could also be a sign of shock or insufficient light.
A Little Encouragement
Propagating plants is such a rewarding journey, and watching your Grammitis moniliformis multiply is a special kind of joy. Be patient with yourself and the process. Every gardener has had their share of failures, but each one teaches us something new. So go ahead, give it a try. I have a feeling you’ll be delighted with the results! Happy growing!
Resource:
https://identify.plantnet.org/k-world-flora/species/Grammitis%20moniliformis%20(Lag.)%20Proctor/data