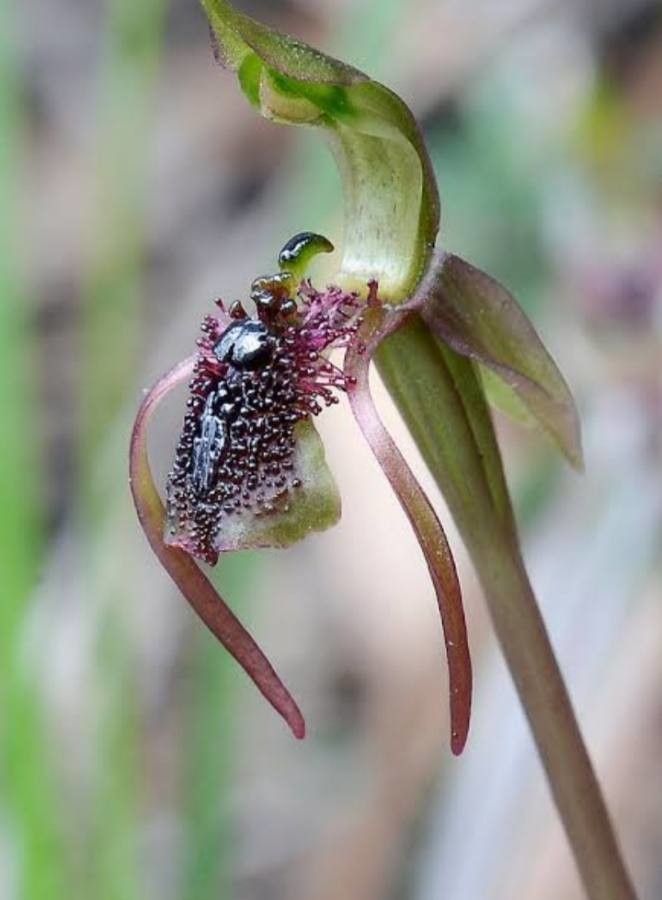
Hey there, fellow plant enthusiasts! Today, we’re diving into the delightful world of Chiloglottis reflexa, affectionately known as the Bird Orchid. If you’ve ever admired its charming, delicate blooms that mimic tiny flying birds, you’re not alone! Propagating these beauties can feel really special, like unlocking a little bit of plant magic for yourself.
Is it Easy or Tricky? Well, I’d say Chiloglottis reflexa is moderately easy, especially if you’re patient. It’s not quite as straightforward as a pothos cutting, but with a bit of care and attention, you’ll be rewarded with new orchids in no time. It’s a fantastic project for anyone looking to stretch their gardening wings a bit!
The Best Time to Start
Honestly, the sweet spot for propagating Chiloglottis reflexa is late spring or early summer, right after it’s finished flowering. This is when the plant is actively growing and has plenty of energy to put into developing new roots and shoots. You’re essentially catching it at its most vigorous.
Supplies You’ll Need
Here’s what you’ll want to have on hand to give your propagation a great start:
- Sharp, sterile pruning shears or a razor blade: Cleanliness is key to preventing disease.
- A good quality potting mix: I like a blend that’s well-draining. A mix for orchids, or a combination of fine bark, perlite, and a touch of peat moss, works wonders.
- Small pots or trays: Clean ones are a must.
- Rooting hormone (optional but recommended): A powder or gel can give your cuttings a helpful boost.
- Watering can with a fine rose or a spray bottle: Gentle watering is important for delicate new growth.
- Labels and a permanent marker: Trust me, you’ll forget what you planted where!
Propagation Methods
Now, let’s get our hands dirty! For Chiloglottis reflexa, division is the most successful and common method I’ve found, though I’ve had some luck with carefully managed cuttings too.
Method 1: Division (My Go-To)
This is like giving your orchid a little haircut and a new home.
- Gently remove the parent plant from its pot. Try to disturb the root ball as little as possible.
- Carefully tease apart the root ball. Look for natural divisions. You’re aiming for sections that have both leaves and healthy-looking rhizomes (those little underground stems). A rhizome is where new growth emerges from.
- Use your sterile shears or razor to separate the divisions. Make sure each division has at least one or two healthy leaves and a good portion of rhizome. If there are any damaged or rotted parts, trim them away.
- Pot each division into its own small pot. Use your well-draining orchid mix. Plant the rhizome just below the surface of the soil, with the leaves pointing upwards.
- Water lightly. You want the soil to be moist but not soggy.
Method 2: Stem Cuttings (A Little More Finesse)
This is where patience really pays off.
- Identify a healthy stem with at least two or three leaves. Look for one that’s firm and green.
- Using your sterile shears, make a clean cut just below a leaf node. A node is that little bump where a leaf attaches to the stem.
- Remove the lowest leaf. This exposes the node, which is where roots will ideally form.
- Dip the cut end into rooting hormone. Gently tap off any excess.
- Pot the cutting in your chosen potting mix. Stick the cut end about an inch deep into the soil. You can put a few cuttings in the same pot, but make sure they have a little space between them.
- Water gently.
The “Secret Sauce” (Pro Tips)
Here are a few little tricks I’ve learned over the years that seem to make all the difference:
- Don’t drown your cuttings! This is crucial. If you’re water propagating (which I don’t often do for these, but if you try, listen up!), make sure absolutely no leaves are touching the water. They will rot. For potted cuttings, aim for consistent, but not waterlogged, moisture.
- Bottom heat is your friend. If you’re doing stem cuttings, placing the pot on a seedling heat mat set to a gentle warmth (around 70-75°F or 21-24°C) can really encourage root development. It mimics the warmth of spring.
- Humidity is key, especially for cuttings. After potting your cuttings, you can create a mini-greenhouse effect by loosely covering the pot with a clear plastic bag supported by stakes. This helps retain moisture around the leaves while the roots are forming. Just be sure to open it daily for a bit of fresh air to prevent fungal issues.
Aftercare & Troubleshooting
Once you see those first signs of roots or new growth, congratulations! You’re on your way.
- Continue to water gently. Never let the soil dry out completely, but also avoid soggy conditions. The goal is consistently damp.
- Gradually introduce your new plants to more light. Start them in bright, indirect light and slowly acclimate them to your desired spot.
- Watch out for rot! This is the most common enemy of propagation. If you see mushy stems or leaves turning yellow and dropping off rapidly, it’s likely a sign of overwatering or poor drainage. If you spot rot on a division, you might be able to salvage healthy parts by cutting away the diseased bits and repotting. For cuttings that rot, it’s often a sign they didn’t get enough air or were too wet.
A Little Encouragement
Propagating plants is a journey, and sometimes it requires a bit of trial and error. Don’t get discouraged if your first attempt isn’t a roaring success. Each Orchid you nurture is a testament to your growing green thumb. Be patient, observe your plants, and most importantly, enjoy the process of bringing more beauty into your world! Happy growing!
Resource:
https://identify.plantnet.org/k-world-flora/species/Chiloglottis%20reflexa%20(Labill.)%20Druce/data