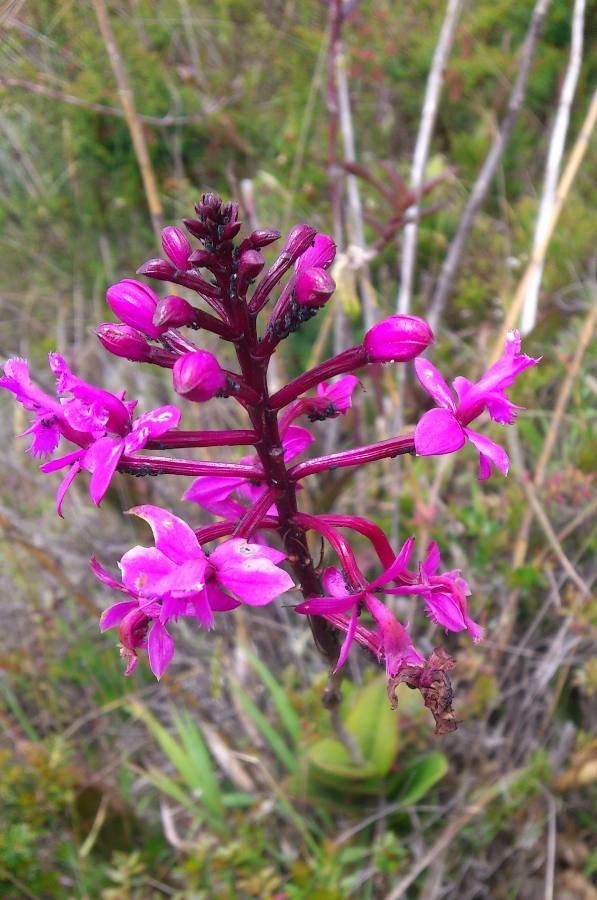
Hello, fellow plant enthusiasts! It’s so lovely to have you here. Today, I want to chat about a truly special orchid: Epidendrum jamiesonis. These beauties are just stunning, aren’t they? With their vibrant blooms and delicate nature, they really bring a touch of tropical magic to any space.
Now, I know some orchids can feel a bit intimidating, but I’m here to tell you that propagating Epidendrum jamiesonis is a wonderfully rewarding experience. And good news for beginners: it’s actually quite manageable! You’ll be sharing these gorgeous plants with friends before you know it.
The Best Time to Start
When it comes to getting the best results, timing is everything. I find that the late spring or early summer is often the sweet spot. This is when your Epidendrum jamiesonis is usually in its active growth phase, meaning it’s full of energy and ready to put down some roots. Waiting until after the plant has finished its main blooming cycle is also a good cue.
Supplies You’ll Need
Don’t worry, you don’t need a whole laboratory for this! A few simple tools will set you up for success:
- Sharp, sterilized pruning shears or a clean knife: A clean cut is crucial to prevent disease.
- Orchid potting mix: A well-draining blend is essential. I usually go for a mix that includes bark, perlite, and a bit of sphagnum moss.
- Small pots or trays: Make sure they have drainage holes.
- Rooting hormone (optional but recommended): This can give your cuttings a helpful boost.
- A spray bottle: For gentle misting.
- Clear plastic bags or a propagation dome: To create a humid environment.
- Labels: To keep track of your precious projects!
Propagation Methods
Epidendrum jamiesonis is a happy camper with a few different propagation techniques. Here are my go-to methods:
Stem Cuttings
This is probably the most common and effective way to propagate these orchids.
- Identify a healthy stem: Look for a stem that has at least two or three pseudobulbs (those thickened stem sections) and ideally, some developing aerial roots near the base.
- Make the cut: Using your sterilized shears, cut the stem just below a node (where a leaf attaches to the stem). Aim to take a cutting that’s about 4-6 inches long.
- Prepare the cutting: Gently remove any lower leaves that might rot if buried or submerged. If you’re using rooting hormone, lightly dust the cut end.
- Potting up: Fill your small pot with your well-draining orchid mix. Make a small hole in the center and insert the cut end of your stem into the mix. Gently firm the potting medium around the base to support the cutting.
- Water gently: Water the potting mix thoroughly. You want it to be moist, but not waterlogged.
Division (for larger plants)
If your Epidendrum jamiesonis has become quite large and bushy, you might be able to divide it.
- Gently remove the plant from its pot: Be very careful with the roots.
- Inspect the root ball: Look for natural divisions where you see healthy pseudobulbs and root systems.
- Separate the sections: Using your hands or a sterilized knife, carefully separate the plant into smaller sections, ensuring each section has at least 2-3 pseudobulbs and a good portion of roots.
- Repot: Pot each division into its own container with fresh orchid mix, just as you would a regular orchid plant. Water them in well.
The “Secret Sauce” (Pro Tips)
Here are a few little tricks I’ve learned over the years that really make a difference:
- Don’t let leaves sit in water: This is a big one, especially for stem cuttings if you choose to start them in water (though I prefer potting mix). Even in the pot, ensure no leaves are constantly pressed down into any standing water. This is a recipe for rot!
- The power of humidity: These orchids love a humid environment, especially when they’re trying to root. Once you’ve potted your cuttings, place the pot inside a clear plastic bag or cover it with a propagation dome. You can open it up for a bit of fresh air each day, but this enclosed environment will keep things nice and moist, encouraging root development.
- Bottom heat can be a game-changer: If you have a seedling heat mat, placing your pots on it during propagation can significantly speed up root formation. It mimics the warmth of a tropical environment and gives those roots a real kickstart.
Aftercare & Troubleshooting
Once your cuttings have started to show signs of life – new leaf growth or visible roots emerging from the potting mix – you’re on the right track!
Continue to keep the potting mix consistently moist but not soggy. Gradually introduce your new plants to more light, moving them from indirect light to brighter, but still filtered, sunlight. Don’t rush this transition.
The most common issue you might encounter is rot. This usually happens from overwatering or poor air circulation. If you see a cutting turning mushy or black, try to remove it immediately. Ensure your potting mix is draining well, and don’t be afraid to let the surface dry out slightly between waterings. Sometimes, a cutting just doesn’t make it, and that’s okay. Gardening is a journey of learning, and we all have our share of casualties!
A Little Patience Goes a Long Way
Propagating orchids is a process that rewards patience. Don’t get discouraged if you don’t see results overnight. Enjoy the quiet observation, the gentle care, and the satisfaction of nurturing new life. With a little love and these tips, you’ll be enjoying many more beautiful Epidendrum jamiesonis plants in no time. Happy growing!
Resource:
https://identify.plantnet.org/k-world-flora/species/Epidendrum%20jamiesonis%20Rchb.f./data