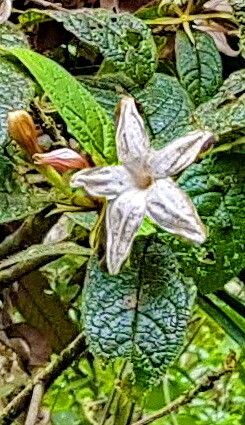
Hello there, fellow garden enthusiast! Today, we’re going to dive into something truly special: propagating Bremeria humblotii. If you’ve encountered this beauty, you’ll know why I’m so excited. Its delicate, trumpet-shaped flowers are an absolute showstopper, often appearing in a lovely shade of soft pink or rose. What’s even more rewarding than admiring one is creating more of them from a plant you already love. It’s like having a secret superpower for your garden!
Now, I’ll be honest. For absolute beginners, Bremeria humblotii can be a tad more challenging than, say, a pothos. It requires a bit of finesse. But don’t let that deter you! With a little care and attention to detail, you’ll be well on your way to success. Think of it as a charming project that truly pays off.
The Best Time to Start
The absolute sweet spot for propagating Bremeria humblotii is when the plant is actively growing. For most of us, this means late spring to early summer. We’re looking for new, yet somewhat firm, growth. Avoid taking cuttings from woody, old stems or during the plant’s resting period in winter. You want that youthful vigor on your side!
Supplies You’ll Need
Here’s what I always have on hand to get my propagation projects off to a flying start:
- Sharp, clean pruning shears or a sharp knife: A clean cut is crucial to prevent disease.
- Rooting hormone powder or gel: This isn’t always strictly necessary, but it does give your cuttings a significant boost and speeds up root development.
- A well-draining potting mix: I like to use a blend of equal parts perlite and peat moss or coco coir. You can also use a dedicated seed-starting mix.
- Small pots or trays: Clean containers are a must!
- Watering can with a fine rose attachment or a spray bottle: Gentle watering is key.
- Plastic bags or a propagator lid: To create a humid environment.
- (Optional but recommended) A heat mat: This can make a world of difference for encouraging root growth.
Propagation Methods
While Bremeria humblotii can be a bit particular, stem cuttings are generally the most successful and accessible method.
Propagating by Stem Cuttings:
- Select your stems: Look for healthy, non-flowering stems that are about 4-6 inches long. You want them to be semi-hardwood – meaning they’re not super flexible and green, but also not completely woody. You can usually tell by gently bending a stem; it should snap rather than just bend.
- Make the cut: Using your sterilized shears or knife, take a clean cut just below a leaf node. This is where roots are most likely to form.
- Prepare the cutting: Gently remove the lower leaves from the cutting, leaving just a few at the top. If the leaves are very large, you can even cut them in half to reduce water loss.
- Apply rooting hormone: Dip the cut end of the stem into your rooting hormone powder or gel, ensuring it’s lightly coated. Tap off any excess.
- Plant your cuttings: Make a small hole in your well-draining potting mix using a pencil or your finger. Insert the cutting into the hole and gently firm the soil around it. Don’t pack it too tightly!
- Create humidity: Water the soil gently until it’s evenly moist. Then, cover the pot or tray with a plastic bag or propagator lid. Make sure the plastic doesn’t touch the leaves too much – you can use stakes if needed.
- Find a good spot: Place your cuttings in a bright spot that receives indirect light. Direct sun will scorch them.
The “Secret Sauce” (Pro Tips)
Here are a few tricks that have helped me achieve consistently good results with my Bremeria humblotii cuttings:
- Bottom Heat is Your Friend: If you have a heat mat, place it under your pots or trays. This gently warms the soil and dramatically speeds up root formation, especially when temperatures might be a bit cooler. It’s like giving your cuttings a warm hug!
- Don’t Drown Them! While they need humidity, you don’t want soggy soil. Overwatering is the fastest way to rot your precious cuttings. Stick your finger into the soil; if it feels moist, hold off on watering.
- Patience, Grasshopper: I know it’s tempting to constantly check for roots, but try to resist! Give them at least 4-6 weeks. You’ll often see new leaf growth emerge before you see roots because the plant is storing energy.
Aftercare & Troubleshooting
Once you start to see signs of new growth (usually tiny leaves unfurling at the top), that’s a great indicator that roots are forming! You can also give the cutting a very gentle tug; if you feel resistance, you likely have roots.
At this point, you can gradually acclimate your new plant to the outside air. Start by opening the plastic bag or propagator lid for a few hours each day, slowly increasing the time over a week or two. Once they’re sufficiently hardened off, you can transplant them into their own individual pots using a good quality potting mix. Water them gently and continue to keep them in bright, indirect light.
The most common sign of failure you’ll see is rotting. If a cutting turns black and mushy, it’s likely gone too far due to overwatering or disease. Don’t be discouraged! It happens to the best of us. Just discard the rotted cutting and start again with fresh material and a slightly lighter touch on the watering.
A Little Patience Goes a Long Way
So there you have it! Propagating Bremeria humblotii might take a bit more care than some plants, but the reward of creating more of these stunning blooms is absolutely worth it. Be patient with the process, observe your cuttings closely, and enjoy the rewarding journey of nurturing new life. Happy propagating!
Resource: