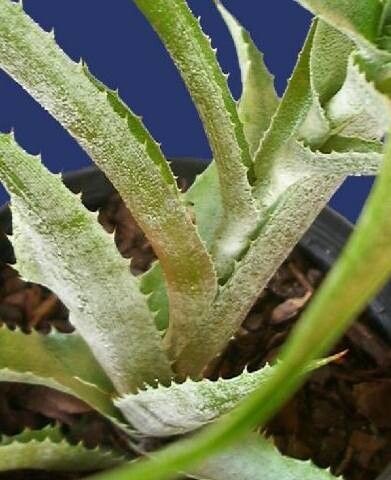
Hello fellow plant enthusiasts! I’m so excited to chat with you today about a real gem in the bromeliad family: Orthophytum foliosum. If you haven’t encountered this beauty, imagine a compact rosette of silvery, segmented leaves that look almost sculpted. It’s truly understated elegance, and bringing new plants into existence from your existing one? Pure garden joy. Now, for beginners, I’d say Orthophytum foliosum falls into the moderately easy category. It’s not as foolproof as a pothos, but with a little attention, you’ll be rewarded.
The Best Time to Start
When it comes to nudging these lovelies into making babies, the springtime is your best bet. Think of it as when everything else in the garden is waking up and feeling energetic, that’s when your Orthophytum will be too. Ideally, you want to propagate when the plant is actively growing, usually after it has finished blooming. Spring and early summer give the pups plenty of time to establish before cooler weather arrives.
Supplies You’ll Need
Before we dive into the magic, let’s gather our tools:
- Sharp, clean pruning shears or a knife: For making clean cuts. Sterilize them with rubbing alcohol before you start!
- Well-draining potting mix: I swear by a mix of equal parts perlite, orchid bark, and peat moss or coco coir. You can also use a specialized bromeliad mix if you have one. The key is drainage, drainage, drainage!
- Rooting hormone (optional but helpful): A powder or gel will encourage faster root development.
- Small pots or seedling trays: Whatever you have that will hold your new plants comfortably. Make sure they have drainage holes.
- Watering can with a fine rose: For gentle watering.
- A spray bottle: For misting.
- Plastic wrap or a clear plastic bag: To create a mini-greenhouse effect.
Propagation Methods
Orthophytum foliosum primarily propagates through division and pups. They don’t really do stem cuttings in the traditional sense, and water propagation isn’t ideal for these guys.
Division (The Most Common & Reliable)
This is how you’ll likely get most of your new plants. Over time, your Orthophytum will send up little baby plants, called pups, from its base.
- Gently remove the mother plant from its pot. If it’s a large plant, be prepared for it to be a bit root-bound.
- Examine the base of the mother plant. You’ll see where the pups are emerging. Look for pups that are at least a quarter of the size of the mother plant and ideally have a few tiny roots of their own already.
- Carefully separate the pups from the mother plant. Use your clean pruning shears or knife to make a clean cut, ensuring you get as many roots attached to the pup as possible. Don’t worry if you can’t get all the roots; the plant will grow more.
If a pup is really stubborn and there are no visible roots, it’s okay to still separate it. It might just take a little longer to root. - Let the cut end callus over. This is crucial! Place the separated pups in a dry, airy spot for a day or two. This prevents rot when you plant them.
- Pot up your pups. Fill your small pots with your well-draining mix. Make a small hole in the center and place the pup in, firming the soil gently around its base.
- Water lightly. Don’t drench them. Just a gentle mist or a small amount of water around the base is enough to settle the soil.
Pups (When division isn’t quite ready)
Sometimes, you’ll see pups that are too small to divide but have started to emerge. You can encourage them!
- Leave them attached to the mother plant. Let them grow until they are a decent size.
- Observe the base. As they grow, you might see tiny roots beginning to form where they attach to the mother plant.
- When they reach about ¼ to ½ the size of the mother plant, proceed with the division steps above.
The “Secret Sauce” (Pro Tips)
- Don’t overwater newcomers. This is probably the biggest pitfall. New divisions and pups are susceptible to rot. It’s far better to slightly underwater than to drown them. Wait until the soil is almost dry before watering again.
- Bottom heat is your friend. If you have the space, placing your newly potted pups on a seedling heat mat set to a low temperature (around 70-75°F or 21-24°C) can dramatically speed up root development. It mimics the warmth of spring and encourages growth.
- Patience with pups is key. Some pups will root and start growing visibly within weeks, while others might take a couple of months. Don’t despair if you don’t see immediate action. They are often working on their root system underground before they put on new leaf growth.
Aftercare & Troubleshooting
Once your pups are potted, treat them like a slightly more delicate version of the mother plant.
- Light: Place them in bright, indirect light. Avoid direct, harsh sun, which can scorch their delicate new leaves.
- Humidity: They appreciate a little extra humidity. Lightly misting their leaves every few days can be beneficial, especially if you don’t have a humidifier.
- Watering: As I mentioned, go easy on the watering. Check the soil every few days. If the top inch feels dry, it’s time for a light watering.
- Signs of trouble: The most common problem is rot, often indicated by mushy, brown stems or leaves. This is almost always due to overwatering or poor drainage. If you see this, act quickly: carefully remove the affected parts with your sterile knife and let any healthy sections callus over before repotting in fresh, dry soil. Another sign of stress is wilting or yellowing leaves, which could also point to overwatering or insufficient light.
Propagating your Orthophytum foliosum is a rewarding journey. It’s a tangible way to understand your plant’s life cycle and share its beauty with others. Remember to be gentle, give them the right environment, and most importantly, enjoy the process. Happy propagating!
Resource:
https://identify.plantnet.org/k-world-flora/species/Orthophytum%20foliosum%20L.B.Sm./data