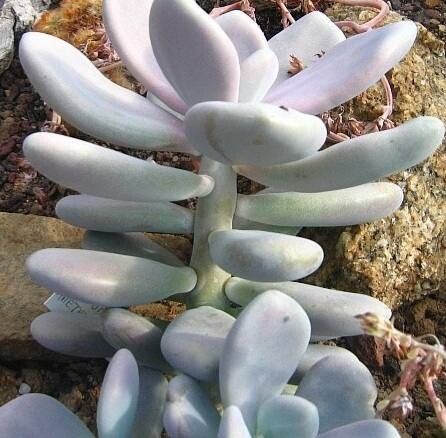
Oh, the sheer delight of watching a tiny new plant unfurl its first leaves! As a gardener for two decades, I can tell you that there are few things as satisfying as propagating your own little green babies. Today, we’re diving into the wonderful world of Graptopetalum amethystinum, affectionately known as the “Jewel Leaf” or “Amethyst Plant.” Its plump, pearly leaves, often blushing with a beautiful lavender or pink hue, are simply irresistible. And guess what? Propagating it is a joy, making it a fantastic choice even for those just dipping their toes into the gardening pool.
The Best Time to Start
For the most robust success, I always recommend propagating Graptopetalum amethystinum during its active growing season. That’s typically in the spring and early summer. The plant is brimming with energy then, and your cuttings will have a much better chance of taking off. Trying to propagate during its dormancy (fall and winter) is like asking a sleepy bear to run a marathon – it just won’t go well!
Supplies You’ll Need
Gathering your tools beforehand makes the whole process smoother. Here’s what I like to have on hand:
- Well-draining soil mix: A cactus/succulent mix is ideal. I often amend mine with a bit of perlite or pumice for extra drainage.
- Clean, sharp pruning shears or a knife: For making clean cuts.
- Rooting hormone (optional but helpful): Especially if you want to speed things up.
- Small pots or trays: Anything that will hold your cuttings and a bit of soil.
- Spray bottle: For gentle misting.
- Labels and a marker: To keep track of what you’ve propagated.
- A bright spot with indirect sunlight: For your new babies.
Propagation Methods
Graptopetalum amethystinum is wonderfully versatile, offering a few easy ways to multiply your collection.
Stem Cuttings
This is my go-to method for Graptopetalum amethystinum.
- Take your cuttings: Using your clean shears or knife, select a healthy stem. Make a cut just below a leaf node (where leaves attach to the stem). Aim for a cutting that’s at least 2-3 inches long, ideally with a few sets of leaves.
- Let them callous: This is crucial! Before planting, let your cuttings sit out in a dry, well-ventilated spot for a few days. You’ll see a dry, scab-like layer form over the cut end. This prevents rot when you plant them.
- Plant the cuttings: Once calloused, you can either dip the cut end in rooting hormone (if using) or go straight to planting. Stick the calloused end about an inch deep into your prepared, slightly moist soil mix.
- Water sparingly: Give the soil a light watering. You don’t want it soggy.
Leaf Cuttings
This method takes a little more patience, but it’s so rewarding to see a whole new plant emerge from a single leaf!
- Remove leaves: Gently twist or cut individual leaves from the main stem. Try to get as much of the leaf base as possible – where it was attached to the stem is where the magic happens.
- Let them callous: Just like stem cuttings, allow the cut ends of the leaves to dry and form a callous for a few days.
- Place them on soil: Lay the calloused leaves on top of your well-draining soil mix in a pot or tray. You don’t need to bury them.
- Mist occasionally: Keep the soil lightly moist by misting with your spray bottle every few days.
Division
If your Graptopetalum amethystinum has produced offsets (baby plants growing from the base), division is a quick way to get new plants.
- Gently extract offsets: Carefully remove the main plant from its pot. You can then gently pull or cut away the offsets from the mother plant, ensuring each offset has some roots attached.
- Let them callous (if needed): If any root ends were broken, let them callous for a day or two.
- Pot them up: Plant each offset in its own small pot with your well-draining soil, watering lightly.
The “Secret Sauce” (Pro Tips)
Over the years, I’ve learned a few little tricks that can really boost your success.
- Don’t let leaves touch the water when water propagating: If you choose to try water propagation for stem cuttings (which I tend to avoid for Graptopetalum in favor of soil, as it’s more prone to rot), ensure only the very bottom of the stem is submerged. Any leaves in the water will quickly turn mushy and rot.
- Bottom heat can be a game-changer: For faster rooting, especially if your house is a bit cool, placing your pots on a gentle seedling heat mat can significantly speed up the process. It mimics the warmth of springtime. Just ensure the heat isn’t too intense!
- Patience is truly a virtue: Graptopetalum amethystinum isn’t the fastest propagator. Don’t be discouraged if you don’t see roots appear for several weeks. Nature takes its time!
Aftercare & Troubleshooting
Once you see signs of life – new leaf buds forming on stem cuttings or tiny roots and baby leaves emerging from leaf cuttings – it’s time for a little extra TLC.
Care for Your New Sprouts:
- Gradually expose to more light: As your new plants grow stronger, you can slowly introduce them to brighter, indirect light.
- Water when the soil is dry: Continue to water only when the soil feels dry to the touch. Overwatering is the biggest enemy of succulents.
- Wait to fertilize: Hold off on any fertilizer for the first few months. Let them establish healthy roots first.
Common Issues:
- Rot: This is usually a sign of too much moisture. The leaves or stems will turn black and mushy. If you catch it early on a stem cutting, you can try to cut away the rot and let the healthy part callous again. For leaf cuttings, it often means the leaf is lost.
- No roots: This usually points to a need for more warmth, light (but not direct sun!), or simply more time. Ensure your cuttings have calloused properly and are in slightly moist soil.
A Little Nurturing Goes a Long Way
Propagating Graptopetalum amethystinum is a wonderful journey. It’s a chance to connect with nature, to celebrate resilience, and to fill your home with beautiful, unique plants. Don’t be afraid to experiment, and remember that even the most experienced gardeners have the occasional plant that doesn’t make it. Just keep trying, be patient, and most importantly, enjoy the process of nurturing those tiny green shoots. Happy propagating!
Resource: