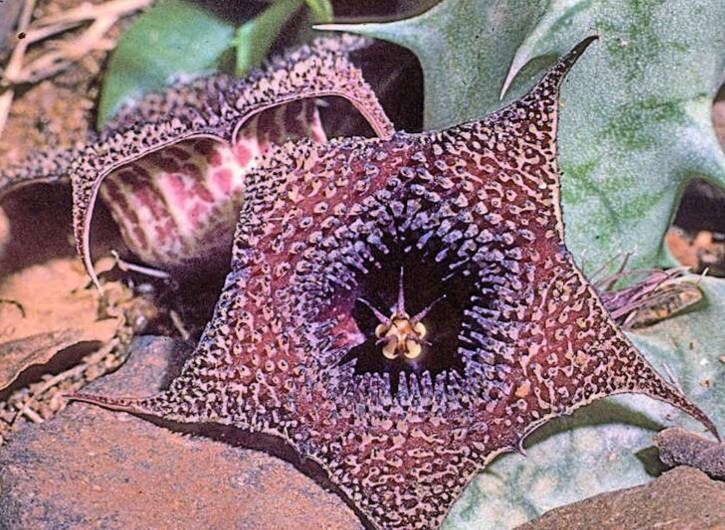
Well hello there, fellow plant lovers! It’s so nice to have you here today. We’re going to chat about one of my absolute favorite plants: the Huernia saudi-arabica. You know, those quirky, star-shaped flowers that look like they’ve beamed in from another planet? They’re just so… unique. And the best part? You can grow your own! Propagating these little wonders is incredibly rewarding, and honestly, it’s not as daunting as you might think. If you’re new to the plant world, this is a fantastic one to start with.
The Best Time to Start
For Huernia saudi-arabica, I find that the happiest time to start propagating is during its active growing season. Think late spring through early autumn. This is when the plant is brimming with energy and will be most receptive to putting out new roots. Starting a bit earlier in the spring gives your new cuttings plenty of time to establish before the cooler weather arrives.
Supplies You’ll Need
Gathering your supplies beforehand makes the whole process so much smoother. Here’s what I always have on hand:
- Well-draining potting mix: A cactus and succulent mix is perfect, or you can whip up your own with potting soil, perlite, and coarse sand.
- Sharp pruning shears or a clean knife: For taking clean cuts. Blurriness is the enemy here!
- Rooting hormone (optional but recommended): This liquid or powder stuff really gives your cuttings a boost.
- Small pots or rooting trays: Ones with drainage holes, of course.
- Dibber or pencil: To make a neat hole for your cutting.
- Watering can with a fine rose: For gentle watering.
- Optional: Heating mat: For a little extra warmth, especially in cooler climates.
Propagation Methods
Let’s get our hands dirty! Huernia saudi-arabica is wonderfully cooperative and typically propagates best through stem cuttings.
Stem Cuttings
This is my go-to method, and it’s incredibly straightforward.
- Select a healthy stem: Look for a mature, firm stem that’s at least a few inches long. Avoid anything that looks thin, weak, or dried out.
- Make the cut: Using your sterilized pruning shears or knife, make a clean cut just above a node (the little bump where leaves or aerial roots form).
- Let it callus: This is crucial! Lay the cuttings on a dry surface, out of direct sun, for 2 to 5 days. You want the cut end to dry out and form a callous. This prevents rot when you plant it.
- Apply rooting hormone (optional): If you’re using it, dip the calloused end into the rooting hormone, tapping off any excess.
- Plant your cutting: Fill your small pot with your well-draining mix. Use your dibber or pencil to make a hole deep enough for the calloused end. Gently insert the cutting and firm the soil around it.
- Water sparingly: Water just enough to settle the soil. You don’t want it soggy.
- Provide bright, indirect light: Place your newly planted cutting in a spot that gets plenty of light but no harsh direct sun.
Water Propagation (with a caveat)
While it’s possible to root Huernia cuttings in water, I’m a bit cautious with this method for succulents like these. If you choose this route, ensure absolutely none of the stem is submerged in the water. You want only the very tip to be in contact. Change the water every few days to keep it fresh. The risk of rot is higher with water propagation, so I lean towards soil for better aeration.
The “Secret Sauce” (Pro Tips)
Here are a few little tricks I’ve learned over the years that really help:
- Don’t overwater initially: This is the biggest killer of succulent cuttings. The calloused stem has stored water, and the soil should be allowed to dry out slightly between waterings. Think “sip, not a gulp!”
- Bottom heat makes a difference: If you have a heating mat, place your pots on it. This gentle warmth encourages root development from below. It’s like a spa treatment for your cuttings!
- Patience is your superpower: Some cuttings will root in a few weeks, while others might take a couple of months. Don’t get discouraged! They’re just taking their sweet time.
Aftercare & Troubleshooting
Once you see signs of new growth – a tiny sprout emerging or a gentle tug on the cutting revealing resistance – you know roots are forming!
- Gradually increase watering: As your plant establishes, you can water a bit more generously, allowing the soil to dry out somewhat between waterings.
- Move to slightly brighter light: Once the roots are confirmed, you can slowly introduce it to brighter light conditions, still avoiding intense, direct afternoon sun.
- Watch out for rot: The most common issue is rot, which looks like a mushy, dark, or discolored stem. If you see this, the cutting is likely lost. Prevent it by ensuring excellent drainage and avoiding overwatering.
- Shriveling: If your cutting shrivels up but isn’t mushy, it might just be using up its stored energy while waiting for roots. Keep it in a bright spot and resist the urge to water too much.
A Bit of Patience Goes a Long Way
There you have it! Propagating your own Huernia saudi-arabica is a wonderfully satisfying journey. Just remember to be patient, provide the right conditions, and trust in the process. Soon enough, you’ll have a cluster of these fascinating plants to admire and share. Happy propagating!
Resource:
https://identify.plantnet.org/k-world-flora/species/Huernia%20saudi-arabica%20D.V.Field/data