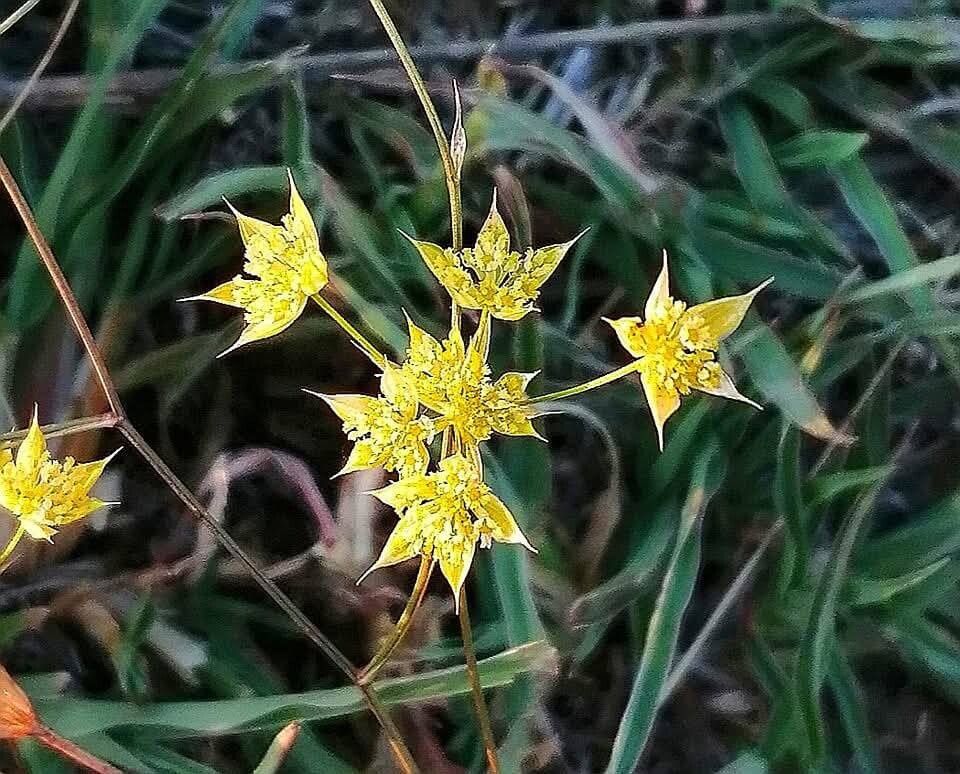
Oh, Bupleurum! If you’re looking for a plant that brings a touch of airy elegance to your garden, you’ve found a winner. I’ve been growing Bupleurum apiculatum for years, and it never fails to charm with its delicate, cloud-like blooms and lovely branching habit. It’s like having little wisps of fog dancing amongst your other plants. Best of all, it’s wonderfully rewarding to propagate. For those just starting out on their plant-parenting journey, I’d say Bupleurum leans towards being moderately easy. A little gentle guidance, and you’ll have plenty of new plants to share!
The Best Time to Start
My favorite time to get Bupleurum going is in late spring to early summer. This is when the plant is actively growing and has plenty of energy to put into rooting. You’ll want to select stems that are semi-hardwood, meaning they’re not brand new and floppy, but not old and woody either. Think of it like a pencil – firm enough to hold its shape, but not so hard that it snaps.
Supplies You’ll Need
Let’s get our toolkit ready for some propagation fun!
- Sharp Pruning Shears or a Craft Knife: For clean cuts, which are so important.
- Rooting Hormone (Optional, but recommended for beginners): A little boost can make a big difference. I like the powder kind.
- Well-Draining Potting Mix: A good blend is a mix of peat moss or coco coir, perlite, and a little compost. You want it light and airy.
- Small Pots or Seedling Trays: Clean ones, please!
- Clear Plastic Bags or a Humidity Dome: To create a greenhouse effect.
- Watering Can or Spray Bottle: For gentle watering.
- Labels and a Marker: Trust me, you’ll thank me later for labeling!
Propagation Methods
I find that stem cuttings are my go-to for Bupleurum. It’s reliable and gives you a great chance of success.
- Take Your Cuttings: Using your clean shears, select a healthy stem from your mature Bupleurum plant. Cut a piece that’s about 4-6 inches long. Try to make your cut just below a leaf node (where leaves attach to the stem). This is where good things happen in terms of rooting.
- Prepare the Cuttings: Gently strip off any lower leaves from the cutting, leaving only the top two or three sets of leaves. If the leaves are quite large, you can even snip them in half to reduce water loss.
- Apply Rooting Hormone (Optional but helpful): Dip the cut end of the stem into your rooting hormone powder. Tap off any excess. This stuff really helps encourage those root cells to form.
- Plant Your Cuttings: Fill your clean pots with your well-draining potting mix. Make a little hole with your finger or a pencil, and insert the cut end of the Bupleurum cutting into the hole. Gently firm the soil around the stem.
- Provide Humidity: Water the soil gently, just enough to moisten it. Then, cover the pots with a clear plastic bag or place them under a humidity dome. This creates a humid environment that helps the cuttings not dry out before they develop roots. You can prop the bag up with a few sticks if it starts to droop.
The “Secret Sauce” (Pro Tips)
Here are a few tricks I’ve picked up over the years that really boost my Bupleurum propagation success:
- Don’t Let the Leaves Touch the Water: If you’re attempting water propagation (which can work for Bupleurum, but I find cuttings in soil more reliable), ensure the leaves are well above the waterline. If they sit in water, they’re much more prone to rotting.
- Bottom Heat is Your Friend: If you have them, placing your pots on a gentle heating mat can really speed up root development. It mimics the warmth of spring soil and gives those roots a nice, cozy environment to emerge from.
- Patience is Key with Bupleurum: Some plants are instant gratifiers. Bupleurum, bless its heart, likes to take its time. Don’t be tempted to tug on the cuttings too soon to check for roots. Wait at least 3-4 weeks before giving them a very gentle tug. You’ll feel resistance when roots have formed.
Aftercare & Troubleshooting
Once you start to see signs of new growth, like tiny new leaves appearing or you feel that lovely resistance when gently tugging, you know your Bupleurum cuttings have rooted!
At this stage, gradually acclimate your new plants to drier air. You can start by removing the plastic bag for a few hours each day, slowly increasing the time until they are fully out. Continue to keep the soil consistently moist but not soggy. A good rule of thumb is to water when the top inch of soil feels dry.
The most common problem you’ll encounter is rot. If a cutting looks limp, mushy, or turns black, it’s likely succumbed to rot. This usually happens if the soil is too wet or the air circulation is poor. If you see this, remove the affected cutting immediately to prevent it from spreading. Don’t get discouraged! Sometimes, even with the best care, not every cutting will make it.
A Little Encouragement
Watching a tiny stem transform into a whole new, beautiful plant is one of the most magical parts of gardening. Propagating Bupleurum apiculatum is a wonderful way to expand your collection and share the joy of these charming plants. Be patient with the process, enjoy the quiet satisfaction of nurturing them, and celebrate each new root and leaf you see. Happy propagating!
Resource:
https://identify.plantnet.org/k-world-flora/species/Bupleurum%20apiculatum%20Friv./data