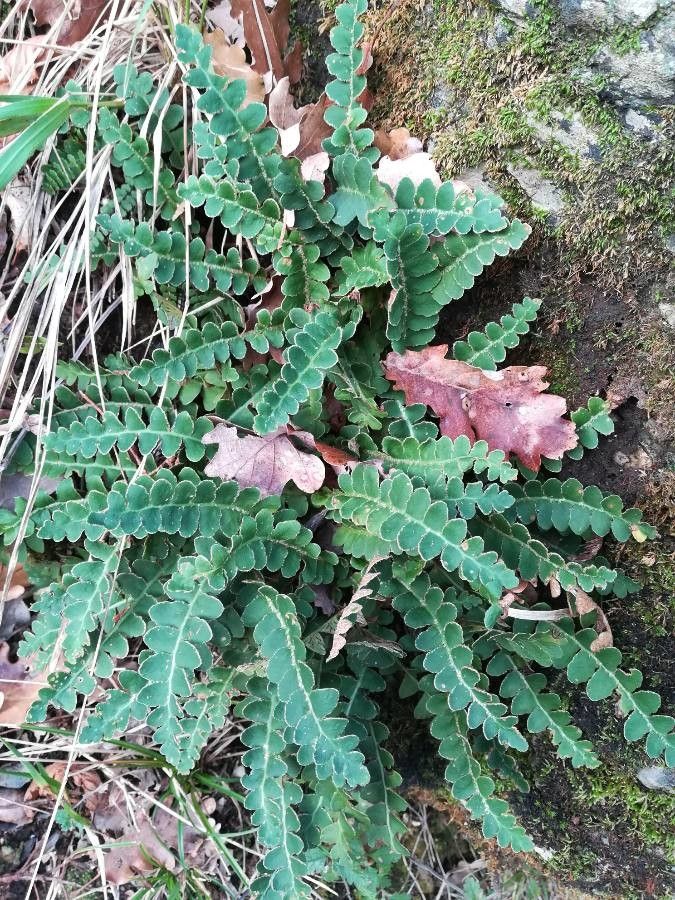
Ah, the Asplenium ceterach, also known as the Rustyback Fern. What a gem! If you’ve ever admired its tough, leathery leaves, often with that charming rusty underside, you’re not alone. I’ve been captivated by this resilient fern for years. It’s got a certain stoic beauty, doesn’t it? And the great news? Propagating it is a wonderfully rewarding project, though I’ll be honest, it’s not quite sitting on the “beginner’s easiest” shelf. It takes a little patience and observation, but the satisfaction of nurturing a new plant from a piece of an old one is truly special. So, let’s dive in!
The Best Time to Start
For Asplenium ceterach, spring and early summer are your golden windows. This is when the plant is actively growing and has the most energy stored. You’ll see new fronds unfurling, which tells you the plant is ready to put its best foot forward for propagation efforts. Trying this during dormancy in winter is generally a recipe for disappointment.
Supplies You’ll Need
Gathering your tools beforehand makes the whole process smoother. Here’s what you’ll want to have on hand:
- Sharp, clean pruning shears or a sharp knife: For making clean cuts.
- Sterile potting mix: A blend specifically designed for ferns or a mix of equal parts peat moss, perlite, and coco coir works beautifully. It needs to be light and airy.
- Small pots or trays: Clean ones! A few inches in diameter are perfect for starting out.
- Plastic bags or propagation domes: To maintain humidity.
- Watering can with a fine rose: For gentle watering.
- Optional: Rooting hormone powder: While not strictly necessary for ceterach, it can give a little boost.
- Optional: Heat mat: For bottom heat, which can speed things up.
Propagation Methods
Asplenium ceterach is a bit of a unique character, and while it can be propagated, it’s not always the most straightforward from cuttings. The most reliable method I’ve found for home gardeners is division.
Division: The Tried and True
This is how I usually go about it, especially if you have a more mature plant that’s starting to look a little crowded.
- Gently remove the parent plant from its pot. Turn the pot on its side and ease the fern out, supporting it with your hand. If it’s really stuck, a gentle tap on the pot rim usually does the trick.
- Inspect the root ball. Look for natural divisions, segments where the plant has naturally started to split or where distinct crowns (the center where new fronds emerge) are appearing.
- Carefully tease apart the roots. Use your fingers or a clean knife to gently separate the sections. The goal is to keep as much healthy root attached to each new division as possible. Don’t be afraid to get your hands dirty here; it’s part of the fun!
- Prepare your new pots. Fill them with your prepared sterile potting mix. Make a little well in the center of each.
- Plant the divisions. Place each division into its pot, ensuring the rhizome (the thickened underground stem) is just at the soil surface or slightly covered. Water gently to settle the soil around the roots.
The “Secret Sauce” (Pro Tips)
Now, for a few little tricks I’ve picked up over the years that can make a difference:
- Think “humid cave.” Ceterach ferns love consistent moisture but hate soggy feet. After planting your divisions, mist them lightly and then cover the pots with a clear plastic bag or propagation dome. This creates a humid microclimate that mimics their natural rainforest home and prevents the delicate new growth from drying out before the roots are established. Keep them out of direct sun, as this can scorch the leaves and cause condensation to build up too much inside.
- Avoid the “dunking” disaster. If you were to attempt propagating from leaf fragments (which is very difficult for this specific fern), never let the cut ends of the frond sit directly in water. They will rot instantly. Instead, keep the soil consistently moist in the pot. With division, this is less of a concern, but it’s a good general fern rule to remember!
- Bottom heat is your friend (sometimes). If you have a heat mat, placing your potted divisions on it can encourage root development significantly. Just ensure the soil doesn’t dry out completely when using bottom heat.
Aftercare & Troubleshooting
Once your divisions are potted and nestled into their humid homes, the real waiting game begins.
- Keep it moist, but not waterlogged. Check the soil every day or two. It should feel damp to the touch, but not soggy. If the soil is drying out, mist the leaves lightly and water the soil gently.
- Gradually acclimate. After a few weeks, if you see signs of new growth (tiny unfurling fronds), you can start to gradually remove the plastic bag for increasing periods each day. This helps the new plant adjust to lower humidity.
- Watch for rot. The most common sign of failure is mushy, black stems or leaves, usually accompanied by a foul smell. This is almost always a sign of overwatering and poor air circulation. If you see this, remove the affected parts immediately and allow the soil to dry out more. Sometimes, the whole division is lost, but don’t despair.
A Little Patience, A Lot of Reward
Propagating Asplenium ceterach really is about patience and observation. Don’t be discouraged if your first attempt isn’t a runaway success. Every plant is a learning experience. Enjoy the process, the quiet contemplation as you check on your new fern babies, and celebrate every tiny unfurling frond. Happy propagating!
Resource:
https://identify.plantnet.org/k-world-flora/species/Asplenium%20ceterach%20L./data