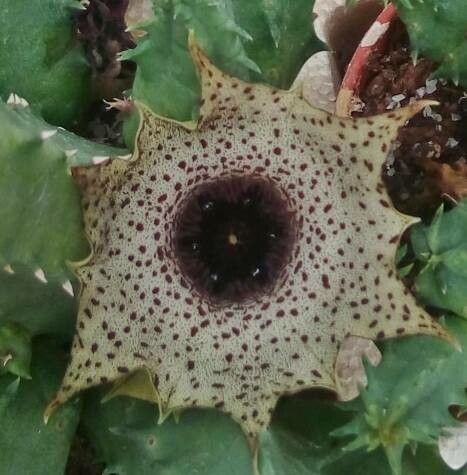
Hey there, fellow plant lovers! I’m so excited to talk to you today about a truly fascinating succulent: Huernia kirkii. If you’ve ever seen one of these beauties, you’ll know why. They boast these incredible, star-shaped flowers that are just breathtaking, often in shades of deep red or speckled patterns. Plus, their unusual stem structures are a real conversation starter.
Now, if you’re thinking about starting your own Huernia kirkii farm, you’ll be glad to hear that propagating this plant is surprisingly rewarding and quite achievable, even for beginners. It’s a fantastic way to expand your collection or share these quirky charmers with friends.
The Best Time to Start
For the highest success rate, I always recommend starting your propagation projects in the spring or early summer. This is when the plant is in its active growing season. The warmer temperatures and increased daylight encourage faster rooting and healthier development for your new plants. Think of it as giving them the best possible head start.
Supplies You’ll Need
Gathering your supplies beforehand makes the whole process smoother. Here’s what I usually have on hand:
- Well-draining potting mix: A cactus and succulent mix is perfect. I often add a bit of extra perlite or pumice for even better aeration.
- Sharp pruning shears or a clean knife: Essential for making clean cuts. Sterilize them with rubbing alcohol to prevent disease.
- Rooting hormone (optional but recommended): This can give your cuttings a little boost in developing roots.
- Small pots or containers: With drainage holes, of course!
- Spray bottle: For misting.
- Labels and a marker: To keep track of your propagates.
Propagation Methods
Huernia kirkii is a trooper, and it’s quite forgiving. The most common and successful methods are stem cuttings and division. I’ll walk you through them.
Stem Cuttings
This is my go-to method for Huernia kirkii.
- Take your cuttings: In spring or early summer, use your sterilized pruning shears or knife to carefully cut sections of a healthy stem. Aim for pieces that are at least 2-3 inches long. You can take multiple cuttings from a single mature stem.
- Let them callous: This is crucial! Remove any leaves from the bottom of the cutting. Then, lay the cuttings on a dry surface in a well-ventilated area for 3-7 days. You want the cut end to dry and form a callus. This prevents rot when you plant them.
- Dip in rooting hormone (optional): Once calloused, lightly dip the cut end into rooting hormone, tapping off any excess.
- Plant the cuttings: Fill your small pots with your well-draining potting mix. Make a small hole in the soil with your finger or a pencil. Insert the calloused end of the cutting into the hole, making sure it’s snug but not packed too tightly.
- Water sparingly: Give the soil a very light watering. You don’t want it soggy.
Division
If your Huernia kirkii has become a bit of a clump, dividing is a great way to create new plants and rejuvenate the parent.
- Gently remove from pot: Carefully take your Huernia kirkii out of its pot.
- Loosen the root ball: Gently tease apart the soil and roots. You’re looking for natural breaks where sections of the stem and their associated roots can be separated.
- Separate the divisions: Using your hands or a clean knife, gently pull or cut the plant into smaller sections. Each division should have some stems and a decent root system.
- Let calloused (if needed): If you had to cut through any thick roots, let those sections dry and callous for a day or two, just like stem cuttings.
- Pot up the divisions: Plant each division in its own pot filled with your well-draining mix. Water just enough to moisten the soil.
The “Secret Sauce” (Pro Tips)
Here are a couple of tricks I’ve learned over the years that really make a difference:
- Don’t overwater initially: This is the number one killer of succulent cuttings. While they need moisture to root, they are much more susceptible to rot when they don’t have established roots. Let the soil dry out almost completely between waterings.
- Consider bottom heat: If you’re propagating in a cooler environment or during a slightly less warm period, placing your pots on a heat mat can really speed up root development. It mimics the warmth of spring soil.
Aftercare & Troubleshooting
Once your cuttings or divisions are planted, patience is key!
- Watering: Water very sparingly for the first few weeks. Wait until the soil feels dry to the touch before watering again. As roots develop, you can gradually increase watering frequency, but always err on the side of caution.
- Light: Place your new plants in a spot with bright, indirect light. Avoid direct sun, which can scorch their tender new growth.
- Signs of success: You’ll know they’re rooting when you see new growth emerging, or if you gently tug on the cutting and feel resistance. This can take anywhere from 2 weeks to a couple of months.
- Troubleshooting: Rot: The most common problem is rot. If you see a cutting or division turning mushy, yellow, or black, it’s likely to rot. Unfortunately, once rot sets in, it’s hard to save. Prevention is key – this means good drainage, proper watering, and always letting cuttings callous. If a cutting rots, discard it to prevent it from spreading.
A Little Encouragement
Propagating plants is a journey, and Huernia kirkii is a wonderful companion on that path. Don’t get discouraged if your first attempt isn’t perfect. Each plant and each cutting is a chance to learn and grow. Enjoy the process of nurturing these unique specimens, and soon you’ll have a lovely collection to admire! Happy propagating!
Resource:
https://identify.plantnet.org/k-world-flora/species/Huernia%20kirkii%20N.E.Br./data