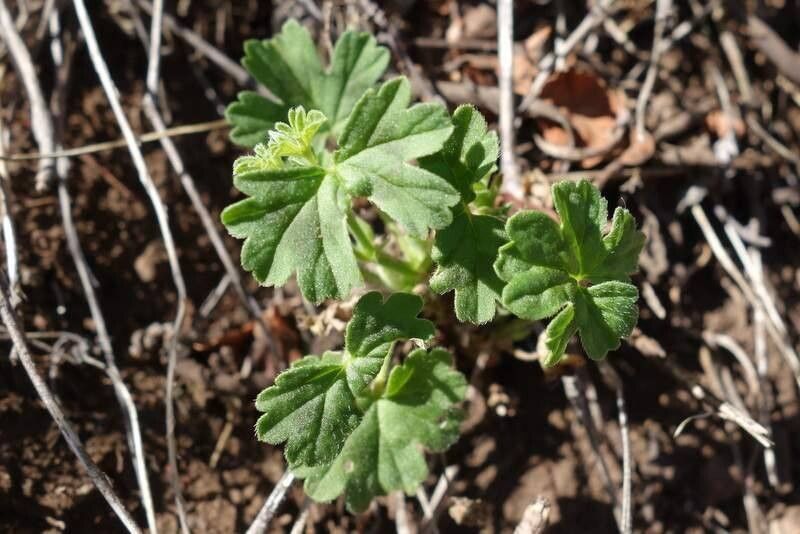
Hello fellow garden enthusiasts! If you’ve had the pleasure of growing Pelargonium alchemilloides, you know its charm. Those distinctive lobed leaves, often with a subtle silvery sheen, make it a really lovely addition to any collection. And the best part? It’s not just beautiful, it’s wonderfully rewarding to propagate. For those just starting out, I’d say Pelargonium alchemilloides is quite beginner-friendly on the propagation front, which is fantastic news! It’s a plant that genuinely wants to grow, and giving you lots of new little baby plants is all part of its generous nature.
The Best Time to Start
For the absolute highest success rate, I always reach for my pruning shears in late spring or early summer. This is when the plant is in its most vigorous growth phase. You’re looking for healthy, new shoots that aren’t too woody yet. Think of it as capturing that burst of energy from the plant.
Supplies You’ll Need
Ready to get your hands dirty? Here’s what I always have on hand:
- Sharp pruning shears or a clean knife: Essential for a clean cut.
- Rooting hormone (optional but recommended): Helps encourage robust root development. I often use a powder.
- Well-draining potting mix: A good base is a mix of peat moss, perlite, and a little coarse sand. You can also buy specific succulent or cactus mixes.
- Small pots or trays: Clean ones, of course! About 3-4 inches in diameter are perfect.
- Watering can or spray bottle: For gentle watering.
- Plastic bags or a small propagator: To create a humid environment.
- Labels and a marker: Don’t forget to label your new babies!
Propagation Methods
Let’s get propagating! Pelargonium alchemilloides is a champ at stem cuttings, and it’s my go-to method.
Stem Cuttings:
- Select your cuttings: Look for a healthy stem that has at least two or three leaf nodes. A node is where a leaf attaches to the stem.
- Make the cut: Using your clean shears or knife, make a cut just below a leaf node. A sharp, angled cut is best. Aim for cuttings that are about 4-6 inches long.
- Remove lower leaves: Gently strip off any leaves from the bottom half of the cutting. You want to expose the nodes where roots will form.
- Apply rooting hormone (optional): Dip the cut end of the stem into your rooting hormone, tapping off any excess. If you’re not using hormone, that’s fine too, it will just take a little longer.
- Plant your cuttings: Fill your small pots with your well-draining potting mix. Make a small hole in the center with your finger or a pencil, and gently insert the cut end of the stem into the soil. Press the soil firmly around the stem to ensure good contact.
- Water gently: Water the soil thoroughly but avoid saturating it. You want it evenly moist, not soggy.
- Create humidity: Cover the pot loosely with a plastic bag or place it in a propagator. This helps keep the moisture in, preventing the cuttings from drying out before they can root. Make sure the leaves aren’t touching the plastic if possible – this can encourage rot.
The “Secret Sauce” (Pro Tips)
Here are a few tricks I’ve learned over the years that really boost success:
- Let them callous: After you take your cuttings and remove the lower leaves, I like to let them sit out in a dry, airy spot for 24 to 48 hours. This allows the cut end to dry and form a ‘scab’ or callous. This helps prevent rot when you plant them.
- Bottom heat is your friend: If you can, place your pots on a heated propagator mat. A little warmth from below can really encourage roots to form more quickly. It mimics that lovely spring soil temperature.
- Don’t overwater! This is probably the biggest mistake beginners make. The cuttings have no roots yet, so they can’t take up much water. Keep the soil consistently moist but never waterlogged. A slight drying out between waterings is often better than too much.
Aftercare & Troubleshooting
Once your cuttings have been in the soil for a few weeks, give them a gentle tug. If there’s resistance, you’ve got roots! You can also look for tiny new leaves starting to emerge.
At this point, you can remove the plastic bag or propagator lid gradually over a few days to help the new plant acclimatize to normal humidity. Continue to water when the top inch of soil feels dry. Once the roots are well-established and you see good growth, you can transplant your new Pelargonium alchemilloides into its own pot.
The most common issue you might face is rot. If your cutting looks mushy, turns black at the base, or wilts dramatically without any signs of dryness, it’s likely rot. This is usually due to overwatering or poor drainage. If you catch it early, you might be able to salvage a healthy part of the stem. If the whole cutting is affected, it’s time to start again. Don’t be discouraged; it happens to the best of us!
A Closing Thought
Propagating Pelargonium alchemilloides is such a satisfying journey. It’s a small act of creation, and watching those tiny roots develop is pure magic. Be patient, enjoy the process, and soon you’ll have an abundance of these lovely plants to enjoy or share with friends. Happy gardening!
Resource: