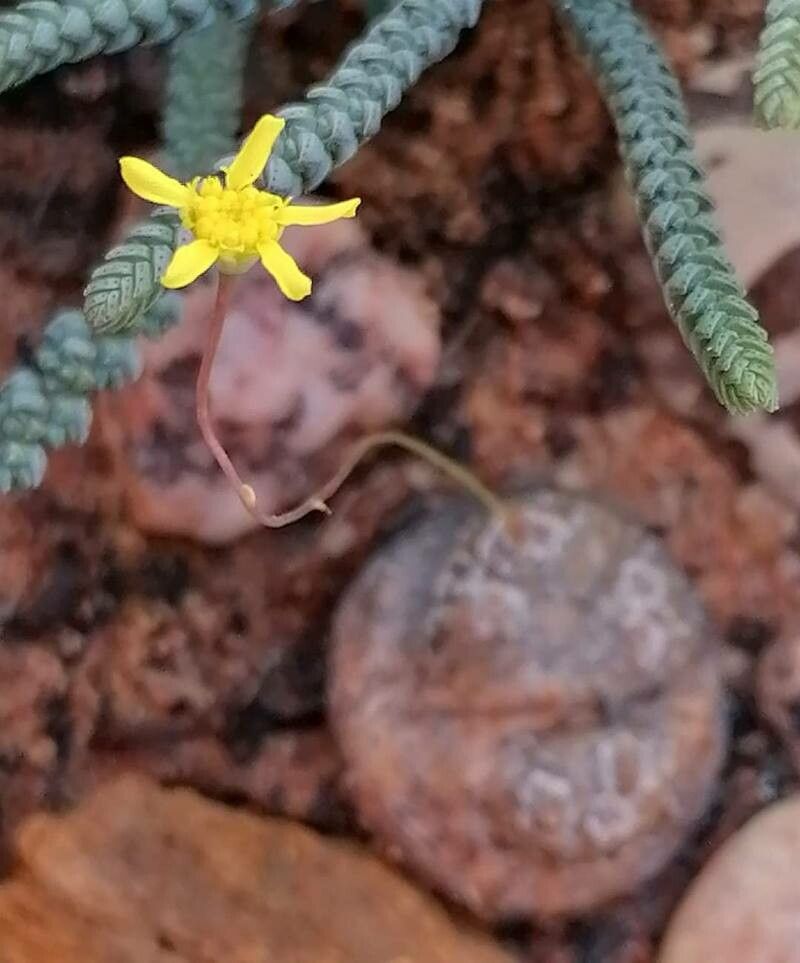
Hello fellow plant lovers! Let’s chat about a real gem in the succulent world: Othonna cacalioides. Also known as “Little Pickles” or “Little Yellow Heads,” this cheerful little succulent is an absolute joy to have in any collection. Its vibrant green, plump leaves, often with a delightful ruby blush on their edges, are like tiny jewels. Plus, when it blooms, those cheerful yellow flowers are simply adorable. Propagating it yourself is incredibly rewarding. You get to multiply that joy, share the love with friends, and gain a deeper understanding of this charming plant. And the best part? For us enthusiasts, Othonna cacalioides is a wonderfully forgiving plant to propagate. Even if you’re just starting your succulent journey, you’ll likely find success here!
The Best Time to Start
When it comes to getting your cuttings to root, spring and early summer are your golden months. This is when the plant is actively growing and has plenty of energy to put into developing new roots. Starting during its period of active growth means your cuttings will be more vigorous and have a better chance of taking off quickly. I usually find that if I take cuttings just before the plant really bursts into spring growth, things go swimmingly.
Supplies You’ll Need
To get started, gather a few essentials:
- Sharp Pruning Shears or a Clean Knife: For taking clean cuts.
- Well-Draining Potting Mix: A succulent or cactus mix is perfect. You can also make your own by mixing potting soil with perlite or pumice (about a 50/50 ratio works well).
- Small Pots or Trays: For your new propagations. Make sure they have drainage holes!
- Rooting Hormone (Optional but Recommended): This can give your cuttings a little boost.
- Spray Bottle: For gentle watering.
- Patience! This is the most important ingredient!
Propagation Methods
Othonna cacalioides is pretty flexible, and two methods work like a charm for me: stem cuttings and water propagation.
Stem Cuttings
This is my go-to method for Othonna cacalioides. It’s straightforward and almost always successful.
- Take a Cutting: Look for a healthy stem that’s at least 2-3 inches long. Using your sharp shears or knife, make a clean cut just above a leaf node. Try to get a section with a few leaves.
- Let it Callus: This is a crucial step! Your cutting needs to heal over at the cut end to prevent rot. Place the cutting in a dry, bright spot (out of direct sun) for 2-5 days. You’ll notice a dry, scab-like layer form at the cut end.
- Plant the Cutting: Once callused, you can plant it. You have two options here:
- For immediate planting: Gently insert the callused end of the cutting into your prepared succulent mix. Don’t bury it too deep, just enough to keep it upright.
- For water propagation (detailed below): This is also a great option for Othonna cacalioides.
- Initial Watering (for soil): Wait a day or two after planting in soil before watering. This gives the soil any chance to settle around the cutting. Then, water lightly.
Water Propagation
I sometimes opt for water propagation because it’s so satisfying to watch those roots emerge!
- Prepare the Cutting: Take your cutting and remove any lower leaves that would sit below the water line.
- Place in Water: Put the cutting in a clean glass or jar filled with fresh water. Make sure only the callused stem end is submerged.
- Location: Place the jar in a bright spot, but out of direct sunlight.
- Change Water Regularly: This is key to prevent bacteria buildup. Change the water every 2-3 days.
- Watch for Roots: You should start seeing tiny white roots emerge from the cut end within a couple of weeks. Be patient!
- Transplant to Soil: Once the roots are about an inch long, it’s time to transfer your cutting to its permanent pot with well-draining succulent mix. Water lightly after transplanting.
The “Secret Sauce” (Pro Tips)
- Don’t Let Leaves Touch Water: Whether you’re water propagating or have a cutting in soil that you’re misting, ensure none of the leaves are sitting in water. This is a surefire way to encourage rot, and we definitely want to avoid that!
- Gentle Misting is Your Friend: When propagating in soil, I’m very hesitant to water thoroughly at first. Instead, I prefer to mist the soil surface lightly every few days, just enough to keep it barely moist. This encourages roots to search for moisture and prevents the young plant from getting logged. You’ll see the soil dry out quickly, which is a good thing.
- Bottom Heat (If You Have It): If you have a propagation mat or a warm windowsill, providing a little bottom heat can really speed up root development, especially if your home is on the cooler side. It mimics the warmth of spring soil and gives those roots a real nudge.
Aftercare & Troubleshooting
Once you see those lovely new roots appearing – hooray!
- For Soil-Propagated Cuttings: Continue with light watering. You can gradually increase watering as the plant establishes itself, waiting until the soil dries out between waterings. Treat it like a mature succulent, but be a little gentler.
- For Water-Propagated Cuttings: After transplanting to soil, water lightly. The roots it developed in water are ready to transition to soil.
- Light Requirements: Gradually introduce your new propagations to brighter light. Avoid harsh, direct sun initially, as they can be a bit sensitive. A bright, indirect light spot is ideal for the first few weeks.
Common Issues:
- Rot: The most common problem is rot. If your cutting turns mushy, black, or smells funky, it’s likely rotted. This usually happens from too much moisture or not letting the cutting callus properly. If you catch it early, you might be able to cut off the rotten part and try again with a fresh cutting.
- Shriveling: If your cutting shrivels up and doesn’t seem to be doing anything, it could be too dry. Try slightly increasing the watering frequency or misting.
A Encouraging Closing
Propagating plants is such a wonderful act of nurturing. It’s about sharing the beauty and the life that plants bring into our homes. Don’t be discouraged if your first attempt isn’t perfect – gardening is all about learning and figuring out what works best for you and your plants. Be patient, enjoy the process of watching new life emerge, and happy propagating!
Resource:
https://identify.plantnet.org/k-world-flora/species/Othonna%20cacalioides%20L.f./data