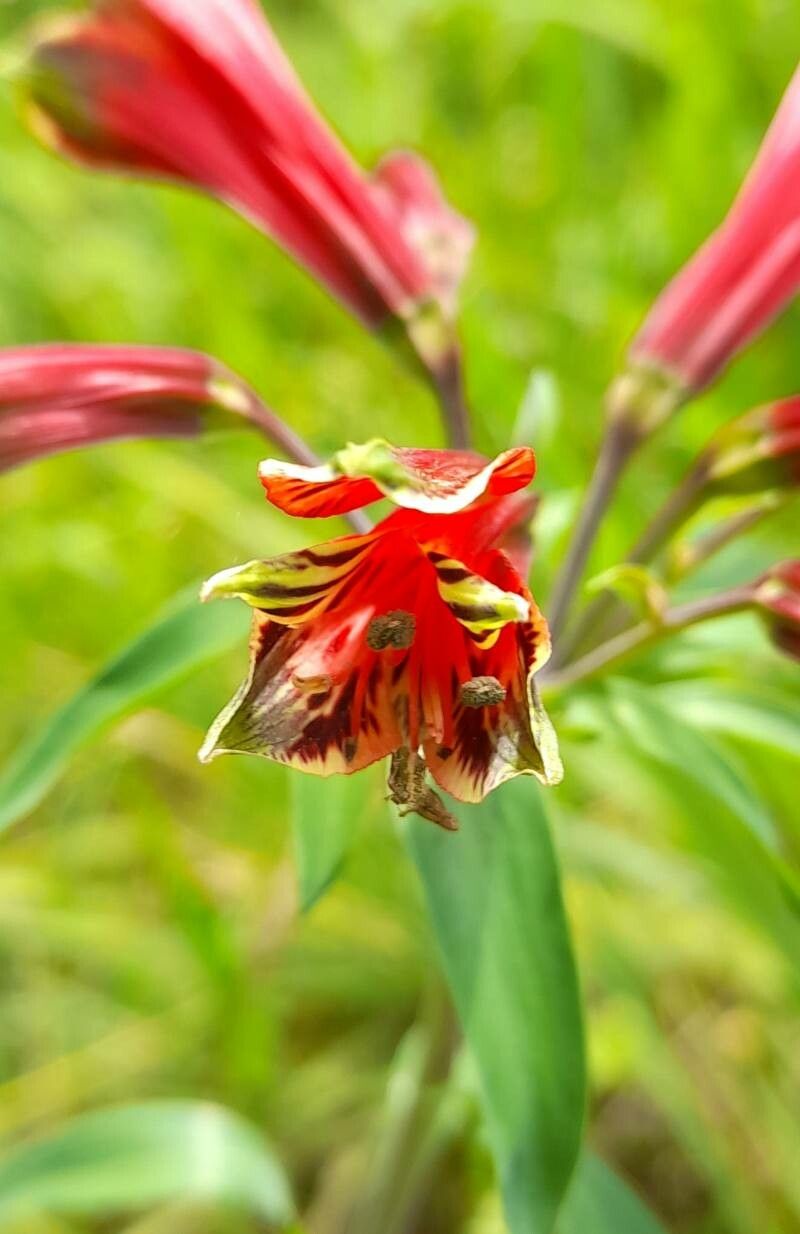
Oh, hello there! Pull up a chair and let’s chat about one of my absolute favorite garden treasures: Alstroemeria psittacina, often called the Peruvian Lily or Parrot Flower. Its vibrant, almost exotic blooms are a real showstopper, aren’t they? They bring such a splash of color and a touch of the tropics to any garden bed or pot.
What I love most is how these beauties just keep on giving. And the joy of creating more of them from your existing plants? Pure garden gold! If you’re a beginner looking to dip your toes into propagation, I’d say Alstroemeria psittacina is a moderately easy plant to work with. A little patience and a few key techniques, and you’ll be well on your way.
The Best Time to Start
For the highest success rate with Alstroemeria psittacina, your best bet is late spring or early summer, right after the main flowering flush has passed. The plant is actively growing at this time, and the new shoots have enough energy to put into root development. You can also have some luck with early autumn, provided you give the new plants enough time to establish before the colder weather sets in.
Supplies You’ll Need
You won’t need a whole professional greenhouse for this, thankfully! Here’s what I always have on hand:
- Sharp Pruning Shears or a Craft Knife: For clean cuts. A dull tool can damage the plant and invite disease.
- Rooting Hormone (Optional but Recommended): Powder or gel. It gives your cuttings a helpful boost.
- Well-Draining Potting Mix: A good mix of peat moss, perlite, and a bit of sand works beautifully. You want something that holds moisture but doesn’t stay waterlogged.
- Small Pots or Seedling Trays: With drainage holes, of course!
- Plastic Bags or a Humidity Dome: To create a mini-greenhouse effect.
- Labels and a Permanent Marker: So you don’t forget what you’ve planted!
- Watering Can with a Fine Rose: For gentle watering.
Propagation Methods
Alstroemeria psittacina is often propagated by division, which is usually the most reliable method. But you can also try stem cuttings, which is a bit more exciting!
Method 1: Division (The Gardener’s Go-To)
This is best done when you’re dividing your main plant anyway, typically in spring.
- Dig Up Your Plant: Gently dig around the base of your Alstroemeria and lift the entire clump. Try to disturb the roots as little as possible.
- Clean Off Excess Soil: Carefully brush off most of the soil so you can see the rhizomes (those thick, fleshy underground stems).
- Identify Natural Breaks: Look for where the rhizomes naturally divide. You want sections that have at least one healthy-looking bud or shoot and a good portion of root attached.
- Divide the Clump: Use your hands or a clean spade to carefully pull or cut the clump apart at these natural divisions. Avoid sawing through the rhizomes if possible; aim for a clean pull.
- Replant Immediately: Either plant the divisions back into your garden bed in their new spots or pot them up. Ensure the buds are just at or slightly below the soil surface. Water thoroughly.
Method 2: Stem Cuttings (A Bit More Adventurous)
This is where we take a piece of a stem and try to coax it into growing roots.
- Select Your Cuttings: Choose healthy, non-flowering shoots that are about 4-6 inches long. Look for stems that are firm but not woody. You can take these from new growth in late spring or early summer.
- Make the Cut: Using your clean, sharp shears or knife, make a clean cut just below a leaf node. A leaf node is where a leaf attaches to the stem.
- Prepare the Cutting: Gently remove the lower leaves from the stem, leaving just a couple of leaves at the top. This reduces moisture loss. If the leaves are very large, you can even cut them in half.
- Apply Rooting Hormone: Dip the cut end of the stem into your rooting hormone, tapping off any excess.
- Plant the Cutting: Fill your small pots with your prepared, moistened potting mix. Make a small hole in the center with your finger or a pencil.
- Insert and Firm: Place the cut end of the stem into the hole, ensuring the leaf node where you removed the leaves is beneath the soil surface. Gently firm the soil around the cutting to ensure good contact.
- Create a Humid Environment: Water gently. Then, cover the pot with a clear plastic bag (propped up so it doesn’t touch the leaves) or place it under a humidity dome.
The “Secret Sauce” (Pro Tips)
Now, for a couple of little tricks I’ve picked up over the years.
- Don’t Be Afraid to Let Them Wilt (Slightly!): For stem cuttings, sometimes letting the cut end slightly dry out for an hour or two before dipping in rooting hormone can actually encourage rooting. It’s like the plant thinks, “Oh no, I’m about to die, better grow some roots!” Just don’t let them shrivel up completely!
- Bottom Heat is Your Friend: If you’re serious about cuttings, a heat mat designed for seedlings can make a HUGE difference. It encourages root development from below, giving your cuttings that extra push. Place your pots on the mat.
Aftercare & Troubleshooting
Once your cuttings are planted or your divisions are in their new homes, it’s all about patience and consistent care.
- For Cuttings: Keep the potting mix consistently moist but not waterlogged. Mist the leaves occasionally, especially if you’re not using a full humidity dome. Place them in a bright spot, but out of direct, harsh sunlight. You’re looking for signs of new growth, which usually means roots are forming. It can take 4-8 weeks, so don’t despair if you don’t see anything immediately. Gently tugging on a cutting – if there’s resistance, roots have formed!
- For Divisions: Water them well and keep an eye on them. They might look a bit stressed initially, but they should perk up within a week or two. Ensure they don’t dry out completely, especially during their establishment phase.
The most common issue you might encounter is rot. This usually happens when the soil is too wet and there’s not enough air circulation. Brown, mushy stems are a clear sign of rot. If you see this, try to remove the affected cutting or plant part immediately and allow the remaining soil to dry out a bit more. Sometimes, over-watering is the culprit.
A Little Encouragement
Propagating plants is a journey, and with Alstroemeria psittacina, it’s a very rewarding one. There might be a few attempts that don’t quite make it, and that’s perfectly normal! Don’t get discouraged. Each try teaches you something new. Just keep nurturing your plants, observe what works, and most importantly, enjoy the magic of creating more beauty for your garden. Happy propagating!
Resource:
https://identify.plantnet.org/k-world-flora/species/Alstroemeria%20psittacina%20Lehm./data