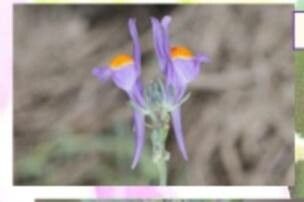
Oh, hello there! Grab a cuppa, settle in, and let’s chat about Linaria haelava. If you’re like me, you’ve probably fallen for its delicate, toadflax-like blooms and the way it dances in the breeze. It’s a real charmer, isn’t it? And the best part? You can easily bring that charm into more corners of your garden by propagating it yourself. It’s a wonderfully rewarding feeling to watch a tiny cutting or division transform into a thriving new plant. For those new to the gardening game, I’d say Linaria haelava is a rather forgiving companion, making it a lovely choice to practice your propagation skills on.
The Best Time to Start
For the most success, I like to get my propagation efforts underway in the late spring or early summer. This is when the plant is actively growing and bursting with energy. Taking cuttings from healthy, non-flowering shoots at this time gives them the best chance to establish quickly. If you’re thinking about dividing an established clump, after it finishes its main flush of blooms is also a good moment.
Supplies You’ll Need
Here’s what I usually gather before I start:
- Sharp pruning shears or a clean craft knife: For taking clean cuts.
- Potting mix: A good quality, well-draining mix is key. I often use a blend of peat moss or coir with perlite or vermiculite.
- Small pots or seed trays: Clean ones are essential to prevent disease.
- Rooting hormone (optional but recommended): This little helper can really boost your success rate.
- Watering can or spray bottle: For gentle watering.
Propagation Methods
Linaria haelava is quite happy to be propagated by stem cuttings. It’s straightforward and usually yields great results.
- Take Your Cuttings: Look for healthy, leafy stems that aren’t yet flowering. Using your sharp pruners or knife, take cuttings about 4-6 inches long. Make the cut just below a leaf node (where a leaf attaches to the stem).
- Prepare the Cuttings: Gently remove the lower leaves from the cutting, leaving just a couple of leaves at the top. This reduces water loss. If you’re using rooting hormone, dip the cut end into the powder, tapping off any excess.
- Potting Up: Fill your small pots or trays with your well-draining potting mix. Use your finger or a small stick to make a hole in the soil.
- Plant the Cuttings: Insert the cut end of each Linaria cutting into the hole and gently firm the soil around it.
- Water Gently: Give the soil a good watering. You want it moist but not waterlogged. I like to use a spray bottle for this initial watering to avoid disturbing the cuttings.
I’ve also found that water propagation can work well for Linaria. Simply place the prepared cuttings (with lower leaves removed) in a jar of clean water, ensuring no leaves are submerged. Change the water every couple of days, and you should see roots forming within a few weeks. Once the roots are about an inch long, you can carefully pot them into your soil mix.
The “Secret Sauce”
Now, for a couple of little tricks I’ve picked up over the years:
- Bottom Heat is Your Friend: If you have it, placing your pots on a heated propagator mat can significantly speed up root development. This gentle warmth mimics ideal spring conditions.
- Humidity is Key: Linaria cuttings can dry out easily. Covering your pots with a clear plastic bag or dome creates a mini-greenhouse effect, keeping humidity high and helping those cuttings thrive. Just make sure to open it daily for a few minutes to allow for air circulation and prevent mold.
Aftercare & Troubleshooting
Once you see new growth emerging, it’s a good sign that roots have formed! At this stage, you can start watering a little more freely, but still allow the topsoil to dry out slightly between waterings. Gradually acclimatize your new plants to more open air if they’ve been covered.
The most common issue you might encounter is rot. If your cuttings look mushy or are turning black, it’s usually a sign of too much moisture and not enough air circulation. Don’t be discouraged if a few don’t make it; it happens to all of us! Just pull out any rotted material and ensure your watering is more judicious going forward.
A Encouraging Closing
Propagating Linaria haelava is a truly delightful way to expand your garden collection. Be patient, observe your little ones, and enjoy the process. Soon enough, you’ll have a whole host of these lovely plants to share and enjoy. Happy gardening!
Resource:
https://identify.plantnet.org/k-world-flora/species/Linaria%20haelava%20(Forssk.)%20Delile/data