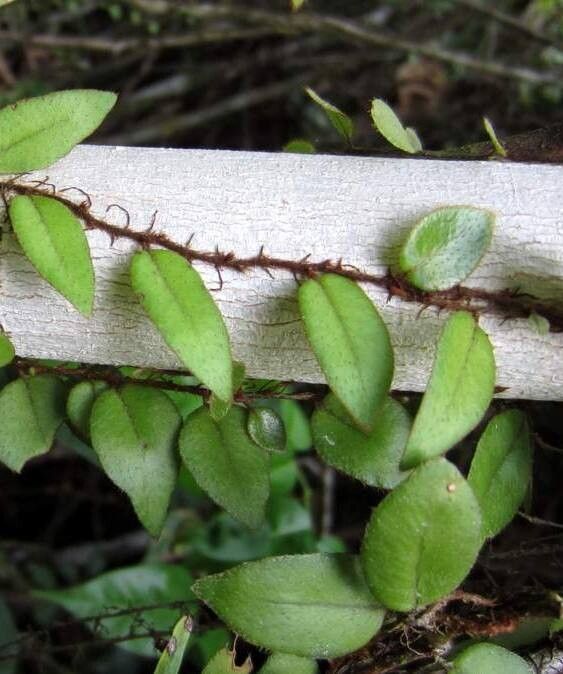
Hello, fellow plant enthusiasts! It’s so lovely to have you here. Today, we’re diving into the delightful world of Microgramma reptans. If you’re looking for a lush, trailing fern that brings a touch of the tropics indoors, this is your plant. Its delicate, creeping rhizomes and elegant fronds are simply captivating. And the best part? Learning to propagate it is incredibly rewarding and, I’m happy to say, quite accessible for beginners! It’s a wonderful way to expand your collection or share these beauties with friends.
The Best Time to Start
For Microgramma reptans, the spring and early summer are your golden windows for propagation. This is when the plant is actively growing and has the most energy to put into developing new roots. Look for healthy, vigorous growth – those are the parts that will give you the best chance of success. Avoid propagating when the plant is stressed, perhaps from extreme heat or a recent move.
Supplies You’ll Need
Grab these essentials, and you’ll be well on your way:
- Sharp, clean pruning shears or a knife: Essential for making those precise cuts.
- Well-draining potting mix: A blend of houseplant soil, perlite, and orchid bark works wonders. You want it to hold some moisture but never get soggy.
- Small pots or propagation trays: Clean, with drainage holes, of course!
- Clear plastic bag or propagation dome: To create a humid environment for cuttings.
- Watering can or spray bottle: For gentle watering.
- (Optional) Rooting hormone: While not always necessary for Microgramma, a dip can give cuttings a little boost. I usually find it works well without it, but it’s a good backup.
Propagation Methods
Let’s get our hands dirty! The most reliable way to propagate Microgramma reptans is through its rhizomes.
Rhizome Cuttings:
This is my favorite method for this particular fern.
- Identify healthy rhizomes: Look for those creeping stems that are plump and have tiny developing fronds or aerial roots emerging.
- Make the cut: Using your clean shears or knife, carefully slice the rhizome into sections. Each section should be at least 2-3 inches long and contain at least one or two nodes (those little bumps where new growth emerges).
- Plant the cuttings: Gently lay the rhizome sections on the surface of your prepared potting mix in small pots. You can lightly press them into the soil so they have good contact, but don’t bury them completely. The top of the rhizome should be just visible.
- Create humidity: Lightly mist the surface of the soil and then cover the pots with a clear plastic bag or a propagation dome. This will trap moisture and create the humid microclimate the cuttings need.
- Place them wisely: Position your pots in a warm spot with bright, indirect light. Avoid direct sun, which can scorch the tender new growth.
The “Secret Sauce” (Pro Tips)
Here are a few things I’ve learned over the years that make a real difference:
- Don’t overwater! This is probably the biggest pitfall for new propagators. Microgramma loves humidity, but its rhizomes will rot if left sitting in soggy soil. Let the surface of the potting mix dry out slightly between waterings. A gentle misting is often all you need initially.
- Bottom heat is a game-changer: If you have a seedling heat mat, placing your propagation tray on it can significantly speed up root development. The warmth encourages those rhizomes to wake up and start sending out roots.
- Patience is your superpower: It can take several weeks, sometimes even a month or two, for new growth to appear. Don’t be discouraged if you don’t see immediate results. Keep them consistently warm and humid, and trust the process.
Aftercare & Troubleshooting
Once you start seeing tiny new fronds unfurling from your cuttings, that’s your cue that roots are forming!
Continue to keep them in their humid environment for a few more weeks, gradually acclimating them to lower humidity by opening the plastic bag or dome a little each day. As they grow larger, you can transplant them into slightly larger pots with fresh potting mix.
The most common issue you’ll encounter is rot. If you see your rhizome cuttings turning mushy and black, it’s a sign of overwatering and poor air circulation. Sadly, once rot sets in, it’s very difficult to save them. The best defense is to ensure good drainage and avoid waterlogged soil from the start.
A Little Encouragement
Watching a new plant emerge from a small piece of its parent is such a magical experience. Don’t be afraid to experiment! Each plant is a learning opportunity, and with a little love and attention, you’ll be enjoying your own propagated Microgramma reptans in no time. Happy gardening!
Resource:
https://identify.plantnet.org/k-world-flora/species/Microgramma%20reptans%20(Cav.)%20A.R.Sm./data