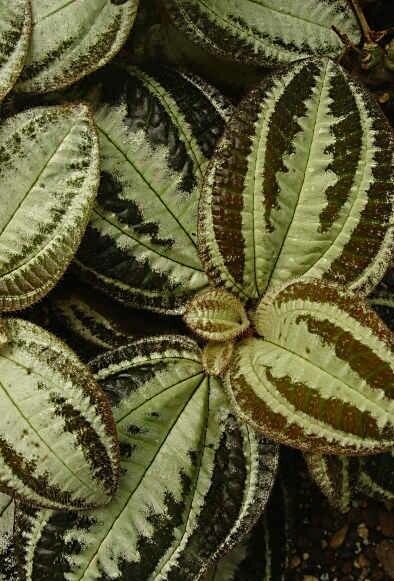
Oh, Bertolonia marmorata! If you’re looking for a plant that’s a real stunner and a joy to have around, you’ve found it. Its velvety, intricately marked leaves are like something painted by a master artist. And the best part? You can have more of these beauties without breaking the bank! Propagating this gem is incredibly satisfying. While it might seem a tad more involved than, say, a spider plant, I wouldn’t call it challenging. With a little care and attention, even beginners can find success.
The Best Time to Start
Generally, the warmer months are your best bet. Think late spring through summer. This is when your Bertolonia is actively growing and has the most energy to put into developing roots. You’ll get the quickest results and the highest success rate when you take cuttings from healthy, vigorous stems during this prime growth period.
Supplies You’ll Need
Gathering your tools beforehand makes the whole process smoother. Here’s what I always have on hand:
- Sharp pruning shears or a clean knife: For making clean cuts.
- A well-draining potting mix: I like to use a blend of peat moss, perlite, and a bit of orchid bark. You can also find specific houseplant or African violet mixes that work well.
- Small pots or seed trays: Clean ones are essential to prevent disease.
- Rooting hormone (optional but recommended): A powder or gel can significantly speed up root development.
- A clear plastic bag or propagation dome: To create a humid environment.
- Watering can or spray bottle: For gentle watering.
Propagation Methods
Bertolonia marmorata is wonderfully amenable to a couple of straightforward propagation techniques. My favorite is taking stem cuttings, but water propagation is also quite successful.
Stem Cuttings
This is my go-to method. You’re essentially taking a piece of the parent plant and coaxing it to grow roots of its own.
- Select Healthy Stems: Look for stems that are a good size, usually about 2 to 4 inches long, with at least two sets of leaves. Avoid anything that looks leggy or stressed.
- Make the Cut: Using your sharp shears or knife, make a clean cut just below a leaf node (where a leaf attaches to the stem). This is where the magic of root development happens.
- Prepare the Cutting: Gently remove the lower leaves from the cutting, leaving just two or three sets of leaves at the top. This helps prevent decay and directs the plant’s energy towards rooting.
- Apply Rooting Hormone (Optional): Dip the cut end of the stem into your rooting hormone, tapping off any excess.
- Plant Your Cuttings: Fill your small pots with your pre-moistened potting mix. Make a small hole with your finger or a pencil and gently insert the cutting, ensuring the leaf nodes where you removed the leaves are buried. Firm the soil gently around the stem.
- Create Humidity: Water the soil lightly. Then, cover the pot with a clear plastic bag or place it under a propagation dome. This creates a mini greenhouse effect, keeping the humidity high, which is crucial for cuttings. You can poke a few holes in the bag to allow for some air circulation.
- Provide Warmth and Light: Place the pots in a bright, indirect light location. Avoid direct sun, which can scorch the tender cuttings. Gentle bottom heat from a heat mat can also be beneficial, encouraging faster root growth.
Water Propagation
For those who enjoy watching the roots emerge, this is a fun alternative.
- Take Cuttings: Follow steps 1 and 2 for stem cuttings.
- Remove Lower Leaves: As in step 3 above, remove the lowest leaves.
- Place in Water: Place the cuttings in a clean glass or jar filled with room-temperature water. Make sure the leaf nodes where you removed the leaves are submerged, but try to keep the remaining leaves out of the water.
- Change Water Regularly: Change the water every few days to keep it fresh and prevent bacterial growth.
- Provide Light: Place the jar in a location with bright, indirect light.
- Pot Up When Rooted: Once the roots are about an inch long, you can carefully transplant them into your well-draining potting mix, just like you would with the stem cuttings.
The “Secret Sauce” (Pro Tips)
After years of tinkering, I’ve picked up a few tricks that really help.
- Don’t overcrowd your cuttings. Give them a little breathing room in their pots. This improves air circulation and reduces the risk of fungal issues.
- Consider using bottom heat. A simple seedling heat mat, kept on a low setting, can make a world of difference in how quickly your cuttings root. It mimics the warmth of spring soil beautifully.
- Be patient with your water propagation. While tempting to leave them in water forever, the longer they stay submerged, the less adept they become at transitioning to soil. Plant them in soil as soon as the roots reach about an inch in length.
Aftercare & Troubleshooting
Once you see those tiny roots emerging (which can take anywhere from 2 to 6 weeks, depending on conditions), you’re on the right track!
Care for your new plant just like you would the parent. Water when the top inch of soil feels dry. You can gradually acclimatize it to lower humidity by opening the plastic bag a little more each day over a week or so.
The most common issue you might encounter is rot. This usually happens if the soil stays too wet or if the humidity is too high without enough air circulation. If you notice a cutting turning black and mushy, unfortunately, it’s best to discard it to prevent any spread. Another sign of failure is if the leaves start to yellow and drop without any new growth appearing after a prolonged period. This might indicate insufficient light or that the cutting simply didn’t establish roots.
A Encouraging Closing
Propagating Bertolonia marmorata is such a rewarding way to multiply your plant collection and share the beauty of these incredible plants with friends. Don’t be discouraged if your first attempt isn’t perfect. Gardening is all about learning and experimenting. Keep at it, observe your plants, and most importantly, enjoy the process! Happy propagating!
Resource:
https://identify.plantnet.org/k-world-flora/species/Bertolonia%20marmorata%20(Naudin)%20Naudin/data