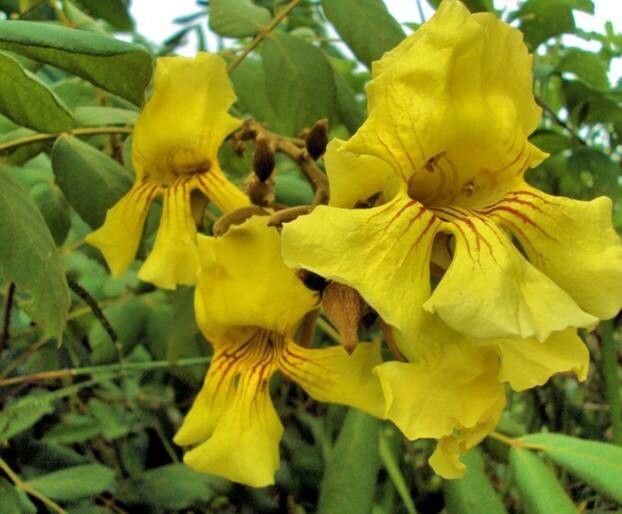
Oh, hello there! Come on in, grab a mug. Today, we’re diving into a really special plant, Markhamia obtusifolia. If you haven’t met it yet, imagine a burst of sunshine in your garden. It’s dripping with gorgeous, trumpet-shaped flowers, usually in vibrant shades of orange and yellow. Honestly, it’s a showstopper. And the best part? Making more of these beauties from cuttings is incredibly rewarding. Don’t you worry, it’s not overly complicated, even if you’re just starting your plant adventure.
The Best Time to Start
My absolute favorite time to get cuttings is when the plant is actively growing, typically in late spring or early summer. You know, when things are bursting with life and energy. The stems are usually a bit softer then, which helps them root more readily. Aim for stems that are new growth but have started to harden up a little – not totally floppy, but not woody either. We’re looking for that sweet spot!
Supplies You’ll Need
Here’s what I always have on hand when I’m feeling like multiplying my Markhamia:
- Sharp Pruning Shears or a Knife: Cleanliness is key to preventing nasty infections.
- Rooting Hormone: A little dust or gel goes a long way in giving your cuttings a boost. I personally like the powder kind, but gel works great too.
- Well-Draining Potting Mix: A mix of perlite, coco coir, and a bit of compost is usually perfect. I often use about a 50/50 blend of perlite and coco coir.
- Small Pots or Trays: Clean pots are a must! Four-inch pots are usually a good size for a few cuttings.
- Clear Plastic Bags or a Humidity Dome: To keep things nice and humid around your cuttings.
- Water: For misting and keeping things hydrated.
Propagation Methods
Stem cuttings are really the way to go with Markhamia obtusifolia. It’s straightforward and usually yields great results.
- Take Your Cuttings: Head out to your thriving Markhamia. Look for young, semi-hardwood stems. You want cuttings that are about 4-6 inches long. Make your cut just below a leaf node – that’s where the magic happens for rooting. Remove the lower leaves, but leave a couple of sets at the top.
- Prepare the Cuttings: Dip the cut end of each stem into your rooting hormone. Gently tap off any excess. You just want a light coating.
- Planting: Fill your clean pots with your prepared potting mix. Make a little hole in the center with your finger or a pencil. Gently insert the cutting into the hole, making sure the roots aren’t being scraped. Firm the soil around it.
- Water and Shelter: Water the soil gently to settle everything in. Then, cover the pot with a clear plastic bag, creating a mini-greenhouse. If you have a humidity dome, that works beautifully too. Just ensure the leaves aren’t pressed too hard against the plastic.
The “Secret Sauce” (Pro Tips)
Now, for a couple of things I’ve learned over the years that can really make a difference:
- Bottom Heat: If you have a heating mat that gardeners use for starting seeds, pop your pots on top of it. This gentle warmth from below is like a cozy blanket for root development; it can significantly speed up the process and encourage stronger roots.
- Don’t Drown Them! While humidity is crucial, you don’t want soggy soil. Check the moisture by gently touching the soil surface. If it feels dry, give it a light misting or a watering, but ensure the pot drains well. Waterlogged soil is the quickest way to rot a cutting before it even has a chance to root.
Aftercare & Troubleshooting
Once you’ve got your cuttings planted, place them in a bright location out of direct sunlight. You’ll want to keep that humidity high – misting occasionally is a good idea. Patience is key here! It can take several weeks, sometimes even a couple of months, for roots to form.
You’ll know your cutting is taking off when you see new leaf growth appearing. Gently tugging on the cutting will also give you some resistance if it has rooted.
The most common sign of a cutting failing is wilting, yellowing, and eventually blackening. This usually means rot has set in due to too much moisture or not enough air circulation. If you see this happening, it’s usually best to discard the cutting and start fresh.
A Encouraging Closing
So there you have it! Propagating Markhamia obtusifolia is such a fulfilling little project. It’s a wonderful way to share these cheerful plants with friends or simply to fill your own garden with more of their vibrant blooms. Don’t be discouraged if your first few attempts aren’t perfect. Gardening is all about learning and trying. Embrace the journey, enjoy the process, and soon enough, you’ll have a whole collection of your own thriving Markhamias! Happy growing!
Resource:
https://identify.plantnet.org/k-world-flora/species/Markhamia%20obtusifolia%20(Baker)%20Sprague/data