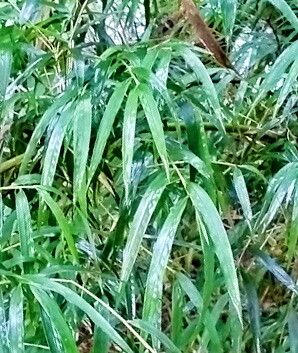
Hello, fellow plant lovers! Today, we’re diving into the world of Chusquea quila, a magnificent bamboo that brings such a lush, tropical feel to any garden. I’ve spent years admiring its graceful, arching canes and dense foliage, and I can tell you, successfully propagating it is a deeply satisfying experience. If you’re looking to expand your bamboo collection or share its beauty with friends, you’re in the right place. Now, I won’t sugarcoat it – Chusquea quila can be a little more challenging than, say, a common houseplant cutting, but with a good understanding of its needs, it’s absolutely achievable, even for those of you who are just starting to feel your green thumb sprout.
The Best Time to Start
For the highest success rate, I find that late spring to early summer is the sweet spot for propagating Chusquea quila. This is when the plant is in its most active growth phase. You’ll be working with vigorous, healthy new shoots that are brimming with the energy needed to establish roots. Think of it as catching the plant at its peak performance!
Supplies You’ll Need
To get our propagation station ready, gather these essentials:
- Sharp, clean pruning shears or a sharp knife: This is crucial for making clean cuts that heal well.
- Potting soil mix: A well-draining mix is key. I like to use a blend of 50% compost and 50% perlite or sharp horticultural sand. This ensures good aeration and prevents waterlogging.
- Small pots or seed trays: Choose pots with drainage holes, of course!
- Rooting hormone (optional but recommended): A powder or gel can give your cuttings a helpful boost.
- A clear plastic bag or propagation dome: This will help maintain humidity.
- Watering can or spray bottle: For gentle watering.
- Labels and a marker: To keep track of your projects!
Propagation Methods
While there are a few ways to go about it, I’ve found the most reliable methods for Chusquea quila are stem cuttings and division.
Stem Cuttings
This is a fantastic way to get multiple new plants from a single parent.
- Select your material: Look for healthy, semi-hardwood stems that are at least a year old but still have some flexibility. You want stems that are not too soft and green, nor too woody and stiff.
- Make the cut: Using your clean shears, take cuttings that are about 6 to 10 inches long. Make your cut just below a node (where a leaf or branch meets the stem).
- Prepare the cutting: Gently remove the lower leaves, leaving only a few at the top. This reduces water loss. If the remaining leaves are very large, you can cut them in half.
- Apply rooting hormone (if using): Dip the cut end of the stem into the rooting hormone, tapping off any excess.
- Plant your cuttings: Moisten your potting mix in the pots. Make a small hole with your finger or a pencil and insert the cutting, ensuring at least one node is below the soil surface. Firm the soil gently around the stem.
- Water and cover: Water thoroughly but gently. Cover the pot with a clear plastic bag or place it under a propagation dome to create a humid environment. Secure the bag with a rubber band or ensure the dome fits snugly.
Division
This is best done when the plant is actively growing, typically in spring.
- Prepare the parent plant: Water the Chusquea quila thoroughly a day or two before you plan to divide it.
- Carefully excavate: Gently dig around the perimeter of the clump. You can then carefully loosen the soil and work a sharp spade or knife through the root ball to separate it into sections. Aim for sections that have several healthy culms (canes) and a good amount of root system.
- Replant immediately: Plant the divisions as you would a new plant, ensuring the top of the root ball is at soil level. Water well.
The “Secret Sauce” (Pro Tips)
Here are a few tricks I’ve learned over the years that can make a big difference:
- The humidity cocoon is non-negotiable: Chusquea quila cuttings are thirsty souls! That plastic bag isn’t just for show; it’s creating a miniature greenhouse. Check it daily to wipe away condensation – too much moisture can lead to rot. If you see a lot of condensation, open the bag for a few hours to let it air out.
- Bottom heat is your best friend: Placing your pots on a heated propagation mat can significantly speed up root development. Bamboo, like many plants, loves a warm foot! This is especially helpful if your ambient room temperature isn’t consistently warm.
- Don’t be shy with the nodes: When making cuttings, make sure at least one or two nodes are buried in the soil. This is where the magic happens for root formation.
Aftercare & Troubleshooting
Once you see new growth emerging from the top of your cuttings, it’s a good sign roots are forming!
- Gradually acclimate: Before removing the plastic bag completely, start gradually introducing your new plants to normal humidity. Do this over a week or so by opening the bag for longer periods each day.
- Water consistently: Keep the soil moist but not soggy. The new plants won’t have a fully developed root system yet, so they’ll be more sensitive to drying out.
- Watch for rot: The most common sign of failure is rotting cuttings. If your stem turns black and mushy, it’s usually a sign of overwatering or poor drainage. If this happens, pull the cutting out, examine it, and if there’s any healthy tissue, you can try again with a different approach (perhaps less water or better drainage). Another sign of failure is wilting that doesn’t recover even when the soil is moist; this can indicate shock or that the cutting simply didn’t take.
A Bit More Patience, A Lot More Bamboo!
Propagating plants is a journey, and sometimes it requires a little trial and error. Don’t get discouraged if your first attempt isn’t a roaring success. Each attempt is a learning experience. Enjoy the process of nurturing these new little bamboos, and soon enough, you’ll be surrounded by even more of their wonderful, swaying beauty. Happy propagating!
Resource:
https://identify.plantnet.org/k-world-flora/species/Chusquea%20quila%20Kunth/data