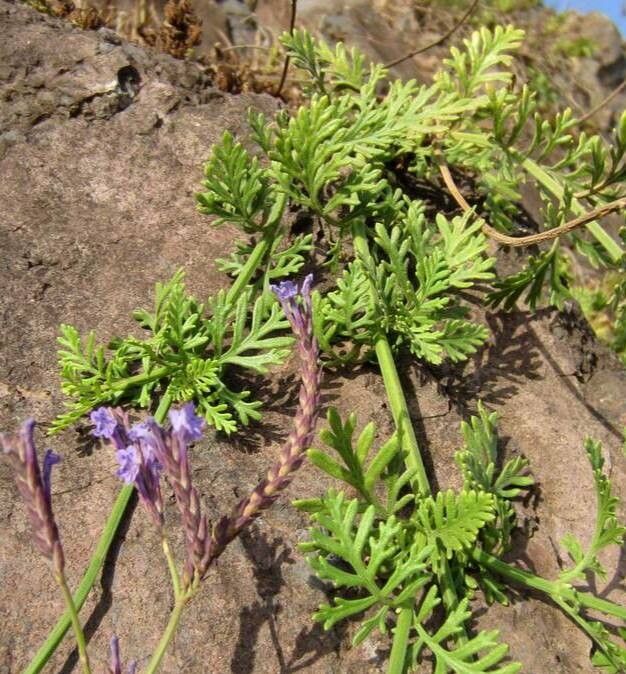
Hello fellow plant lovers! It’s your garden mentor here, ready to chat about one of my absolute favorites: Lavandula canariensis, or Canary Island Lavender.
There’s something truly special about this lavender. Its feathery foliage has a delicate, almost ethereal charm, and it blooms with a lovely, informal grace that’s a little different from its more common cousins. Being able to create more of these beauties from your existing plants is incredibly rewarding. It’s also a fantastic way to fill in your garden beds or share the love with friends. For beginners, I’d say Canary Island Lavender is moderately easy to propagate. It’s not as foolproof as a basil cutting, but with a little care, you’ll be well on your way to success!
The Best Time to Start
For the happiest cuttings and best chance of root development, I always recommend starting in late spring through early summer. This is when the plant is actively growing and has plenty of energy to put into forming new roots. Look for stems that are firm and woody at the base, but still have some flexibility at the tip. Avoid very soft, new growth or overly mature, brittle stems.
Supplies You’ll Need
Before we get our hands dirty, gather these essentials:
- Sharp Pruning Shears or a Craft Knife: Cleanliness is key to prevent disease.
- Small Pots or Seed Starting Trays: About 3-4 inches in diameter are perfect. Make sure they have drainage holes!
- Well-Draining Potting Mix: A good blend is equal parts perlite, peat moss, and coarse sand. You can also use a commercial seed-starting mix amended with extra perlite.
- Rooting Hormone (Optional but Recommended): A powder or gel will give your cuttings a significant boost.
- Watering Can with a Fine Rose: For gentle watering.
- Plastic Bags or a Small Greenhouse: To create a humid environment.
- Labels and a Marker: Don’t forget to label your precious babies!
Propagation Methods: Stem Cuttings are Your Best Bet!
The most reliable way to propagate Lavandula canariensis is through stem cuttings. Here’s how I do it:
- Take Your Cuttings: Using your clean shears, select non-flowering stems that are about 4-6 inches long. Cut just below a leaf node (where a leaf attaches to the stem). This node is where roots are most likely to form.
- Prepare the Cuttings: Gently remove the lower leaves, leaving just a few at the top. If the leaves are very large, you can even cut them in half to reduce water loss. Dip the cut end into your rooting hormone, tapping off any excess.
- Potting Them Up: Fill your pots with your prepared, moistened potting mix. Using a pencil or your finger, make a small hole in the center of each pot.
- Planting the Cuttings: Insert the cut end of each cutting into the hole, ensuring the buried part has come into contact with the rooting hormone. Gently firm the soil around the base of the cutting.
- Create Humidity: Water the pot gently. Then, cover the pot with a clear plastic bag or place it in a propagator. This creates a mini-greenhouse and keeps the humidity high, which is crucial for preventing the cuttings from drying out. You can use stakes to keep the bag from touching the leaves.
- Placement is Key: Place your pots in a bright location out of direct, scorching sunlight. A windowsill that gets bright, indirect light is ideal.
The “Secret Sauce” (Pro Tips)
Here are a few things I’ve learned over the years that really make a difference:
- Don’t Let the Leaves Touch the Water While Rooting in Water: If you’re tempted to try water propagation (which I find a bit trickier for lavender), always ensure no leaves are submerged. They’ll just rot and invite fungal issues. Stick to stem cuttings in soil for better results.
- Bottom Heat is Your Friend: If you have a heat mat, a little bottom warmth can significantly speed up root formation. It mimics the warmth of summer soil and gives those root cells a gentle nudge. Aim for around 70-75°F (21-24°C).
- Be Patient with Air Circulation: Once you see signs of rooting, gradually begin to acclimate your cuttings to drier air by opening the plastic bag a little more each day. This prevents shock when you eventually remove the cover entirely.
Aftercare & Troubleshooting
After about 3-6 weeks, you should start to see new growth, which is a great sign! Another way to check for roots is to gently tug on the cutting. If there’s resistance, you’ve got roots!
Once roots have formed, water regularly, allowing the soil to dry out slightly between waterings. Gradually remove the plastic cover over a week or so. When the new plant is well-established and growing vigorously, you can transplant it into larger pots or its permanent garden spot.
The biggest culprit for failure is often rot. If your cuttings turn mushy and black, it’s usually due to too much moisture and poor air circulation. Make sure your soil drains exceptionally well, and don’t let them sit in soggy conditions. If you see browning leaves that aren’t related to dryness, it could also be a sign of too much direct sun.
A Little Patience Goes a Long Way
Propagating any plant is a journey, and Lavandula canariensis is no different. Be patient with your little cuttings. Some will take sooner than others, and a few might not make it – that’s just part of the gardening dance! The joy of seeing those tiny roots emerge and then nurturing them into new plants is truly unparalleled. Happy propagating!
Resource:
https://identify.plantnet.org/k-world-flora/species/Lavandula%20canariensis%20Mill./data