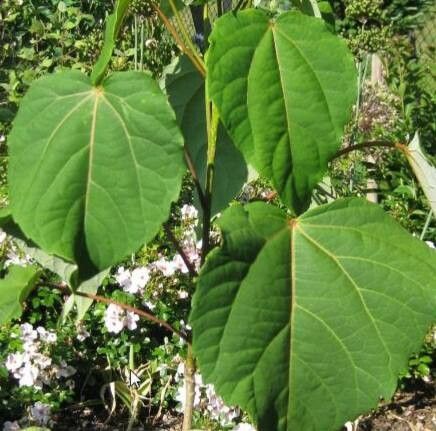
Oh, hello there, fellow garden enthusiast! Pull up a chair. I’ve got something special to chat about today: Idesia polycarpa. If you’re looking for a tree that brings a bit of drama and charm to your landscape, this is it. Those lovely heart-shaped leaves and, for the female trees, the stunning clusters of orange-red berries that hang on through winter? Absolutely captivating.
Propagating your own Idesia polycarpa is incredibly rewarding. It’s a way to extend that beauty, share it with friends, or simply satisfy that gardener’s itch to create something new. Now, I won’t pretend it’s as foolproof as, say, a succulent cutting, but it’s definitely achievable for motivated beginners. Don’t let a little challenge deter you; the payoff is well worth it.
The Best Time to Start
For Idesia polycarpa, late spring to early summer is your sweet spot. This is when the plant is actively growing, and the new shoots have had a chance to mature just enough to make good cuttings. You want stems that are semi-hardwood – not too soft and floppy, but not quite woody and rigid either. Think of it as that perfect stage of ripeness.
Supplies You’ll Need
Before we get our hands dirty, let’s gather our tools. It’s always best to be prepared!
- Sharp Pruning Shears or a Clean Knife: For making clean cuts. We don’t want to crush those delicate tissues.
- Rooting Hormone: While not strictly essential for every plant, it can give your cuttings a significant boost. I prefer a powder form for cuttings.
- Potting Mix: A well-draining mix is crucial. I like to use a blend of seed-starting mix or a very fine peat moss mixed with perlite (about a 50/50 ratio). This ensures good aeration and prevents waterlogging.
- Small Pots or Trays: Clean pots with drainage holes are a must.
- Plastic Bag or Humidity Dome: To maintain a humid environment around your cuttings.
- Watering Can or Mister: For gentle watering.
- (Optional) Bottom Heat Mat: This adds a lovely warmth to the soil, encouraging root development.
Propagation Methods
We’ll focus on the most reliable way to get new Idesia polycarpa plants going: stem cuttings.
- Take Your Cuttings: In late spring or early summer, select healthy, non-flowering stems from a mature plant. Look for pieces that are about 6-8 inches long. Make a clean cut just below a leaf node (where a leaf attaches to the stem).
- Prepare the Cuttings: Gently remove the lower leaves, leaving just a few at the top. This prevents them from rotting in the soil and allows the plant to focus its energy on rooting. If your cuttings are very long, you can carefully cut the remaining leaves in half to reduce water loss through transpiration.
- Apply Rooting Hormone: Dip the cut end of each stem into your rooting hormone. Tap off any excess. This step encourages cell division and speeds up root formation.
- Plant Your Cuttings: Fill your clean pots with your prepared potting mix. Make a small hole in the center with your finger or a pencil. Insert the cut end of the stem into the hole, making sure the nodes where you removed the leaves are below the soil surface. Gently firm the soil around the base of the cutting.
- Set Up for Success: Water the pots gently until the soil is evenly moist but not soggy. Place the pots inside a clear plastic bag or cover them with a humidity dome. Prop the bag up with stakes so it doesn’t touch the leaves. Place them in a location that receives bright, indirect light. Avoid direct sun, which can scorch the cuttings.
The “Secret Sauce”
Here are a couple of tricks I’ve learned over the years that can really make a difference:
- The “Heel” Trick: Sometimes, when you take a cutting, you can get a little bit of the parent stem along with it – sometimes called a “heel.” If you can do this carefully, it can encourage faster rooting. Just give the stem a gentle tug or slice to take a tiny sliver of the older wood.
- Bottom Heat is Your Friend: If you have a heat mat, use it! Providing consistent warmth to the base of the cuttings can significantly speed up the rooting process. It mimics the conditions of reaching out for warmth in the soil, which is a natural trigger for root growth.
Aftercare & Troubleshooting
Now comes the waiting game, but the care is simple.
- Keep it Moist: Check the moisture levels regularly. The soil should always feel slightly damp. If it feels dry, give it a gentle watering or misting.
- Ventilate Occasionally: If you’re using a plastic bag, peel it back for a few minutes each day to allow for some air circulation. This helps prevent fungal issues.
- Look for Roots: It can take several weeks, sometimes even a couple of months, for roots to form. You’ll know they’re establishing when you see new leaf growth at the top. You can also gently tug on a cutting; if there’s resistance, roots have likely formed.
The most common issue you’ll encounter is rot. If you notice your cuttings turning black and mushy, it’s usually a sign of too much moisture and not enough air circulation. Don’t be discouraged; learn from it and try again! Sometimes, a cutting just doesn’t make it, and that’s part of the gardening journey.
A Encouraging Closing
So there you have it! Propagating Idesia polycarpa is a beautiful way to connect with nature and multiply your joy. Be patient. Gardening is a marathon, not a sprint, and every new sprout is a whispered promise of future beauty. Enjoy the process, savor the moments, and I can’t wait to hear about your success!
Resource:
https://identify.plantnet.org/k-world-flora/species/Idesia%20polycarpa%20Maxim./data