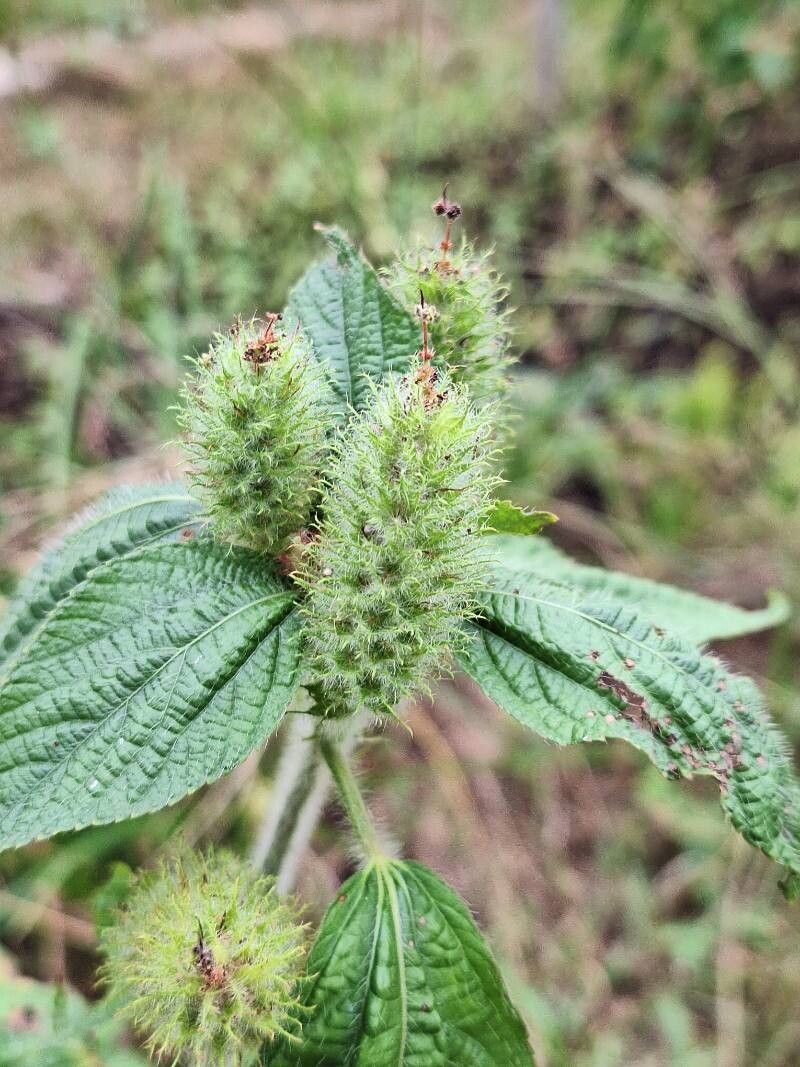
Hello there, fellow plant lovers! It’s so good to be chatting with you today. We’re going to dive into a topic that brings me so much joy: propagating plants! This time, our star is the lovely Acalypha alopecuroidea, also known as the Fox’s Tail Copperleaf. Isn’t that a delightful name? This plant boasts striking, often vibrant foliage that can really add a pop of color and texture to any garden or indoor space. And the best part? Those gorgeous leaves can be the starting point for many new plants. It’s a truly rewarding feeling to watch a tiny cutting develop into a thriving new specimen. For those of you just dipping your toes into the world of propagation, I’m happy to say that Acalypha alopecuroidea is generally quite forgiving, making it a fantastic choice for beginners.
The Best Time to Start
When it comes to coaxing new life from your existing plants, timing is everything. For Acalypha alopecuroidea, the absolute sweet spot is during its active growing season. This typically means late spring through summer. You’re looking for healthy, vigorous new growth – the kind that’s soft and pliable, not woody. Taking cuttings from actively growing, non-flowering stems tends to give the best results. You want the plant to have plenty of energy to put into creating new roots.
Supplies You’ll Need
Gathering your tools before you start makes the whole process much smoother. Here’s what I usually have on hand:
- Sharp Pruning Shears or a Craft Knife: Clean cuts are crucial for healthy healing and root development.
- Potting Mix: A light, well-draining mix is best. I often use a blend of peat moss, perlite, and a bit of coarse sand. You can also find pre-made propagation mixes.
- Small Pots or Propagation Trays: Ones with drainage holes are a must.
- Rooting Hormone (Optional but Recommended): This really gives your cuttings a helping hand. Look for a powdered or liquid form.
- Clear Plastic Bag or Dome: To create a humid environment for your cuttings.
- Water: For hydration, of course!
- Gloves (Optional): Some people find certain plants’ sap a little irritating.
Propagation Methods
Acalypha alopecuroidea is a champion when it comes to stem cuttings. It’s my go-to method, and I think you’ll find it works wonders.
Stem Cuttings:
- Take Your Cuttings: Using your clean shears, select a healthy, non-flowering stem that is about 4-6 inches long. Make a clean cut just below a leaf node (where a leaf attaches to the stem). Remove the leaves from the lower half of the cutting, leaving just a couple of healthy leaves at the top. This prevents rot and focuses the plant’s energy on rooting.
- Prepare for Rooting: If you’re using rooting hormone, dip the cut end into it, tapping off any excess.
- Plant Your Cuttings: Fill your small pots or trays with your well-draining potting mix and moisten it thoroughly. Make a small hole in the center of the soil with your finger or a pencil. Gently insert the cut end of the stem into the hole, ensuring it reaches the bottom. Firm the soil gently around the stem to provide support.
- Create a Humid Environment: Water the soil again lightly. Then, cover the pot or tray with a clear plastic bag, securing it around the base with a rubber band, or place a clear plastic dome over it. This traps moisture and creates the high humidity that cuttings crave.
- Find a Good Spot: Place your propagated cuttings in a warm location with bright, indirect light. Avoid direct sunlight, which can scorch the young leaves.
Water Propagation (Another Option):
While stem cuttings in soil are my preference, water propagation can be a fun way to watch the roots develop.
- Prepare Your Cuttings: Follow the same steps as above for taking and preparing stem cuttings, but skip the rooting hormone.
- Place in Water: Put the cuttings into a clean jar or glass filled with fresh water. Make sure no leaves are submerged below the waterline. You can use a rubber band to hold the stems in place if needed.
- Change Water Regularly: Change the water every few days to keep it fresh and prevent bacterial growth.
- Root Development: You should start to see small white roots forming from the leaf nodes within a few weeks. Once the roots are about an inch long, you can transplant them into potting mix as described above.
The “Secret Sauce” (Pro Tips)
Over the years, I’ve learned a few little tricks that can really make a difference.
First, when you’re using bottom heat – perhaps by placing your propagation tray on a seedling heat mat – it’s incredible for encouraging root development. The warmth stimulates the plant’s natural rooting processes. Don’t crank it up too high, though; a gentle warmth is all you need.
Second, and this sounds simple, but patience is truly the secret sauce. Don’t get discouraged if you don’t see roots immediately. Some plants take longer than others. I like to gently tug on a cutting after a few weeks; if there’s resistance, you’ve got roots! If not, just keep providing good conditions.
Lastly, for water propagation, always make sure no leaves are touching the water. They’ll turn mushy and rot, which can spread to the cutting and kill it before it even has a chance to root.
Aftercare & Troubleshooting
Once you see signs of new growth – tiny leaves unfurling, or the cutting feels secure when gently tugged – your plant is likely starting to establish roots.
- Acclimatize: Gradually reduce the humidity over a week or so. Poke a few holes in your plastic bag, or lift your dome for longer periods. This helps the new plant adjust to normal air conditions before you remove the cover completely.
- Watering: Water your new plant thoroughly when the top inch of soil feels dry. Be careful not to overwater, as this is a common culprit for failure due to root rot.
- Light: Continue to provide bright, indirect light. As the plant grows stronger, it can tolerate a bit more light, but always observe how it responds.
The most common sign of trouble is wilting or yellowing leaves, often followed by soft, mushy stems. This is usually a sign of overwatering or rot. If you notice this, remove the affected cutting immediately, check the soil moisture, and ensure good drainage. If the stem is already too far gone, it’s best to discard it and try again with fresh cuttings. Sometimes, a cutting simply won’t root, and that’s okay! It’s all part of the learning curve.
A Little Encouragement to Close
Propagating plants like Acalypha alopecuroidea is a beautiful way to multiply your green friends and share the joy of gardening. Don’t be afraid to experiment! Each cutting you take is an opportunity to learn and connect with the natural world. Be patient with yourself and the process. The thrill of seeing those first tiny roots emerge is an unparalleled reward. Happy propagating, and may your new Fox’s Tail Copperleaves flourish!
Resource:
https://identify.plantnet.org/k-world-flora/species/Acalypha%20alopecuroidea%20Jacq./data