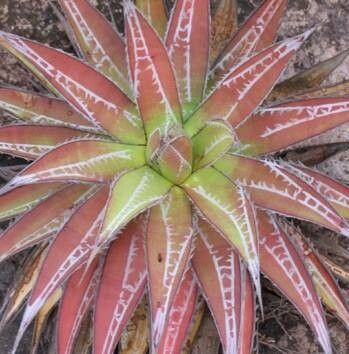
Oh, how I love the Agave impressa! That striking rosette of fleshy, architectural leaves, often with those beautifully textured margins, just screams “sophistication” in any garden. And the best part? You can easily multiply this beauty. It’s so rewarding to watch a little piece of your existing plant grow into something spectacular. For many succulents, including this gem, propagation is often quite forgiving. I’d say Agave impressa is a pretty approachable plant to start with, especially if you’re new to coaxing new life from your favorites.
The Best Time to Start
When’s the magic window for propagating Agave impressa? Generally, I find the late spring or early summer is your sweet spot. This is when the plant is actively growing and has the most energy to put into establishing roots. You’re looking for a healthy, mature plant that’s showing good vigor. If your agave is already producing offsets (those little baby plants that pop up around the base), that’s an even stronger signal that now is the time to get propagating.
Supplies You’ll Need
Gathering your tools beforehand makes the whole process feel smoother. Here’s what I typically have on hand:
- Sharp Pruning Shears or a Clean Knife: Sterilize them between cuts, please!
- Rooting Hormone Powder (Optional but Recommended): Helps give your cuttings a little head start.
- Well-Draining Soil Mix: A mix specifically formulated for succulents and cacti is perfect. You can also make your own with potting soil, perlite, and coarse sand.
- Small Pots or Trays: Make sure they have drainage holes.
- Gloves: Agave spines can be no joke!
- A Watering Can or Misting Bottle: For gentle watering.
- A Sunny Spot: Bright, indirect light is ideal for starting out.
Propagation Methods
For Agave impressa, the most reliable and rewarding method is often by dividing offsets.
- Locate the Offsets: Gently dig around the base of your mature Agave impressa. You’ll often find small “pups” or offsets growing from the main plant’s rhizomes.
- Gently Separate: Use your sterilized knife or pruners to carefully cut the offset away from the mother plant. Try to get a bit of the root system attached if possible. Some offsets might pull away more easily than others.
- Allow to Callus: This is a crucial step! Let the cut end of the offset dry out and form a callus for a few days up to a week. This prevents rot when you plant it. You can lay them on a paper towel in a dry, well-ventilated spot out of direct sun.
- Plant the Offset: Once callused, lightly dip the cut end into rooting hormone (if using). Then, plant the offset in your well-draining soil mix. Don’t bury it too deep; just enough for it to stand upright securely.
- Wait for Roots: Resist the urge to water immediately. Wait about a week to 10 days before giving it its first light watering. Then, water sparingly, only when the soil is completely dry.
The “Secret Sauce” (Pro Tips)
I’ve learned a few things over the years that I’m happy to share to boost your success!
- Don’t Drown Them: When you finally start watering your new offsets, err on the side of underwatering. Agave are desert dwellers, and too much moisture is their nemesis, especially when they’re trying to root. It’s much easier to revive an agave that’s a bit too dry than one that’s started to rot.
- Think Warmth, Not Harsh Sun: While Agave love sun, newly propagated plants are a bit more delicate. They do best in bright, indirect light rather than scorching, direct sun, especially when they’re young and haven’t developed a strong root system yet. A little gentle warmth from below, if you have access to a heated propagator or a warm windowsill, can also really encourage root development.
Aftercare & Troubleshooting
Once you see signs of new growth – usually a tiny new leaf emerging from the center – that’s your cue! It means roots are forming. Continue watering sparingly, allowing the soil to dry out completely between waterings. Gradually introduce your new plant to more sunlight as it grows stronger.
The main problem you’ll likely encounter is rot. If your offset looks mushy, discolored (black or brown and slimy), or just won’t perk up despite your best efforts, it’s probably succumbed to rot. This is usually a sign of too much moisture. If you catch it early, you might be able to cut away the rotten parts and let the healthy section callus over again, but it’s often a sign that the cutting is a goner. Keep an eye out for wilting that doesn’t improve with watering – that’s also a bad sign.
A Encouraging Closing
Propagating plants is all about patience and observation. Don’t be discouraged if every single attempt isn’t a roaring success right away. Each cutting you take is a chance to learn and connect more deeply with your plants. So, grab your shears, find a happy offset, and enjoy the journey of creating new life! You’ve got this.
Resource:
https://identify.plantnet.org/k-world-flora/species/Agave%20impressa%20Gentry/data