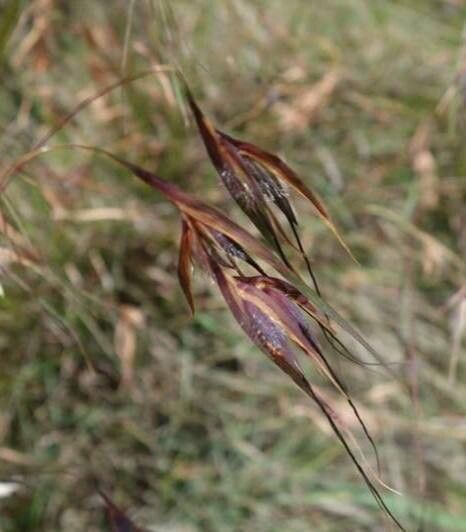
Oh, hello there, fellow plant enthusiast! I’m absolutely thrilled you’re looking to get your hands a little dirty with Themeda triandra, often called Kangaroo Grass. It’s one of those grasses that just sings in the garden, with its beautiful reddish-brown flower heads that dance in the breeze. Watching it grow and bloom is such a joy, and propagating it yourself? Well, that’s a whole other level of garden satisfaction. It’s a relatively straightforward plant to work with, even for those just starting out on their propagation journey.
The Best Time to Start
For Themeda triandra, the sweet spot for propagation hits when the plant is in its active growing season. That means late spring through early summer is your golden window. You’re looking for healthy, actively growing shoots. Avoid trying to propagate from the plant when it looks stressed or is dormant. Vigorous growth equals a higher chance of success!
Supplies You’ll Need
Here’s your handy checklist to get ready:
- Sharp pruning shears or a clean knife: For making neat cuts.
- Well-draining potting mix: A blend of equal parts potting soil, perlite, and sand works wonders.
- Small pots or seed trays: With drainage holes, of course!
- Rooting hormone (optional but recommended): Especially for quicker results.
- Watering can or spray bottle: For gentle hydration.
- Labels and a marker: To keep track of your precious new plants.
- A warm, bright location: With indirect sunlight.
Propagation Methods
Themeda triandra is most commonly and successfully propagated by seed and division.
Propagation by Seed
This is how you’ll get a good number of new plants relatively easily.
- Harvesting Seeds: Wait until the flower heads have turned a rich brown and the seeds within appear mature. You’ll often see fluffy bits attached. Carefully collect these seed heads. It’s best to do this on a dry day.
- Cleaning and Drying: Gently rub the seed heads to release the seeds. You can sieve them to remove excess chaff. Let the seeds dry completely in a shallow dish for a few days in a well-ventilated area.
- Sowing: Fill your pots or trays with the well-draining potting mix. Lightly moisten the soil. Sow the seeds thinly on the surface. You can lightly press them in, but don’t bury them deeply – they need light to germinate.
- Germination: Cover the pots with a clear plastic lid or plastic wrap to maintain humidity. Place them in a warm spot with bright, indirect light. Keep the soil consistently moist but not waterlogged. Germination can take anywhere from 2 weeks to a couple of months, so patience here is key!
- Transplanting: Once the seedlings are a few inches tall and have a decent root system, you can carefully transplant them into individual pots.
Propagation by Division
If you want a more mature plant quicker, or you’re tidying up an existing clump, division is the way to go.
- Timing: This is best done in early spring just as new growth is emerging.
- Excavation: Gently dig up the entire clump of Kangaroo Grass. You might need a spade or garden fork to loosen the soil around it.
- Separation: Once out of the ground, carefully separate the root ball. You can do this by hand, pulling apart sections. If the roots are very tough, you might need to use a sharp, clean knife or trowel to cut through them. Aim for sections that have at least a few healthy shoots and a good amount of root.
- Replanting: Immediately replant the divided sections into well-prepared soil or pots filled with your well-draining mix. Water them in thoroughly.
The “Secret Sauce” (Pro Tips)
Here are a couple of little tricks I’ve learned over the years:
- When sowing seeds, I often find that lightly scarifying the seed coat (gently rubbing seeds with sandpaper or a nail file) can improve germination rates. It helps break down any dormancy.
- If you decide to use rooting hormone for stem cuttings (though less common for this grass), make sure to tap off any excess powder before planting. Too much can actually inhibit root growth! For division, I don’t typically use hormone, but a good sprinkle of mycorrhizal fungi on the roots can give them a fantastic start.
Aftercare & Troubleshooting
Once your seedlings are planted or your divisions are in their new homes, the key is consistent, gentle care.
- Watering: Keep the soil consistently moist but not soggy. Overwatering is the quickest way to invite trouble, especially with newly divided plants, as it can lead to rot. Check the soil moisture by sticking your finger about an inch deep.
- Light: Provide bright, indirect sunlight. Too much direct sun can scorch delicate new growth.
- Troubleshooting: The most common issue you might face is rot, typically due to overwatering. You’ll see a yellowing of the leaves that progresses rapidly, and the base of the plant might turn mushy. If you spot this, try to dry out the soil immediately and remove any affected parts. If it’s severe, unfortunately, the plant might not recover. Another sign of poor establishment can be wilting, which could also be due to underwatering or simply the stress of being moved. Ensure they are keeping the soil evenly moist.
A Encouraging Closing
Propagating plants is a journey of patience and observation. Don’t be discouraged if every single attempt doesn’t result in a thriving new plant. Each one is a learning experience. Enjoy the process, celebrate your successes, and soon you’ll have beautiful Kangaroo Grass spreading its charm throughout your garden! Happy gardening!
Resource:
https://identify.plantnet.org/k-world-flora/species/Themeda%20triandra%20Forssk./data