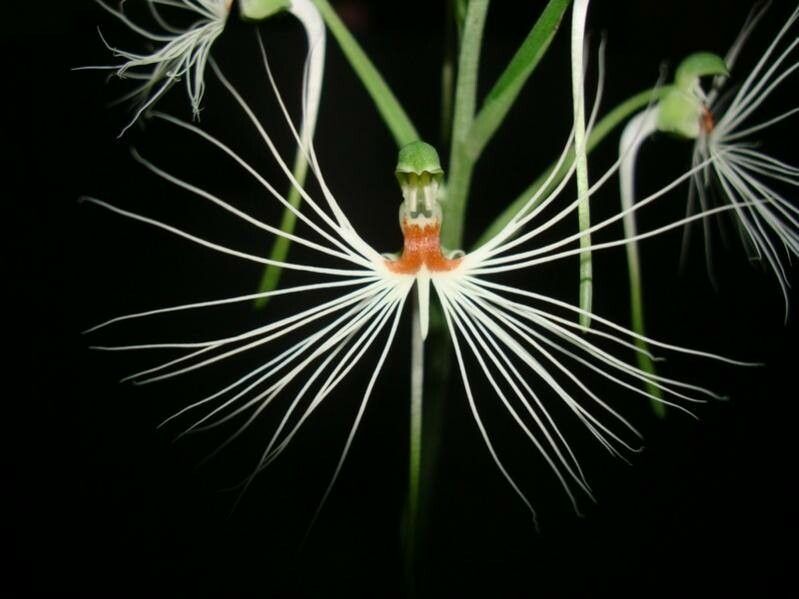
Well hello there, fellow plant lover! Today, we’re diving into the wonderful world of Habenaria medusa. If you’ve ever seen one of these beauties in person, you know what I mean. Those intricate, almost otherworldly blooms, like delicate white lace cascading from the pot, are simply captivating. Propagating your own isn’t just about getting more plants; it’s about understanding this unique orchid and celebrating its resilience. Now, I’ll be honest, Habenaria medusa can be a little fussy, so it might not be the very first plant I’d recommend for a complete beginner. But with a bit of patience and a good understanding of its needs, you can absolutely succeed.
The Best Time to Start
The absolute sweet spot for propagating Habenaria medusa is during its active growing season. This typically means late spring through summer, when the plant is robust and putting out new energy. You’ll want to wait until you see new growth emerging from the tuber – that’s your signal that the plant is ready to be multiplied. Trying to propagate when it’s dormant or just finishing its bloom cycle is often a recipe for disappointment.
Supplies You’ll Need
Before we get our hands dirty, let’s gather our tools. Having everything ready makes the process so much smoother.
- Sharp, sterilized pruning shears or a clean knife: Essential for making clean cuts. Sterilize them with rubbing alcohol to prevent disease.
- Well-draining potting mix: For orchids like Habenaria, a mix designed for epiphytic orchids is ideal. Think bark chips, perlite, and a little bit of sphagnum moss. You want it airy!
- Small pots or seedling trays: Clean and with drainage holes, of course!
- Rooting hormone (optional, but helpful): A powdered hormone can give your cuttings a boost.
- Spray bottle: For misting.
- Clear plastic bag or humidity dome: To maintain a humid microclimate.
- A small trowel or spoon: For scooping mix.
Propagation Methods
The most reliable way to increase your Habenaria medusa collection is through division of its tubers. These orchids grow from fleshy underground tubers, and over time, they can form clusters.
Division of Tubers:
- Gently remove the plant from its pot. Be careful not to damage the roots or the tubers attached to them.
- Clean off excess soil. You can gently rinse the tubers with water to get a better look.
- Identify healthy tubers. Look for plump, firm tubers. You’ll want divisions that have at least one growth point or eye.
- Using your sterilized shears or knife, carefully cut the tubers apart. Make sure each piece has its own root system or is attached to the main root mass. If a tuber is very large, you might need to cut it into smaller sections. For very delicate divisions, I sometimes use a toothpick to gently separate adhered tubers.
- Allow the cut surfaces to dry and callus. This is crucial. Place the divided tubers in a dry, airy spot for 24-48 hours. You’ll see a dry, papery layer form over the cut, which helps prevent rot.
- Pot up your divisions. Plant each tuber in its own small pot filled with your well-draining orchid mix. Bury the tuber just deep enough so that the eye or growth point is visible at the surface, or just barely covered.
- Water lightly. Just enough to settle the mix. You don’t want to drench it.
The “Secret Sauce” (Pro Tips)
Here are a couple of things I’ve learned over the years that make a difference:
- Don’t water too much, too soon. After dividing and potting, resist the urge to water heavily. The tubers need to establish before they can handle a lot of moisture. Light misting is usually enough for the first week or two.
- Provide consistent warmth. Habenaria medusa loves a bit of gentle warmth to encourage root and growth development. Placing your pots on a heated propagation mat (set to a low temperature, around 70-75°F or 21-24°C) can significantly speed up the process.
Aftercare & Troubleshooting
Once your divisions are potted, give them a good home. Keep them in a warm spot with bright, indirect light. Mist the surface of the potting mix occasionally if it looks very dry, but avoid waterlogging the pot.
The biggest challenge you might face is rot. If you notice mushy, dark spots on the tubers or they shrink away and become soft, it’s a sign of too much moisture and poor air circulation. If you catch rot early, you can try to cut away the affected parts with your sterilized knife and let the remaining healthy tissue callus for a few days before repotting in fresh, drier mix. You might lose a division to rot, and that’s okay. It’s part of learning! Be patient; it can take several weeks, sometimes even months, for new growth to appear.
A Encouraging Closing
So there you have it! Propagating Habenaria medusa is a bit of a journey, but oh so rewarding when you see those tiny new tubers sprout and grow. Don’t get discouraged if your first attempt isn’t perfect. Gardening is all about observation and adaptation. Keep learning, enjoy the process, and soon you’ll have a whole cascade of these beautiful blooms to admire. Happy growing!
Resource:
https://identify.plantnet.org/k-world-flora/species/Habenaria%20medusa%20Kraenzl./data