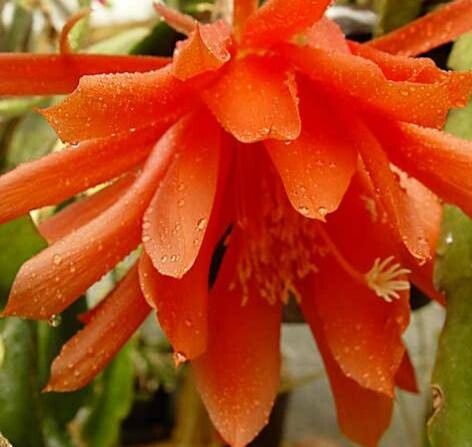
Hello there, fellow plant lovers! I’m so excited to chat with you today about a truly special plant: Disocactus aurantiacus, or the Orange Orchid Cactus. Its cascade of vibrant orange blooms is simply breathtaking, isn’t it? Those delicate, fiery petals will make your heart sing every time they appear. Propagating this beauty is incredibly rewarding. You get to share the magic, fill your own space with more of these stunning plants, and frankly, it’s not nearly as daunting as you might think. Even if you’re just dipping your toes into the world of plant propagation, give this one a go!
When to Get Your Hands Dirty
The absolute best time to propagate Disocactus aurantiacus is during its active growing season, which typically runs from late spring through summer. This is when the plant is full of energy, making it much more receptive to taking root. You want to work with healthy, mature stem segments that aren’t actively flowering.
Your Propagation Toolkit
Gathering your supplies beforehand makes the process smooth and enjoyable. Here’s what you’ll want to have on hand:
- Sharp, clean pruning shears or a very sharp knife: For making clean cuts, reducing the risk of disease.
- Well-draining potting mix: This is crucial! A cactus/succulent mix is perfect, or you can create your own by blending equal parts potting soil, perlite, and coarse sand.
- Small pots or trays: Terracotta pots are great because they breathe.
- Rooting hormone (optional but recommended): A powder or gel that encourages root development. I find it makes a noticeable difference.
- Watering can with a fine rose or a spray bottle: For gentle watering.
- Plastic bag or humidity dome (optional): To create a mini greenhouse environment for cuttings.
- Labels and a marker: To keep track of what you’ve propagated and when.
Bringing New Life: Stem Cuttings
This is by far the most common and effective way to propagate our orange orchid cactus. It’s wonderfully straightforward!
- Select a healthy stem segment. Look for a mature, vibrant stem that’s at least 6 inches long. Avoid any that look thin, pale, or damaged.
- Make a clean cut. Using your sterile pruning shears or knife, slice through the stem where it joins another segment. Always make your cuts at a joint.
- Allow the cutting to callous. This is a critical step! Place the cutting in a dry, well-ventilated spot away from direct sunlight for 2-3 days, or even up to a week. You want the cut end to dry out and form a protective scab, or “callous.” This prevents rot when you plant it.
- Apply rooting hormone (if using). Once calloused, dip the cut end into your rooting hormone powder or gel. Tap off any excess.
- Plant the cutting. Fill your small pot with your well-draining potting mix. Make a small hole in the center with your finger or a pencil. Insert the calloused end of the cutting into the hole. Gently firm the soil around it. If you have multiple cuttings, you can plant them in the same pot, spaced a few inches apart.
- Water lightly. After planting, give the soil a very light watering. You don’t want it soggy.
- Provide the right environment. Place the pot in a bright location but out of direct, harsh sunlight. A little indirect light is perfect. If you’re using a plastic bag or dome, place it loosely over the pot to maintain humidity.
The “Secret Sauce” from My Garden
Over the years, I’ve picked up a few tricks that seem to really boost propagation success with these types of plants.
- Let the soil dry between waterings. Especially when your cuttings are just starting out, it’s so tempting to baby them with water. But resist! Let the top inch or so of soil dry out completely before watering again. This encourages roots to search for moisture and prevents that dreaded rot.
- Bottom heat is your friend. If you have a heated propagator mat, now’s the time to use it! A little gentle warmth from below can significantly speed up root formation. If you don’t have one, placing the pot on top of a nearby appliance that generates a little warmth (like the top of a refrigerator) can often do the trick. Just keep an eye on it!
- Don’t rush it! I know it’s hard to be patient, but these plants can take their sweet time. I’ve had cuttings that took 2-3 months to show signs of new growth. That’s perfectly normal! Trust the process.
Tending to Your New Sprouts & What to Watch For
Once you start seeing tiny new growth, like little leaves or even a slight tug when you gently pull on the cutting, congratulations! Your new plant is establishing roots.
- Gradually reduce humidity. If you used a plastic bag or dome, start opening it up for longer periods each day to acclimate your new plant to normal air.
- Continue with bright, indirect light. Keep them out of hot, direct sun for now.
- Water as needed. Continue to let the soil dry out between waterings. The new plant will become more thirsty as it grows.
Now, for the not-so-fun part: troubleshooting. The most common issue is rot. If your cutting turns mushy, black, or smells funky, it’s likely rotted. This usually happens from too much moisture and not enough callous time. If you see rot setting in, remove the affected part immediately and try again with a fresh cutting, paying close attention to the callousing step. Sometimes, cuttings just don’t take. That’s part of gardening! Don’t get discouraged; just grab another segment and try again.
Happy Growing!
Witnessing a new life emerge from a simple stem cutting is one of the most satisfying joys of gardening. Be patient with your Disocactus aurantiacus, give it the nurturing environment it needs, and before you know it, you’ll have a beautiful new plant to admire. Enjoy the journey, and happy propagating!
Resource: