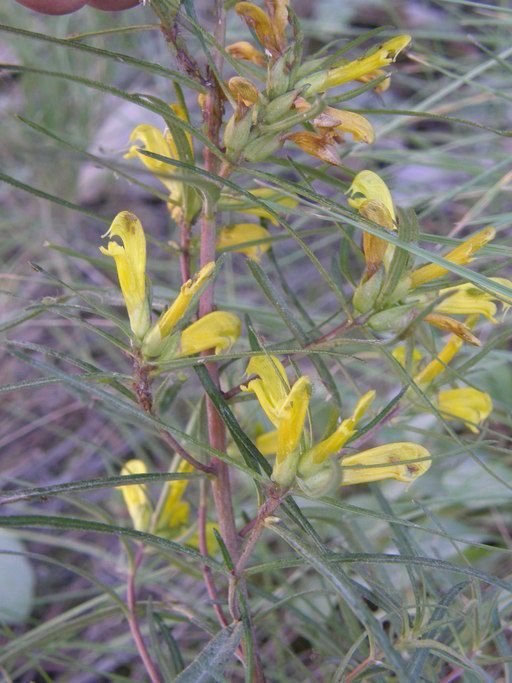
Hello fellow plant lovers! Today, we’re diving into the delightfully charming world of Pedicularis angustifolia, also known as Elephant’s Head. If you’ve ever spotted this beauty with its whimsical, elephant trunk-like blooms nodding in the breeze, you know just how special it is. Propagating these little treasures is such a rewarding journey, letting you extend their unique charm throughout your garden. Now, let’s be honest, Pedicularis can be a bit of a diva, so while not the absolute easiest for a complete beginner, with a little care and attention, you’ll be celebrating success!
The Best Time to Start
The sweet spot for propagating Pedicularis angustifolia is generally in the late spring to early summer. This is when the plant is actively growing and has ample energy to put into developing new roots. Look for healthy, new shoots that are not yet flowering. If you’re working with divisions, the very beginning of spring as new growth emerges is also a fantastic window.
Supplies You’ll Need
To give your Pedicularis cuttings the best shot at life, gather these handy items:
- Sharp, clean pruning shears or a sharp knife: Essential for taking clean cuts.
- Well-draining potting mix: A seed starting mix or a blend of peat moss, perlite, and a bit of compost works wonders. The key is aeration!
- Rooting hormone (optional but helpful): A powder or gel can give cuttings a boost.
- Small pots or trays: Clean, with drainage holes, of course.
- Plastic bags or a propagation dome: To maintain humidity.
- Watering can with a fine rose: To water gently.
- Bottom heat (optional): A heating mat can encourage faster root development.
Propagation Methods
Let’s get our hands dirty and explore the ways to bring more Elephant’s Heads into your world.
Stem Cuttings: The Classic Approach
- Take your cuttings: In late spring or early summer, find a healthy stem and make a clean cut just below a leaf node. You want cuttings that are about 3-4 inches long.
- Prepare the cuttings: Gently remove the lower leaves, leaving only a few at the top. If they’re quite large, you can even snip them in half to reduce water loss.
- Dip in rooting hormone: If you’re using it, briefly dip the cut end into the rooting hormone, tapping off any excess.
- Plant them: Insert the cuttings about an inch deep into your prepared, moist potting mix. Gently firm the soil around them.
- Create a humid environment: Water them thoroughly and then cover the pots with a plastic bag or a propagation dome. Make sure the leaves don’t touch the sides of the bag if possible. Place them in a bright spot out of direct sun.
Division: A More Established Plant
If you have a mature Pedicularis plant, division is a great way to multiply.
- Gently excavate: In early spring, carefully dig up the plant.
- Separate the clumps: Gently shake off excess soil to expose the root ball. You should be able to see distinct sections or crowns. Carefully pull or use a clean knife to separate these into smaller divisions, ensuring each section has healthy roots and at least one growing.
- Replant immediately: Plant your divisions into their new spots in the garden or in pots with fresh, well-draining soil. Water them in well.
The “Secret Sauce” (Pro Tips)
Here are a couple of little tricks I’ve learned over the years that can really make a difference:
- Don’t drown those leaves! When you’re misting or watering your cuttings, be mindful not to let water sit on the leaves for too long, especially when they are enclosed in plastic. This is a common culprit for rot. A light misting is usually sufficient once enclosed.
- Warm toes equal happy roots. If you can provide gentle bottom heat using a heating mat, you’ll find that your cuttings root much faster and more reliably. It mimics that perfect spring soil temperature.
Aftercare & Troubleshooting
Once you see signs of new growth or the cuttings feel a bit resistant when gently tugged, this indicates root development.
- Acclimatize slowly: Gradually introduce your new plants to less humid conditions over the course of a week or so. Remove the plastic for increasing periods each day.
- Continue to water: Keep the soil consistently moist but not soggy.
- Watch for rot: The most common problem is rot, which looks like mushy, black stems on your cuttings. This is usually caused by too much moisture and poor air circulation. If you spot it, remove the affected cutting immediately to prevent it from spreading.
- Patience is key: Sometimes, it can take several weeks, even months, for Pedicularis to show significant root development. Don’t give up too soon!
A Little Encouragement to Close
Growing Pedicularis angustifolia from cuttings or divisions is a journey that teaches us a lot about patience and observation. Don’t be discouraged if a few don’t make it – it happens to the best of us! Celebrate every tiny new leaf or root, and savor the joy of nurturing these unique plants. Happy gardening, and enjoy the whimsical dance of your Elephant’s Heads!
Resource:
https://identify.plantnet.org/k-world-flora/species/Pedicularis%20angustifolia%20Benth./data