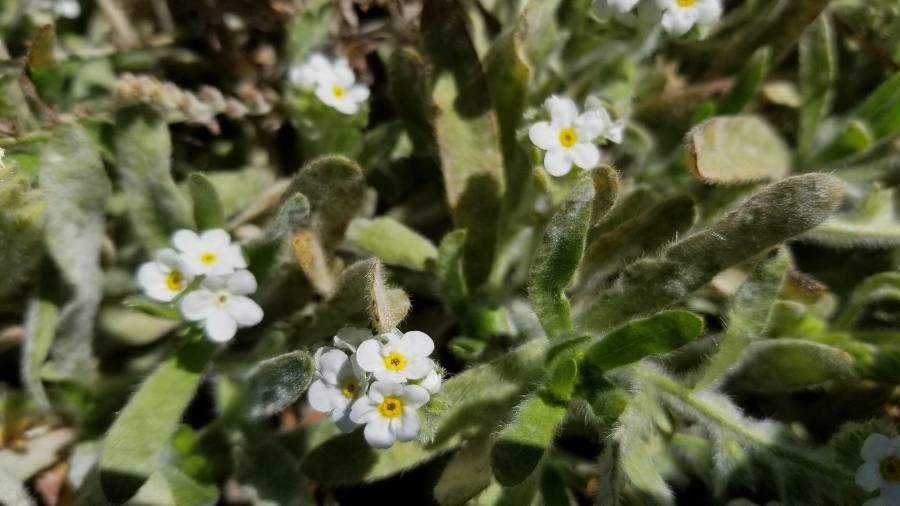
Oh, hello there! I’m so glad you’re thinking about diving into the wonderful world of propagation, and what a fantastic choice you’ve made with Plagiobothrys mollis. It’s a real little gem, isn’t it? Those delicate, sometimes hairy leaves and those sweet little blooms just bring a smile to my face. Sharing cuttings and baby plants is one of my absolute favorite gardening joys. It’s like cloning a little piece of happiness to give away or to fill in those empty spots in the garden. Now, for beginners, I’d say Plagiobothrys mollis is moderately easy. It’s not a finicky plant at all, but it does appreciate a bit of mindful attention.
The Best Time to Start
For me, the sweet spot for propagating Plagiobothrys mollis is late spring to early summer. This is when the plant is actively growing. You’ll see lots of new, tender shoots developing. These are much more receptive to forming roots than older, woody stems. Think of it as catching the plant at its most energetic – prime time for making new life!
Supplies You’ll Need
Gathering your supplies is half the fun, right? Here’s what I like to have on hand:
- Sharp, clean pruning shears or a sharp knife: Crucial for making clean cuts that heal well.
- Rooting hormone powder (optional but helpful): This can significantly boost success rates.
- Small pots or seed trays: With good drainage holes, of course.
- A well-draining potting mix: I often use a blend of equal parts peat moss or coco coir, perlite, and a little bit of compost. You want something that holds moisture but doesn’t get waterlogged.
- A plastic bag or propagation dome: To create a humid environment.
- Watering can with a fine rose: For gentle watering.
- Labels and a permanent marker: To keep track of what’s what!
Propagation Methods
Plagiobothrys mollis is quite happy to be propagated from stem cuttings. It’s tried and true!
- Taking Cuttings: Select a healthy, non-flowering stem. Look for one that’s about 4-6 inches long. Using your clean shears or knife, make a clean cut right below a leaf node (that’s where a leaf attaches to the stem – it’s a hotbed of potential!). Remove the lower leaves from the cutting, leaving only a few at the very top. This prevents them from rotting in the soil.
- Applying Rooting Hormone (Optional): If you’re using rooting hormone, dip the cut end of the stem into the powder. Tap off any excess.
- Planting the Cuttings: Fill your small pots or trays with your prepared potting mix. Make a small hole in the center of the mix with your finger or a pencil. Gently insert the cut end of the stem into the hole, ensuring the nodes where you removed the leaves are buried. Firm the soil gently around the cutting.
- Creating Humidity: Water the soil thoroughly but gently. Then, cover the pot or tray with a clear plastic bag, or place it inside a propagation dome. This traps humidity, which is essential for cuttings to root. Make sure the leaves don’t touch the plastic if possible, as this can encourage rot.
- Placement: Place your pots in a location that receives bright, indirect light. Avoid direct sunlight, as this can scorch the delicate cuttings.
The “Secret Sauce” (Pro Tips)
Here are a few little nuggets I’ve picked up over the years that make a difference:
- Bottom Heat is Your Friend: If you can, place your pots on a heated propagation mat. This gentle warmth encourages root development from below, giving your cuttings a real boost. I find it speeds things up considerably!
- Don’t Drown Them: While humidity is key, overwatering is the enemy. Check the soil moisture regularly by gently touching the surface. It should feel moist, not soggy. If it feels wet, wait a day or two before watering again.
- Patience with the Twist Test: After a few weeks, you can gently tug on a cutting. If you feel resistance, it means roots have formed! If it comes out easily, it likely hasn’t rooted yet. Don’t despair if it’s not immediate; Plagiobothrys mollis can sometimes take their sweet time.
Aftercare & Troubleshooting
Once your cuttings have developed a healthy root system – you’ll see roots emerging from the drainage holes or feel that resistance when you gently tug – it’s time for a little more dedicated care. Gradually remove the plastic cover over a few days to acclimate the new plant to normal humidity. Continue to water gently. You can transplant them into slightly larger pots once they have a good root ball.
The most common sign of failure is rot, which usually shows up as a black, mushy stem or wilting that doesn’t recover. This is almost always a sign of overwatering and poor drainage. If you see this, sadly, it’s best to discard the cutting and start again, making sure your soil is drier and has better aeration next time. Yellowing leaves can sometimes be a sign of too much direct sun, so adjust their placement.
A Encouraging Closing
There you have it! Propagating Plagiobothrys mollis is such a rewarding way to expand your garden and share the joy of these lovely plants. Remember to be patient with your little cuttings. Gardening is a journey, and every new plant you nurture is a small triumph. Enjoy the process, and happy growing!
Resource: