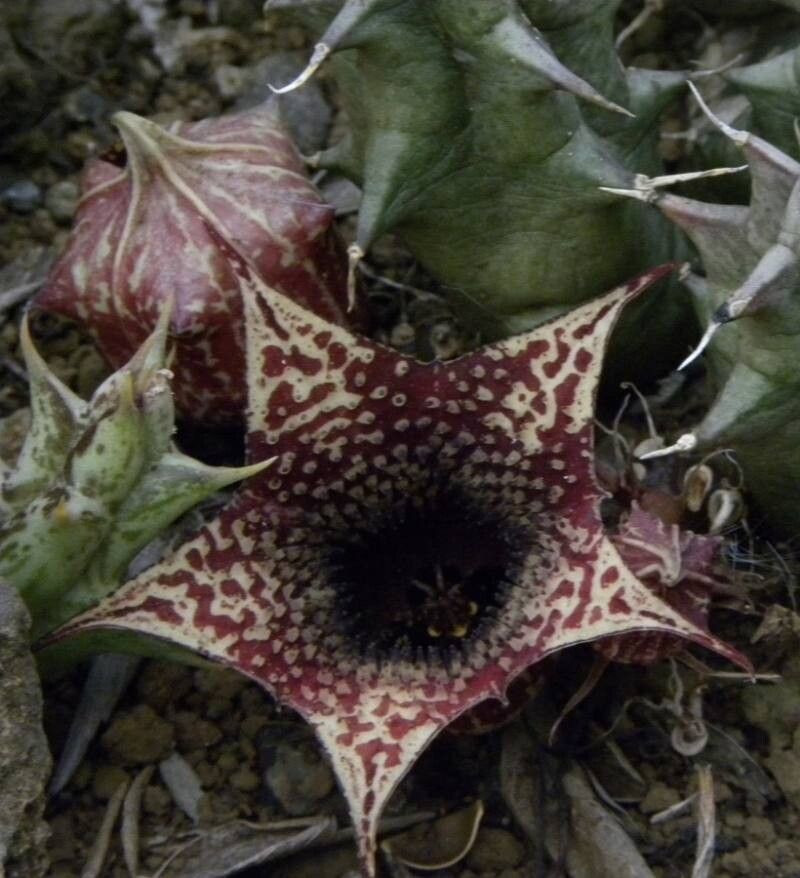
Oh, Huernia loeseneriana! What a charming little plant. With its fascinating, star-shaped blooms that often pack a wonderfully earthy scent, it’s a real conversation starter in any succulent collection. If you’ve ever admired its unique beauty and thought, “I’d love more of these!”, you’re in luck. Propagating Huernia loeseneriana is a wonderfully rewarding experience, and I’m delighted to share how I do it. For beginners, I’d say this one leans towards the easier side, which makes it a great plant to practice your propagation skills on.
The Best Time to Start
Hands down, the spring and early summer are your golden ticket for propagating Huernia loeseneriana. This is when the plant is actively growing and has plenty of energy to put into developing new roots. You want to work with healthy stems that are robust and not stressed. Mid-shoot sections are usually ideal, avoiding the very old, woody base or the tender, new growth at the tip.
Supplies You’ll Need
Here’s a little checklist of what I always have on hand when I’m propagating:
- Sharp, clean pruning shears or a craft knife: Hygiene is key to prevent disease.
- Rooting hormone powder or gel: While not strictly necessary for Huernia, it really speeds things up and increases success rates.
- A well-draining potting mix: I swear by a cactus and succulent blend, or my own mix of potting soil, perlite, and coarse sand (roughly 1:1:1).
- Pots or trays: Small pots, seedling trays, or even just plastic containers with drainage holes work wonderfully.
- Spray bottle: For a gentle mist of water.
- Labels: Trust me, you’ll thank yourself later!
Propagation Methods
My favorite and most reliable method for Huernia loeseneriana is by stem cuttings. It’s straightforward and yields great results.
- Take the Cutting: Gently twist or cut a healthy stem section about 3-6 inches long from the main plant. Look for segments that are firm and not mushy.
- Let it Callus: This is super important! After taking your cutting, set it aside in a dry, airy spot for 2-5 days. You want the cut end to dry out and form a callous. This prevents rot when you plant it. Seriously, don’t skip this step!
- Optional: Apply Rooting Hormone: Once calloused, dip the cut end lightly into your rooting hormone powder or gel. Tap off any excess.
- Plant Your Cutting: Fill your small pot with your well-draining mix. Make a small hole in the center with your finger or a pencil. Gently insert the calloused end of your cutting into the hole, making sure it’s stable. You can plant a few cuttings in one pot, leaving space between them.
- Water Sparingly: After planting, I give mine a very light watering. The goal is just to settle the soil around the cutting. You don’t want to drench it.
Another method you can try is division, especially if your plant is getting a bit crowded.
- Gently Remove from Pot: Carefully ease the parent plant out of its container.
- Separate the Offsets: Look for healthy rosettes or clumps that are growing from the base. Gently tease them apart with your fingers or use a clean knife to separate them if they’re tightly bound. Make sure each division has at least a few healthy stems.
- Let Them Callus (Just Like Cuttings): Even divisions benefit from a short drying period. Let the cut or separated surfaces heal for a day or two.
- Pot Them Up: Plant each division in its own small pot with well-draining mix, watering as you would a cutting.
The “Secret Sauce” (Pro Tips)
I’ve learned a few tricks over the years that really give these little guys a boost.
- The “Breathable” Pot Trick: For cuttings, I often use terracotta pots. They allow the soil to dry out more quickly, which is a Huernia’s best friend. If you’re using plastic, make sure those drainage holes are ample!
- Bottom Heat is Your Friend: While not always essential, placing your potted cuttings on a heat mat designed for seedlings can significantly speed up root development. Just a gentle warmth encourages them to get going.
- Don’t Mist Too Much: While succulents like a bit of humidity, over-misting a cutting can lead to fungal issues. I usually only mist if the soil looks bone dry after a week or two, and I do it lightly.
Aftercare & Troubleshooting
Once your cuttings are planted, patience is key. Keep them in a bright, indirect light spot. Avoid direct, scorching sun. Water very sparingly – think a light sprinkle every week or two, only when the soil is completely dry. You’ll know it’s taking off when you see new growth emerging from the tip or sides of the stem, or if the cutting feels firmly rooted when you give it a gentle tug.
The biggest thing to watch out for is rot. If your cutting turns black and mushy from the base up, it’s a sign of too much moisture and often a lack of proper callusing. Unfortunately, if rot sets in, it’s usually fatal, so prevention is paramount. If you see a bit of shriveling, don’t panic just yet; it might be thirsty. Give it a tiny sip of water if the soil is bone dry.
A Encouraging Closing
Propagating Huernia loeseneriana is a journey. There might be a cutting or two that doesn’t make it, and that’s perfectly normal. Don’t get discouraged! Enjoy the process of nurturing these new plants, and celebrate every tiny bit of progress. Soon enough, you’ll have a whole troop of these fascinating blooms to share. Happy propagating!
Resource:
https://identify.plantnet.org/k-world-flora/species/Huernia%20loeseneriana%20Schltr./data