Hey there, fellow plant lovers! Grab a cup of something warm, because today we’re diving into the delightful world of Calliandra brenesii. If you’ve ever swooned over those delicate, feathery blooms and the way they seem to dance in the breeze, you’re in for a treat.
Why Propagate Calliandra brenesii?
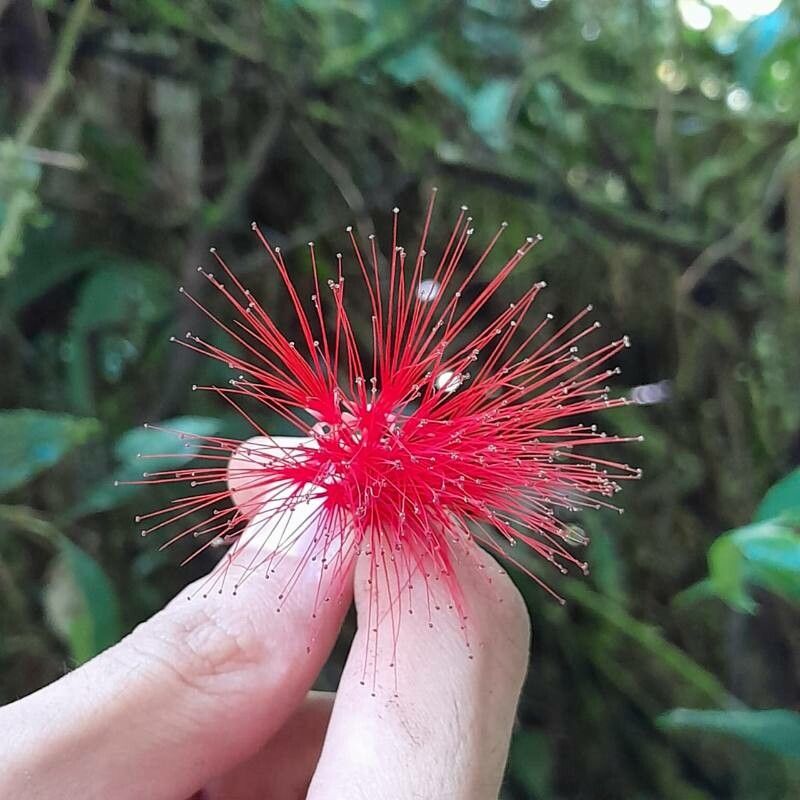
This little jewel, often called the “Fairy Duster” or “Pueblo Flame,” is such a joy to have around. Its vibrant, pom-pom flowers are a magnet for hummingbirds and butterflies, and when it’s happy, it just seems to radiate good vibes. Propagating it means you can share this natural magic with friends, fill your own garden with more of these beauties, or simply enjoy the rewarding journey of growing a plant from scratch.
Now, as for beginners, I’d say Calliandra brenesii falls into the moderately easy category. It’s not as fussy as some orchids, but it does appreciate a little thoughtful care. With these tips, you’ll be well on your way to success!
The Best Time to Start
Hands down, the late spring to early summer is your golden window. This is when your Calliandra brenesii is actively growing, full of vigor, and ready to put energy into developing new roots. You’re basically tapping into its annual growth spurt for the best results. Look for healthy, non-flowering stems to ensure the plant’s resources are directed towards root formation.
Supplies You’ll Need
Let’s get our toolkit ready! Here’s what I always have on hand:
- Sharp, sterile pruning shears or a clean knife: Essential for clean cuts that heal well.
- Rooting hormone: A good quality product can significantly boost your success rate. Look for one formulated for stem cuttings.
- Propagating medium: A well-draining mix is crucial. I love using a blend of perlite and peat moss (about 50/50), or a commercial seed-starting mix. Some people also swear by coir.
- Small pots or trays: Clean containers with drainage holes are a must.
- Clear plastic bag or propagator: To create a humid environment around your cuttings.
- Watering can with a fine rose or spray bottle: For gentle watering.
- Optional: Heat mat: This isn’t strictly necessary, but it can really speed things up, especially if your home tends to be on the cooler side.
Propagation Methods: Let’s Get Our Hands Dirty!
The most reliable way to propagate Calliandra brenesii at home is through stem cuttings. Here’s how I do it:
-
Select Your Cuttings: On a healthy, mature plant, choose stems that are semi-hardwood. This means they’ve started to mature and aren’t totally soft and green, but they haven’t become woody and old either. Aim for stems about 4-6 inches long, with at least a couple of leaf nodes. Gently pinch or snip a cutting from the parent plant.
-
Prepare the Cutting: Remove the lower leaves from the stem, leaving just a couple of leaves at the top. This prevents them from rotting in the moist soil. If the upper leaves are very large, you can even cut them in half to reduce moisture loss. Next, dip the cut end of the stem into your rooting hormone, tapping off any excess.
-
Potting Up: Fill your clean pots with your prepared propagating medium. Make a small hole in the center of the medium with your finger or a pencil. Gently insert the cut end of your Calliandra cutting into the hole, ensuring it’s making good contact with the rooting hormone. Firm the medium gently around the stem to hold it in place.
-
Create a Humid Environment: Water the medium thoroughly but gently. Then, place the pot inside a clear plastic bag or propagator. Seal it loosely so there’s still some air exchange, or open it up for a few minutes each day. This creates a mini-greenhouse effect, keeping humidity high, which is vital for cuttings to develop roots before they dry out.
-
Placement is Key: Place your cuttings in a bright, indirect light location. Avoid direct sunlight, which can scorch the delicate cuttings. Consistent warmth is also beneficial.
The “Secret Sauce” (Pro Tips)
Over the years, I’ve learned a few tricks that really make a difference. Think of these as my little gifts to you!
- Bottom Heat Boost: If you have a heat mat, place your pots on it. This provides gentle warmth to the base of the cutting, encouraging root development much faster. It’s like giving them a warm footbath to get things started!
- “Air Layering” for the Brave: For larger, established plants, you can try air layering. This involves wounding a stem, wrapping it with moist sphagnum moss, and then covering it all with plastic wrap. Roots will form within the moss, and then you can sever the stem below the roots and pot it up. It’s a bit more involved but can yield a larger plant more quickly.
- Patience is a Virtue (and a Necessity): Calliandra brenesii can be a bit leisurely about rooting. Don’t be discouraged if you don’t see roots right away. Give it at least 4-6 weeks, sometimes longer. Resist the urge to pull them out and check!
Aftercare & Troubleshooting
Once you start to see signs of root development – usually new leaf growth – it’s time to gradually acclimate your new baby to normal conditions.
- Ventilation: Begin by gradually opening the plastic bag or propagator a bit more each day over a week or so. This helps the new plant adjust to lower humidity.
- Watering: Once you’ve removed the cover, continue to water regularly, keeping the soil consistently moist but not waterlogged. As the plant grows, you can reduce watering frequency.
- Feeding: Wait until you see vigorous new growth before introducing a diluted, balanced liquid fertilizer. Start with half-strength.
Troubleshooting: The most common culprit for failure is rot. This usually happens if the cuttings are kept too wet or have poor drainage. You might notice stems turning black and mushy. If you see this, unfortunately, that cutting is likely lost. Ensure good air circulation and a well-draining mix to prevent this. If your cuttings look limp and dry, they likely haven’t rooted and have dried out.
A Heartfelt Closing
Growing plants is a journey, and with Calliandra brenesii, it’s a particularly beautiful one. Be patient with yourself and with your little cuttings. Sometimes they thrive, and sometimes they don’t – that’s just part of the gardening dance. Celebrate every bit of new growth, learn from every experience, and most importantly, enjoy the process of bringing this stunning plant into your life. Happy propagating!
Resource:
https://identify.plantnet.org/k-world-flora/species/Calliandra%20brenesii%20Standl./data