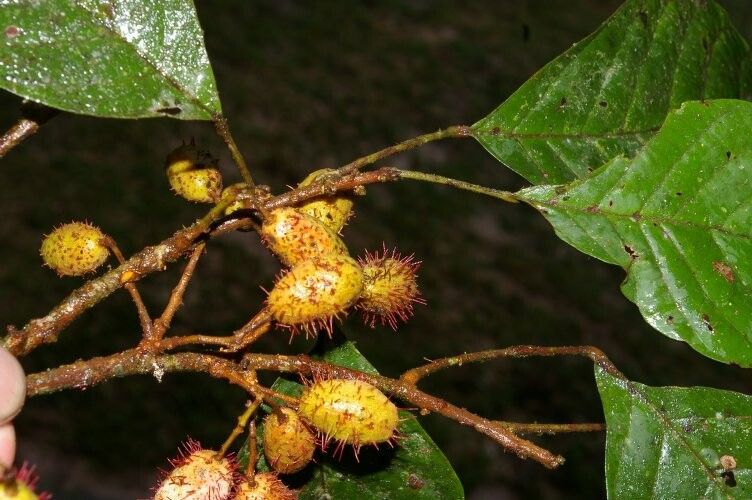
Hello, fellow garden enthusiasts! It’s so wonderful to be back here, sharing another exciting journey into the world of plants. Today, we’re diving into something truly special: Sloanea sinemariensis. This magnificent tree, with its elegant foliage and potential for dramatic blooms, is a treasure to behold. And you know what’s even more rewarding? Growing it yourself from scratch!
Propagating Sloanea sinemariensis might sound like a big undertaking, but trust me, the satisfaction of nurturing a tiny cutting into a robust new plant is just incredible. Is it a walk in the park for absolute beginners? Honestly, I’d say it requires a little patience and attention to detail, but it’s definitely achievable with the right approach. Think of it as a delightful challenge that will teach you a lot.
The Best Time to Start
For the highest success rate with Sloanea sinemariensis, I always recommend starting in the late spring to early summer. This is when the plant is in its active growth phase. You’ll find that cuttings taken during this time have a vibrant energy, making them more receptive to rooting and less prone to succumbing to stress. Look for new, semi-hardwood growth – a stem that’s slightly firm but still has some flexibility. Avoid the very soft, floppy new tips or the old, woody stems.
Supplies You’ll Need
Here’s a handy list of what you’ll want to have on hand before you get started:
- Sharp Pruning Shears or a Clean Knife: Essential for making clean cuts.
- Rooting Hormone: A good quality rooting powder or gel will significantly boost your success rate.
- Well-Draining Potting Mix: I like a blend of potting soil, perlite, and a bit of coco coir for aeration and moisture retention. A good general-purpose potting mix with added perlite works well too.
- Small Pots or Seedling Trays: Clean pots are a must!
- Plastic Bags or a Propagator Lid: To create a humid environment.
- Watering Can with a Fine Rose: Gentle watering is key.
- Labels and a Pen: To keep track of your cuttings and when you took them.
Propagation Methods
Let’s get our hands dirty! We’ll focus on the most reliable method for Sloanea sinemariensis: stem cuttings.
- Select Your Cuttings: As mentioned, look for healthy, semi-hardwood stems that are about 6-8 inches long. Make sure there are several nodes (the points where leaves attach to the stem) along the cutting.
- Prepare the Cuttings: Using your sharp shears or knife, make a clean cut just below a node. Remove the lower leaves from the stem, leaving only a few at the very top. This reduces water loss and prevents leaves from rotting in the soil.
- Apply Rooting Hormone: Dip the cut end of each stem into your rooting hormone. Tap off any excess. This hormone contains plant growth stimulants that encourage root development.
- Plant Your Cuttings: Fill your small pots with the well-draining potting mix. Make a small hole in the center of the soil with your finger or a pencil. Insert the treated end of the cutting into the hole, ensuring at least one node is buried under the soil. Gently firm the soil around the base of the cutting.
- Create a Humid Environment: Water the soil gently. Then, place the pot inside a plastic bag or cover it with a propagator lid. This traps humidity, which is crucial for preventing the cuttings from drying out before they develop roots. Make sure the plastic bag doesn’t touch the leaves if possible. Use stakes to prop it up if needed.
- Placement: Place your pots in a bright, indirect light location. Avoid direct sunlight, as this can scorch the delicate cuttings.
The “Secret Sauce” (Pro Tips)
Now for a few little tricks I’ve picked up over the years:
- Bottom Heat is Your Friend: If you have a heated propagator or can place your pots on a heat mat, do it! Warm soil temperatures significantly speed up root formation. It mimics what happens naturally in the warmer ground during the growing season.
- The “Wiggle Test” is Your Indicator: Don’t be tempted to pull on your cuttings too soon to check for roots! Wait at least 4-6 weeks. A good way to tell without disturbing them is to gently tug on the cutting. If there’s resistance, you’ve got roots!
- Think About Airflow: While humidity is important, stagnant air can lead to fungal issues. If you’re using a plastic bag, open it up for a few minutes each day to allow for some air exchange. This helps prevent problems before they start.
Aftercare & Troubleshooting
Once your cuttings have developed a good root system and you can feel that resistance (the “wiggle test”!) or even see roots peeking from the drainage holes, it’s time for their next stage. Carefully transplant them into slightly larger pots with fresh potting mix. Continue to water them gently and keep them in bright, indirect light. Gradually introduce them to slightly less humid conditions over a week or two.
The most common issue you might encounter is rot. This usually happens due to overwatering or poor drainage, leading to soggy soil that suffocates the roots. You might see the stem turning mushy and black, or the leaves wilting and yellowing disproportionately. If you spot rot, it’s often difficult to save, but you can try taking a healthy cutting from higher up the stem and starting again, ensuring better drainage and less moisture this time.
A Encouraging Closing
Propagating plants is an act of faith, patience, and a deep connection with nature. Don’t be discouraged if not every cutting makes it. Each attempt is a learning experience. Enjoy the process, celebrate the small victories, and know that with a little care and persistence, you’ll soon be enjoying your very own Sloanea sinemariensis! Happy gardening!
Resource:
https://identify.plantnet.org/k-world-flora/species/Sloanea%20sinemariensis%20Aubl./data