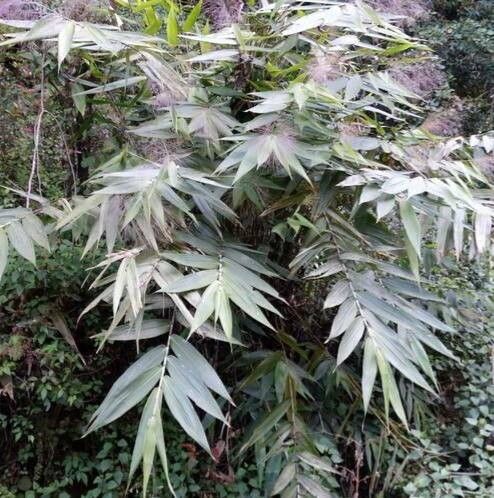
Hello there, fellow plant enthusiasts! I’m so excited to chat with you today about a truly spectacular grass: Thysanolaena latifolia, commonly known as the broom grass or tiger grass. If you’ve ever seen this beauty unfurling its elegant, feathery plumes, you know exactly why it’s captured my heart. It brings such a graceful, almost tropical vibe to any garden, and those magnificent flower stalks? Pure magic! Even better, learning to propagate it yourself opens up a whole new world of gardening possibilities. Don’t worry if you’re new to this; while it has its quirks, with a little guidance, you’ll be enjoying your own fluffy delights in no time.
The Best Time to Start
My personal sweet spot for propagating Thysanolaena latifolia is late spring or early summer. This is when the plant is really hitting its stride, pushing out new growth with vigor. You’re looking for stems that are firm and actively growing, but not yet flowering or going to seed. Think of it as snagging those juicy, energetic bits before they get too mature.
Supplies You’ll Need
Gathering your tools is half the fun, right? Here’s what I always have on hand:
- Sharp Pruning Shears or a Clean Knife: Essential for making clean cuts. Dirty tools spread disease, so keep them spotless!
- Well-Draining Potting Mix: I like a blend of good quality potting soil, perlite, and a bit of coarse sand. You want it to dry out reasonably quickly between waterings.
- Rooting Hormone (Optional but Recommended): This isn’t strictly necessary for Thysanolaena, but it can give your cuttings a significant boost and increase success rates, especially if you’re a beginner. Look for one containing IBA.
- Small Pots or Trays: Clean pots with drainage holes are a must.
- Plastic Bags or a Propagation Dome: To create a humid environment for your cuttings.
- Water: For watering and potentially for water propagation, if you go that route.
- Labels and a Marker: Trust me, you’ll forget what you planted and when!
Propagation Methods
Here are the two methods I find most successful for our feathery friend:
Stem Cuttings: The Most Reliable Route
This is my go-to for Thysanolaena latifolia.
- Select Your Stems: Look for healthy, non-flowering stems. You want pieces that are about 6-8 inches long.
- Make the Cut: Using your clean shears, make a clean cut just below a node (the swollen joint where leaves emerge). This is where the magic of rooting happens.
- Prepare the Cuttings: Gently strip off the lower leaves, leaving only two or three at the very top. This prevents them from rotting in the soil. If the remaining leaves are very large, you can even cut them in half to reduce water loss.
- Apply Rooting Hormone (If Using): Dip the cut end into your rooting hormone powder, tapping off any excess.
- Plant Them Up: Fill your clean pots with your well-draining potting mix. Make a small hole with your finger or a pencil and gently insert the cutting, ensuring the node is buried. Firm the soil gently around the stem.
- Water and Cover: Water the soil lightly until it’s moist but not waterlogged. Then, cover the pots with a plastic bag or propagation dome to maintain high humidity. Secure it with a rubber band.
Division: A Classic Approach
If you have an established clump, division is a simple and effective way to get more plants.
- Dig Up the Clump: In the spring, carefully dig up the entire plant, or a section of it. Try to disturb the roots as little as possible.
- Separate the Rhizomes: Look for the thick, underground stems (rhizomes). You can often gently pull these apart with your hands. If they’re stubborn, use a clean, sharp spade or knife to divide the clump into sections, ensuring each section has at least one or two healthy shoots and some root attached.
- Replant: Immediately replant these divisions into well-prepared soil, watering them in well. They’ll settle and grow into new plants.
The “Secret Sauce” (Pro Tips)
Here are a few little tricks I’ve picked up over the years that make a big difference:
- Don’t Let the Leaves Touch the Water (for water propagation): If you ever consider water propagation (though I find stem cuttings in soil more reliable for this grass), make absolutely sure no leaves are submerged. They’ll just rot and take your cutting with them. Only the stem should be in the water.
- Bottom Heat is Your Friend: While not strictly essential, placing your pots on a propagation mat set to a low temperature (around 70-75°F or 21-24°C) can really speed up root development. It mimics that lovely warm soil feel the plant loves in summer.
- Patience is Key (and Humidity!): Thysanolaena can be a bit slow to root, especially if the conditions aren’t quite right. Keep that humidity high, and resist the urge to constantly poke at them! Checking for roots too soon can disturb fragile new growth.
Aftercare & Troubleshooting
Once your cuttings have been in their humid haven for a few weeks, it’s time to check for roots. Gently tug on a cutting. If you feel resistance, congratulations! You’ve got roots. You can also look for new leaf growth.
- Acclimatize Slowly: Once roots are established, gradually introduce your new plants to lower humidity. Start by opening the plastic bag for an hour or two each day.
- Watering: Water when the top inch of soil feels dry.
- Light: Place them in bright, indirect light. Direct sun can be too harsh for brand-new cuttings.
- Troubleshooting: Rot: The most common issue is rot, usually caused by overwatering or poor drainage. If you see stems turning mushy and brown, unfortunately, that cutting is likely lost. Pull it out immediately to prevent it from spreading. Ensure your soil drains well and avoid drenching your cuttings – moist is the goal, not soggy. Yellowing leaves can sometimes indicate too much direct sun or a nutrient deficiency, but often, it’s just the plant adjusting.
A Gentle Encouragement
Propagating plants is truly one of the most rewarding aspects of gardening. It connects you to the life cycle of the plants you love and allows you to share that beauty with others. Be patient with your Thysanolaena latifolia cuttings. Some will take, some might not, and that’s all part of the learning process. Just enjoy the journey, celebrate your successes, and soon you’ll be surrounded by the elegant plumes of your own homegrown broom grass. Happy propagating!
Resource: