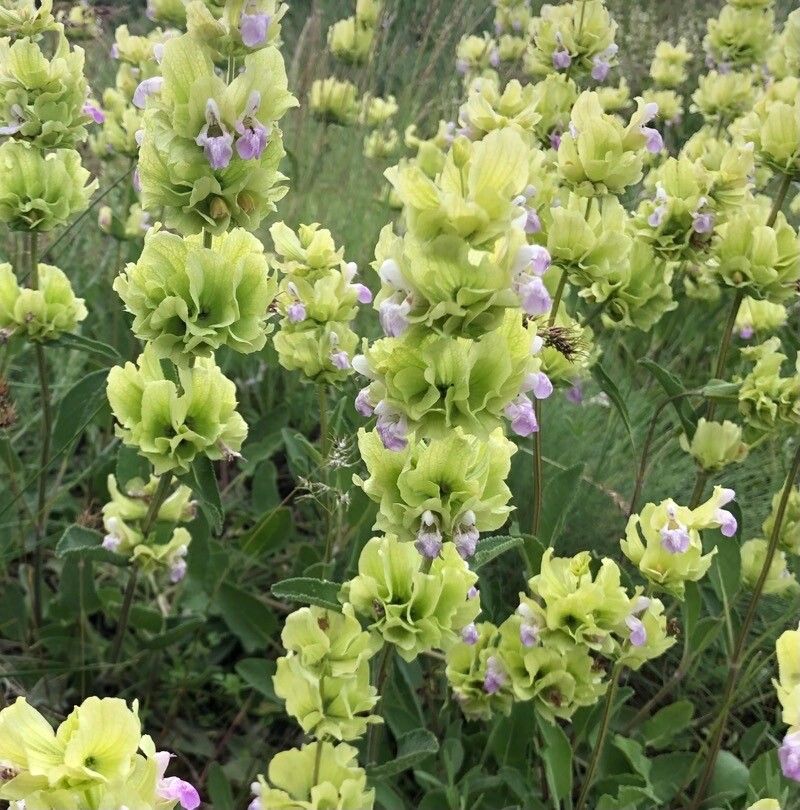
Well hello there, fellow garden enthusiasts! It’s so wonderful to have you join me. Today, we’re diving into the delightful world of Salvia absconditiflora, a plant that always brings a smile to my face with its vibrant blooms and charming presence. If you’ve ever admired its beauty and thought, “I wish I had more of those!”, you’re in the right place. Propagating this beauty is truly a rewarding experience, and I’m excited to share my secrets with you. Don’t worry if you’re new to this; while it has a few quirks, Salvia absconditiflora is moderately easy to propagate with a little know-how.
The Best Time to Start
For Salvia absconditiflora, the sweet spot for propagation is undoubtedly late spring to early summer. This is when the plant is in a vigorous growth phase, and its stems are putting on a good show. You’ll want to look for new, non-woody growth – think of those soft, flexible tips rather than anything stiff and woody from older parts of the plant. This young, pliable material has the best chance of rooting quickly and successfully.
Supplies You’ll Need
Gathering your tools beforehand makes the whole process so much smoother. Here’s what I always have on hand:
- Sharp pruning shears or a clean craft knife: For making precise cuts.
- Well-draining potting mix: I love a blend of peat moss or coco coir, perlite, and a little sterile potting soil. This prevents waterlogging, which is crucial.
- Small pots or seed trays: Clean ones are a must to prevent disease.
- Rooting hormone (optional but recommended): A powder or gel that encourages root development.
- Clear plastic bag or a propagation dome: To create a humid environment.
- Spray bottle: For misting.
- Labels: To keep track of your precious cuttings!
- Small pebbles or grit (optional): For improving drainage at the bottom of pots.
Propagation Methods
Let’s get our hands dirty! Stem cuttings are my go-to for Salvia absconditiflora.
Propagating by Stem Cuttings
- Select Your Cuttings: Pick healthy, non-flowering stems from your mature plant. Aim for cuttings about 4-6 inches long.
- Make the Cut: Using your sharp pruners or knife, make a clean cut just below a leaf node. This is the point where a leaf attaches to the stem, and it’s where roots are most likely to form.
- Prepare the Cuttings: Gently remove the lower leaves, leaving just a few at the top. This prevents them from rotting in the soil and allows the plant to focus its energy on root production.
- Apply Rooting Hormone (Optional): Dip the cut end of each stem into rooting hormone. Tap off any excess.
- Plant Your Cuttings: Fill your pots or trays with your prepared potting mix. Make small “starter holes” with a pencil or your finger, then insert the cuttings about an inch deep. Gently firm the soil around each one.
- Create a Humid Environment: Water the soil gently. Then, cover the pots with a clear plastic bag or propagation dome. Ensure the leaves aren’t touching the plastic if possible. This traps moisture and keeps the cuttings from drying out.
- Placement: Place your pots in a bright spot that receives indirect sunlight. Avoid direct sun, which can scorch the delicate cuttings.
Water Propagation (A Simpler Approach)
If you prefer a simpler method, water propagation can work well for some Salvias.
- Prepare Cuttings: Follow steps 1-3 from the stem cutting method.
- Place in Water: Put the cuttings into a vase or jar filled with clean water. Ensure only the stem is submerged, and crucially, that no leaves are touching the water. Leaves in the water will quickly rot and can kill the cutting.
- Change Water Regularly: Change the water every few days to keep it fresh and oxygenated.
- Wait for Roots: Be patient! You’ll see tiny white roots begin to emerge from the nodes. Once the roots are about an inch long, you can carefully pot them into soil as described above.
The “Secret Sauce” (Pro Tips)
Here are a few things I’ve learned over the years that really make a difference:
- Bottom Heat is Your Friend: If you can, pop your pots on a heat mat designed for plant propagation. This gentle warmth from below encourages root growth much faster than ambient room temperature alone. It’s a game-changer!
- Don’t Be Afraid to “Wipe” (Sometimes): If you see any signs of mold or fungus on your cuttings or soil, a gentle wipe with a clean cloth dipped in a diluted hydrogen peroxide solution (a teaspoon of 3% peroxide per pint of water) can help. But overwatering is the usual culprit, so be mindful of that!
- The “Snap Test”: When you think your cuttings might be rooted, give them a gentle tug. If there’s resistance, you’ve got roots! If they pull out easily, they haven’t rooted yet.
Aftercare & Troubleshooting
Once your cuttings develop roots (you’ll see new leaf growth, which is a good sign!), it’s time for a little more attention.
- Gradual Acclimation: Slowly introduce your new plants to less humid conditions. Start by opening the plastic bag for a few hours each day, then remove it completely over a week or so.
- Watering: Water them when the top inch of soil feels dry. Avoid overwatering, as this is the fastest way to invite root rot, which is the most common failure. You might see wilting, yellowing leaves, or a mushy stem base if rot sets in.
- Light: Continue to provide bright, indirect light. As they get stronger, you can gradually introduce them to a bit more direct sun, mimicking the conditions of your mature plant.
A Final Word of Encouragement
There you have it! Propagating Salvia absconditiflora is a beautiful process of nurturing new life. Don’t get discouraged if not every single cutting makes it. Gardening is a journey of learning and observation. Be patient with your little green babies, celebrate every tiny root you see, and most importantly, enjoy the process of growing your garden, one beautiful Salvia at a time. Happy planting!
Resource: