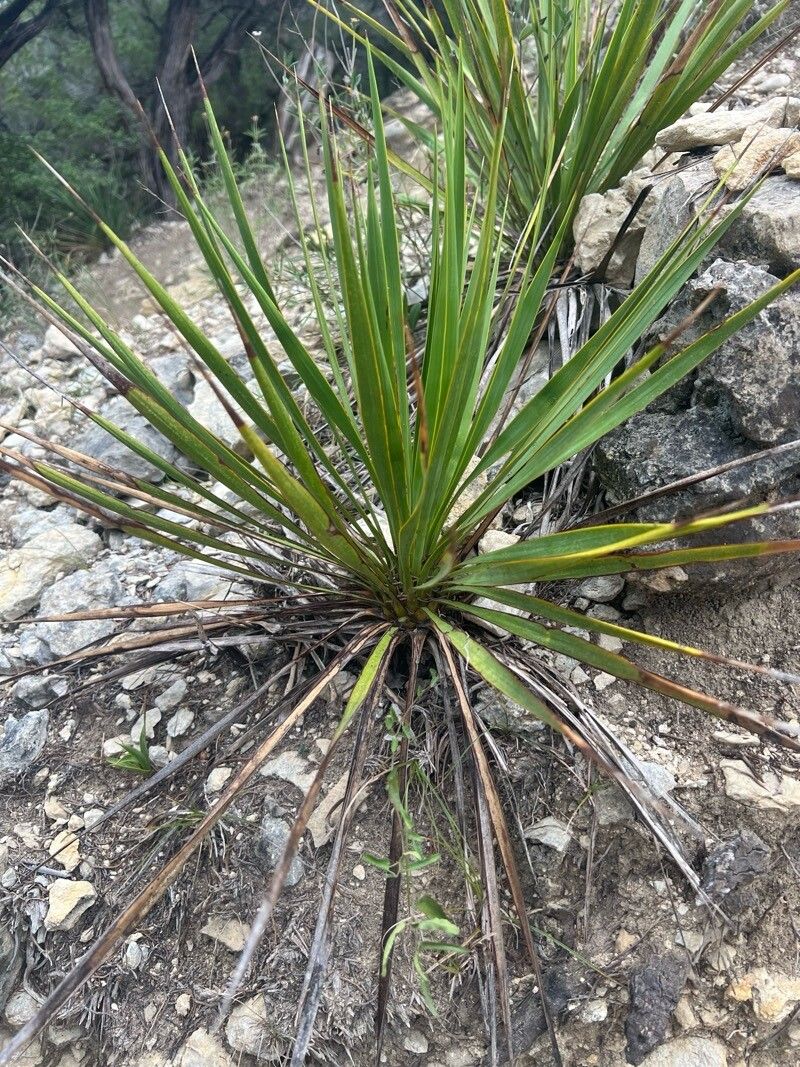
Hello fellow plant lovers! I’ve got a special desert dweller on my mind today: Yucca reverchonii. If you’ve ever admired its architectural beauty, those sword-like leaves forming a stunning rosette, you know it’s a real showstopper. And the best part? You can bring that magic into your own garden (or onto your patio!) by propagating it yourself.
Now, I know some desert plants can be a bit… finicky. But good news! Propagating Yucca reverchonii is actually quite manageable, even if you’re just dipping your toes into the world of plant propagation. It’s a wonderfully rewarding way to expand your collection or share a piece of this resilient beauty with friends.
The Best Time to Start
My personal favorite time to get propagating Yucca reverchonii is in the late spring or early summer. This is when the plant is actively growing and has plenty of energy to dedicate to putting down roots. Waiting until after this peak growth spurt means you’re essentially tapping into a plant that’s already feeling robust and ready to multiply.
Supplies You’ll Need
Before we get our hands dirty, let’s gather our tools. Having everything ready makes the process so much smoother.
- Sharp, clean pruning shears or a sharp knife: For making clean cuts, which is crucial for preventing disease.
- Rooting hormone powder or gel: This isn’t strictly essential, but it can give your cuttings a helpful boost.
- Well-draining potting mix: Think a cactus or succulent mix. You want to avoid anything that holds too much moisture. A good blend would be about 50% potting soil and 50% perlite or coarse sand.
- Small pots or containers: With drainage holes, of course!
- Watering can or spray bottle: For gentle watering.
- Optional: A heat mat: If you live in a cooler climate, this can mimic the warmth of summer and encourage faster root development.
Propagation Methods
Yucca reverchonii is pretty straightforward when it comes to propagation. We’ll focus on the two most successful methods:
Stem Cuttings
This is probably my go-to method for Yucca reverchonii. It’s straightforward and yields great results.
- Identify a healthy stem: Look for a mature branch or a pup that’s growing from the base of the mother plant. You want a piece that’s at least 6-8 inches long.
- Make the cut: Using your clean shears or knife, make a clean cut just above a node (where a leaf attaches).
- Remove lower leaves: Strip off the leaves from the bottom few inches of the cutting. This exposes the stem and encourages root formation.
- Let it callus: This is a super important step! Place the cutting in a dry, well-ventilated spot for 2-7 days. You’ll see a dry, scab-like layer form over the cut end. This prevents rot when you plant it.
- Apply rooting hormone (optional): Once it’s callused, dip the cut end into your rooting hormone.
- Plant the cutting: Fill your small pot with the well-draining mix. Make a hole in the center and insert the callused end of the cutting, deep enough so it stands upright. Gently firm the soil around it.
Division (for pups)
If your Yucca reverchonii has produced baby plants (pups) around its base, dividing them is a fantastic way to get new plants.
- Gently remove some soil: Carefully brush away the soil from the base of the mother plant to expose the pups and where they connect.
- Identify a healthy pup: Look for a pup that has its own root system if possible.
- Make the separation: Using your sharp knife or shears, carefully cut the pup away from the mother plant, trying to keep as many of its roots intact as you can.
- Let it callus: Just like with stem cuttings, allow the cut end of the pup to dry and callus over for a few days.
- Plant the pup: Pot it up in your well-draining mix.
The “Secret Sauce” (Pro Tips)
Here are a couple of my tried-and-true tricks that I’ve learned over the years to give these cuttings the best chance.
- Don’t overwater early on: I can’t stress this enough! While roots need moisture to grow, overly wet soil is the fastest way to invite rot. Water sparingly at first, allowing the soil to dry out almost completely between waterings. It’s better to underwater slightly than to overwater.
- Embrace the warmth: Yucca reverchonii loves a bit of warmth, especially when trying to root. If you’re using a heat mat, place the pot directly on it after planting. This gentle bottom heat mimics the soil temperature of their natural sunny habitat and really speeds things up.
Aftercare & Troubleshooting
Once your cuttings or pups are planted, give them a light watering. Then, place them in a bright spot with indirect sunlight. Direct sun can scorch a newly planted cutting.
You’ll know your cutting is starting to root when you see new leaf growth or feel a slight resistance when gently tugging on it. This can take anywhere from a few weeks to a couple of months. Be patient!
The most common issue you’ll encounter is rot. If you see the cutting turning mushy, black, or developing a foul odor, it’s likely rotting. This is usually a sign of too much moisture. If you catch it early, you might be able to salvage it by cutting away the rotten parts and letting the healthy section callus again. But often, it’s best to discard it and try again. Another sign of trouble is wilting that doesn’t improve after watering – this can also indicate root problems.
A Little Encouragement
Propagating Yucca reverchonii is a journey, and like any good gardening adventure, it requires a little patience. Don’t get discouraged if your first attempt isn’t a runaway success. Observe your plants, learn from each experience, and most importantly, enjoy the process! Seeing a new plant emerge from a humble cutting is one of the most satisfying feelings a gardener can have. Happy propagating!
Resource:
https://identify.plantnet.org/k-world-flora/species/Yucca%20reverchonii%20Trel./data