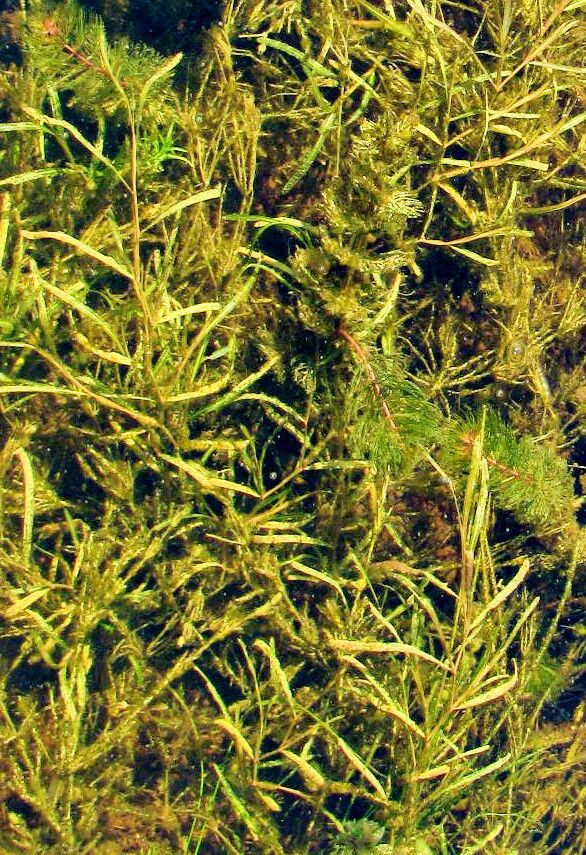
Oh, hello there! Come on in, let’s chat about Potamogeton friesii, or as some of us fondly call it, Fries’ Pondweed. It’s such a lovely, delicate aquatic plant, isn’t it? Those fine, ribbon-like leaves dancing in the water create such a sense of tranquility in a pond or water feature. And the best part? Propagating it is incredibly rewarding. Seeing those tiny shoots emerge and grow into a new plant feels like a little bit of magic. Now, for a beginner, it’s not the absolute easiest aquatic plant to start with, but with a little care and attention, you’ll be amazed at how successful you can be. Think of it as a gentle introduction to the underwater world of gardening!
The best time to start propagating Potamogeton friesii is when the plant is actively growing. This usually means during the late spring and throughout the summer months. You’re looking for lush, healthy growth. Avoid trying to propagate when the water is very cold or when the plant seems to be slowing down its growth. Go for vibrant, fresh stems; they have the most energy to put into developing new roots.
Here’s what you’ll want to have on hand for our propagation adventure:
- Sharp, clean pruning shears or scissors: For making precise cuts.
- A small, clean container or tray: For holding your cuttings initially.
- A balanced, all-purpose potting mix or aquatic plant substrate: If you plan to pot them directly.
- Fresh pond water or dechlorinated tap water: Essential for keeping your cuttings hydrated.
- Small plastic bags or a propagator lid: To maintain humidity.
- A well-lit spot out of direct, harsh sunlight: Think bright, indirect light.
- Optional: Rooting hormone (liquid or powder): While not strictly necessary, it can give a little boost.
Let’s dive into the methods!
Stem Cuttings: The Most Common and Easiest Way
This is my go-to method for Potamogeton friesii. It’s straightforward and usually yields great results.
- Select a healthy stem: Look for a stem that is at least 4-6 inches long. It should have several healthy leaves and preferably some nodes (the points where leaves attach to the stem).
- Make a clean cut: Using your sharp shears, cut the stem about an inch below a leaf node.
- Prepare the cutting: You can gently remove the lower leaves if they are going to be submerged in the rooting medium. This helps prevent them from rotting. If you want to use rooting hormone, dip the cut end into it now.
- Rooting the cutting: You have a couple of options here:
- Water propagation: Place the cutting in a clean jar or container filled with fresh pond water or dechlorinated tap water. Make sure at least one node is submerged, but try to keep the leaves out of the water as much as possible. Place the container in a bright spot with indirect light.
- Substrate propagation: You can plant the cutting directly into a small pot filled with your potting mix or aquatic substrate. Gently firm the substrate around the stem, ensuring the node is buried. Place the pot in a tray of water.
Division: For the Established Plants
If you have a mature, well-established Potamogeton friesii plant that’s looking a bit crowded, division is a fantastic option.
- Gently remove the plant: Carefully lift the entire plant from its container or the pond bed. Rinse off excess substrate gently so you can see the root structure.
- Identify healthy sections: Look for strong, vigorous shoots that have their own roots attached.
- Separate the divisions: Using your fingers or clean shears, carefully tease apart or cut the plant into smaller sections. Each division should have a good portion of roots and at least one healthy shoot.
- Replant: Pot up the divisions into new containers or replant them directly into your pond.
The “Secret Sauce”: My Personal Tips for Success
I’ve learned a few tricks over the years that make a world of difference:
- Don’t overcrowd your cuttings! Give each stem a little space in its container. If they are too close together, they compete for light and can spread any potential disease. For water propagation, try one cutting per jar, or put a few in a larger container but ensure they aren’t touching.
- Humidity is key, but ventilation is your friend. While covering your cuttings with a plastic bag or propagator lid helps maintain that moist environment for root development, open it up for a short period each day. This allows for air circulation and helps prevent fungal issues. You want it humid, but not stagnant.
- Think bottom heat for faster roots. If you’re serious about getting those roots quickly, especially if you’re propagating a bit out of the peak season, placing your pots on a gentle heat mat can make a noticeable difference. Just a little warmth encourages root formation.
Once you see those little white roots starting to emerge – hooray! This is the exciting part!
For water-propagated cuttings, wait until the roots are at least an inch long before considering transplanting them into a pot or placing them in their permanent pond location. For substrate-propagated cuttings, you’ll see new leaf growth as a good indicator that roots are forming.
Troubleshooting: The most common issue you’ll face is rot. If your cuttings turn mushy, dark, or start to disintegrate, they’ve likely succumbed to rot. This is often caused by over-saturation without enough air circulation, or sometimes by using dirty water or containers. Remove any rotting material immediately to prevent it from spreading. If you see stem rot, it’s often best to discard that cutting and start again with fresh material and a cleaner setup.
Don’t get discouraged if a few cuttings don’t make it. It’s all part of the learning curve! Be patient with your new baby plants. With a little love and the right conditions, you’ll soon have more Fries’ Pondweed than you know what to do with! Happy planting!
Resource:
https://identify.plantnet.org/k-world-flora/species/Potamogeton%20friesii%20Rupr./data