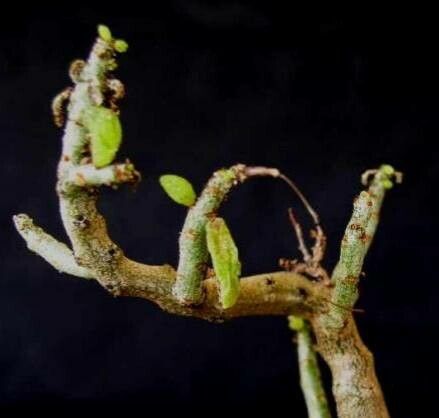
Growing More of That Wonderful Tylecodon bleckiae!
Oh, those Tylecodon bleckiae! Aren’t they simply enchanting? With their plump, grayish-green leaves and that wonderfully sculptural habit, they’re a real showstopper in any succulent collection. If you’ve fallen for their charm, you’re in luck, because propagating them is a deeply satisfying way to fill your home with more of these beauties. While Tylecodon bleckiae can be a little particular, especially for absolute beginners, don’t let that deter you. With a little patience and the right approach, you’ll be well on your way to success!
When’s the Best Time to Get Started?
For Tylecodon bleckiae, I find the absolute best time to start new plants is during their active growing season. This typically falls in the late spring and early summer, after their dormant period. You’ll see new growth emerging, and the plant will be full of energy, making it much more receptive to propagation. Trying to take cuttings when they’re resting just won’t yield the same results, and can even be detrimental to the parent plant.
What You’ll Need to Gather
Before we dive in, let’s make sure you have everything at your fingertips:
- Sharp, clean pruning shears or a knife: A nice sharp tool is crucial for clean cuts that heal well.
- Well-draining succulent or cactus potting mix: This is non-negotiable! You want something airy that dries out quickly. I often mix in extra perlite or pumice.
- Rooting hormone (optional but recommended): A little help never hurt! It encourages faster root development.
- Small pots or containers: Terracotta pots are fantastic for succulents as they allow the soil to breathe.
- Gravel or small pebbles: For drainage holes in your pots, if they don’t already have them.
- A watering can with a fine rose or a spray bottle: Gentle watering is key.
- A light-colored tray (optional): This helps reflect light onto the developing roots.
Let’s Get Propagating: Stem Cuttings
This is my go-to method for Tylecodon bleckiae. It’s reliable and gives you a good chance of new plants emerging.
- Select a healthy stem. Look for a firm, mature stem that’s at least 3-4 inches long. Avoid anything that looks soft or mushy.
- Make a clean cut. Using your sterilized shears or knife, make a swift, clean cut just above a leaf node.
- Let it callous. This is a very important step. Place the cutting on a dry surface, out of direct sunlight, for 3-7 days. You want the cut end to dry and form a scab – this prevents rot.
- Apply rooting hormone (if using). Once the end has calloused over, dip the cut end into your rooting hormone powder, tapping off any excess.
- Plant your cutting. Fill your small pot with your well-draining soil mix. Make a small hole in the center with your finger or a pencil.
- Insert the cutting. Gently place the calloused end of the cutting into the hole and firm the soil around it. It should stand up on its own. If it’s wobbly, you can insert a small stake for support temporarily.
- Wait for roots. Place the pot in a bright spot with indirect sunlight. Do not water it immediately. Wait at least a week, maybe two, before giving it a very light watering. The goal is to encourage the roots to reach out for moisture. You’ll know roots have formed when you feel a gentle tug on the cutting or see new leaf growth.
A Pinch of “Secret Sauce” from My Garden
Here are a couple of things I’ve learned over the years that really make a difference with sensitive plants like these:
- The Water Level Rule: If you’re tempted to try water propagation (which is a bit riskier with Tylecodon bleckiae if not done perfectly), make absolutely sure that only the very calloused end of the cutting touches the water. If any leaves are submerged, they’re almost guaranteed to rot before roots can form. I usually use a narrow-necked jar and suspend the cutting so only the bottom millimeter or two is in contact with the water.
- Embrace Bottom Heat: If you can, use a seedling heat mat set to a low temperature (around 70-75°F or 21-24°C). This gentle warmth encourages root development from below and can significantly speed up the process, especially if your home is a bit cooler.
Aftercare and What to Watch For
Once your cuttings show signs of rooting – a little tug or new growth – it’s time to transition them to a more regular watering schedule. Water sparingly when the soil is completely dry. Still keep them in bright, indirect light. They’re still delicate babies at this stage.
Now, let’s talk about what might go wrong. The biggest culprit is rot. If you see your calloused cutting turning mushy, black, or smelling funky, unfortunately, it’s likely rotted. This is almost always due to too much moisture, either from overwatering or the soil not draining well enough. If you catch rot early, you might be able to salvage a healthy piece of the stem and try again after it callouses. Another sign of failure is if the cutting simply shrivels up and doesn’t attempt to root. This can happen if it’s too dry for too long, or if it’s just not a viable cutting.
Happy Growing!
Propagating Tylecodon bleckiae is a journey, and like all good gardening, it’s about patience and observation. Don’t get discouraged if your first attempt isn’t a roaring success. Learn from it, adjust your approach, and celebrate every tiny root that emerges. Before you know it, you’ll have a whole new generation of these magnificent succulents to enjoy. Happy propagating!
Resource:
https://identify.plantnet.org/k-world-flora/species/Tylecodon%20bleckiae%20G.Will./data